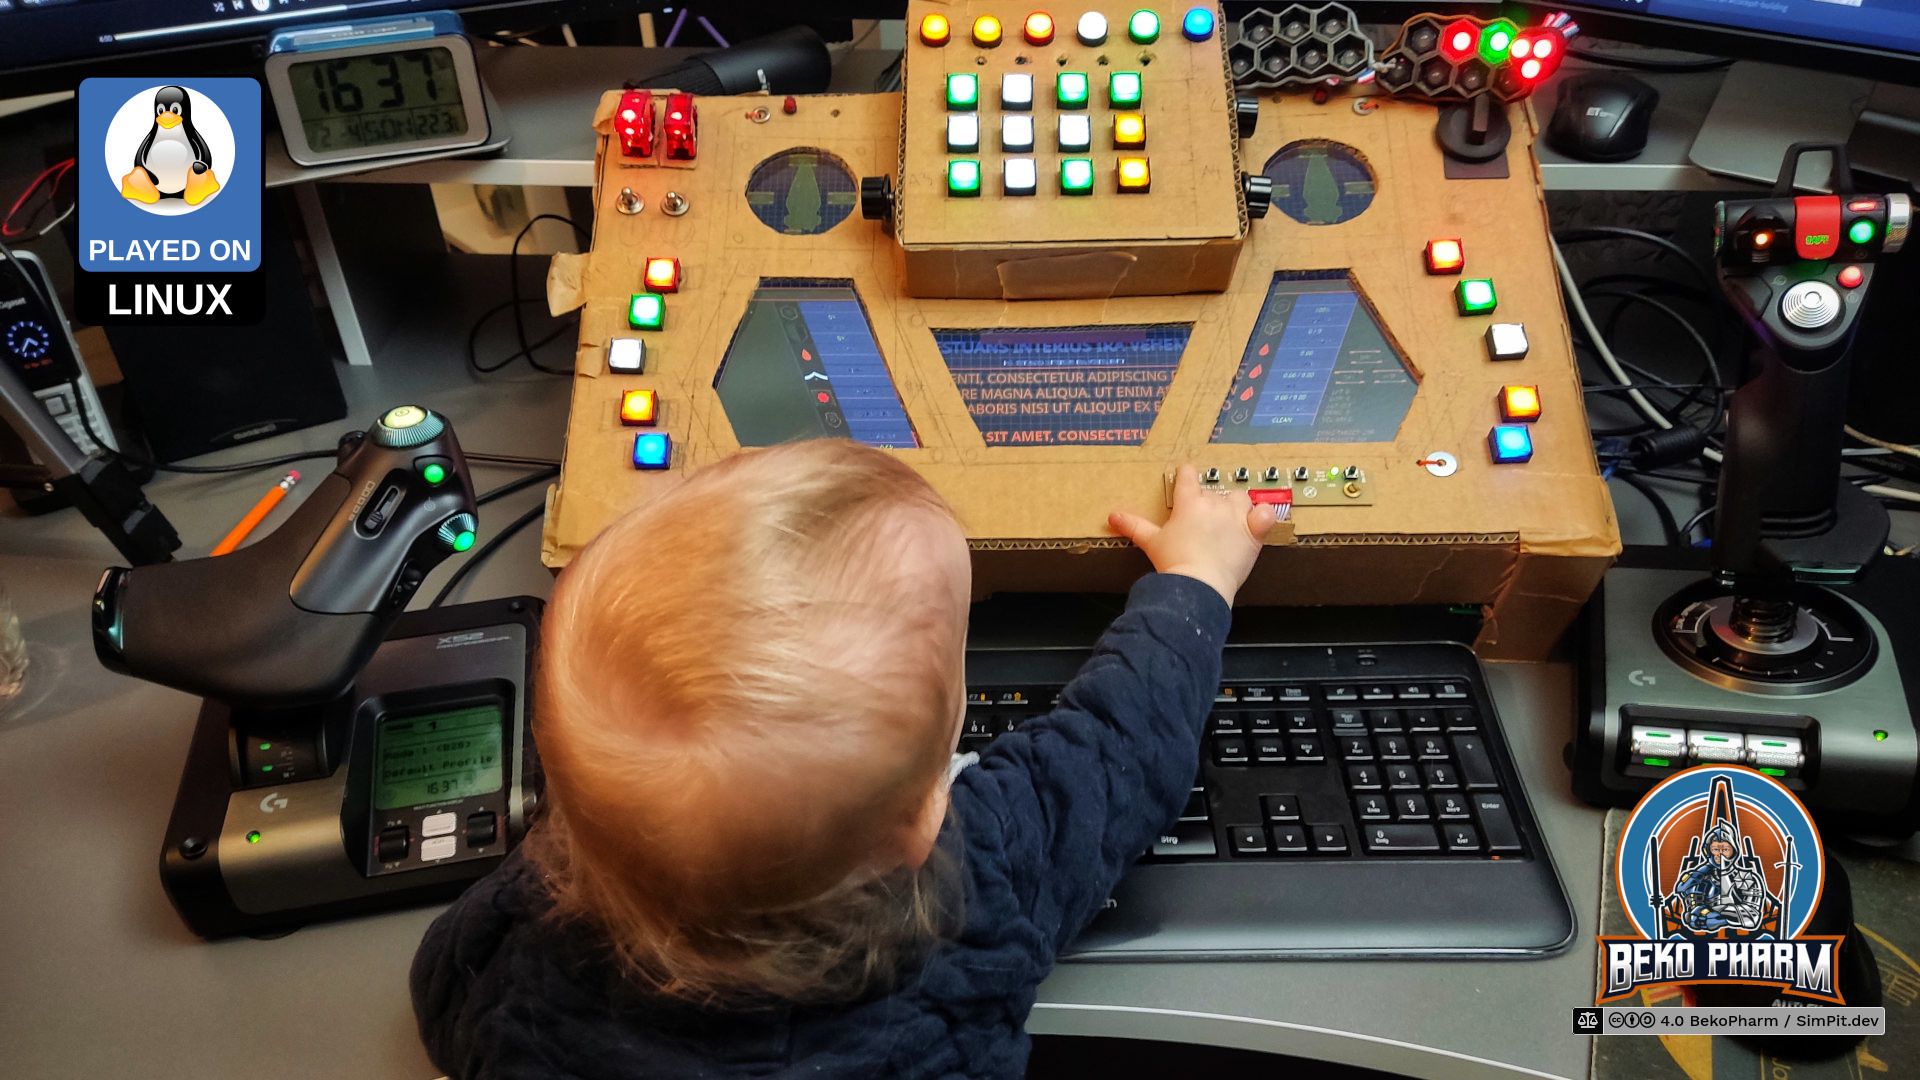
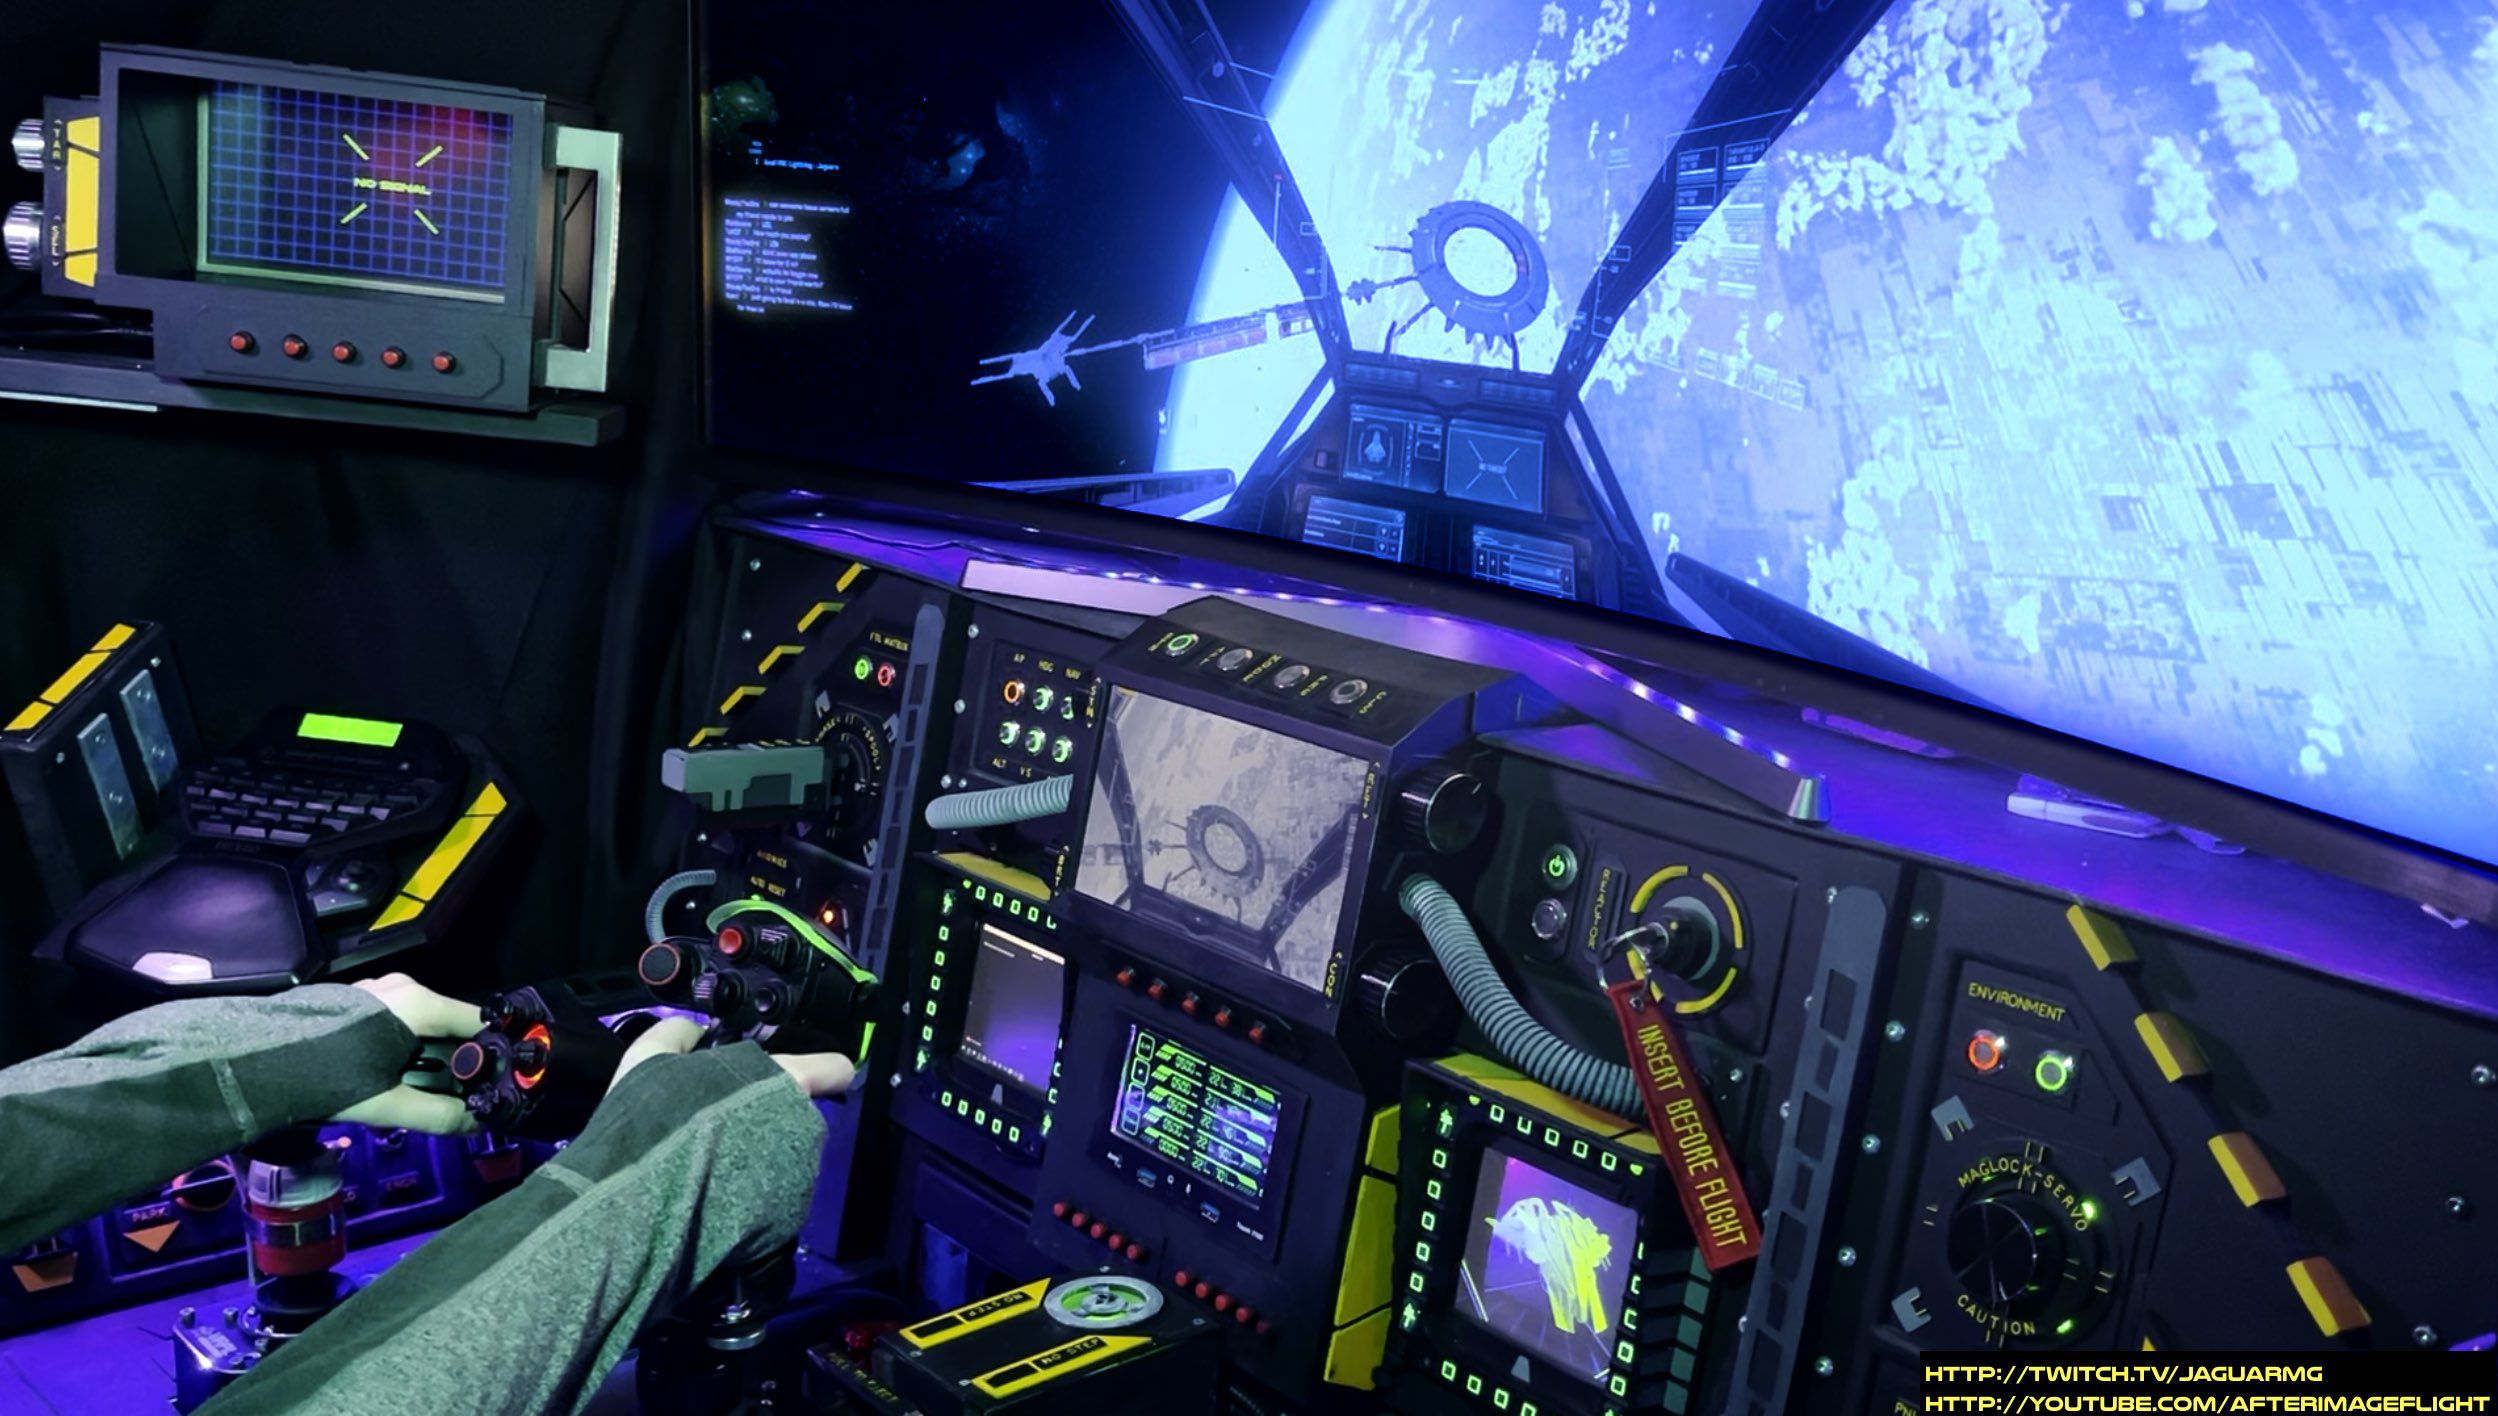
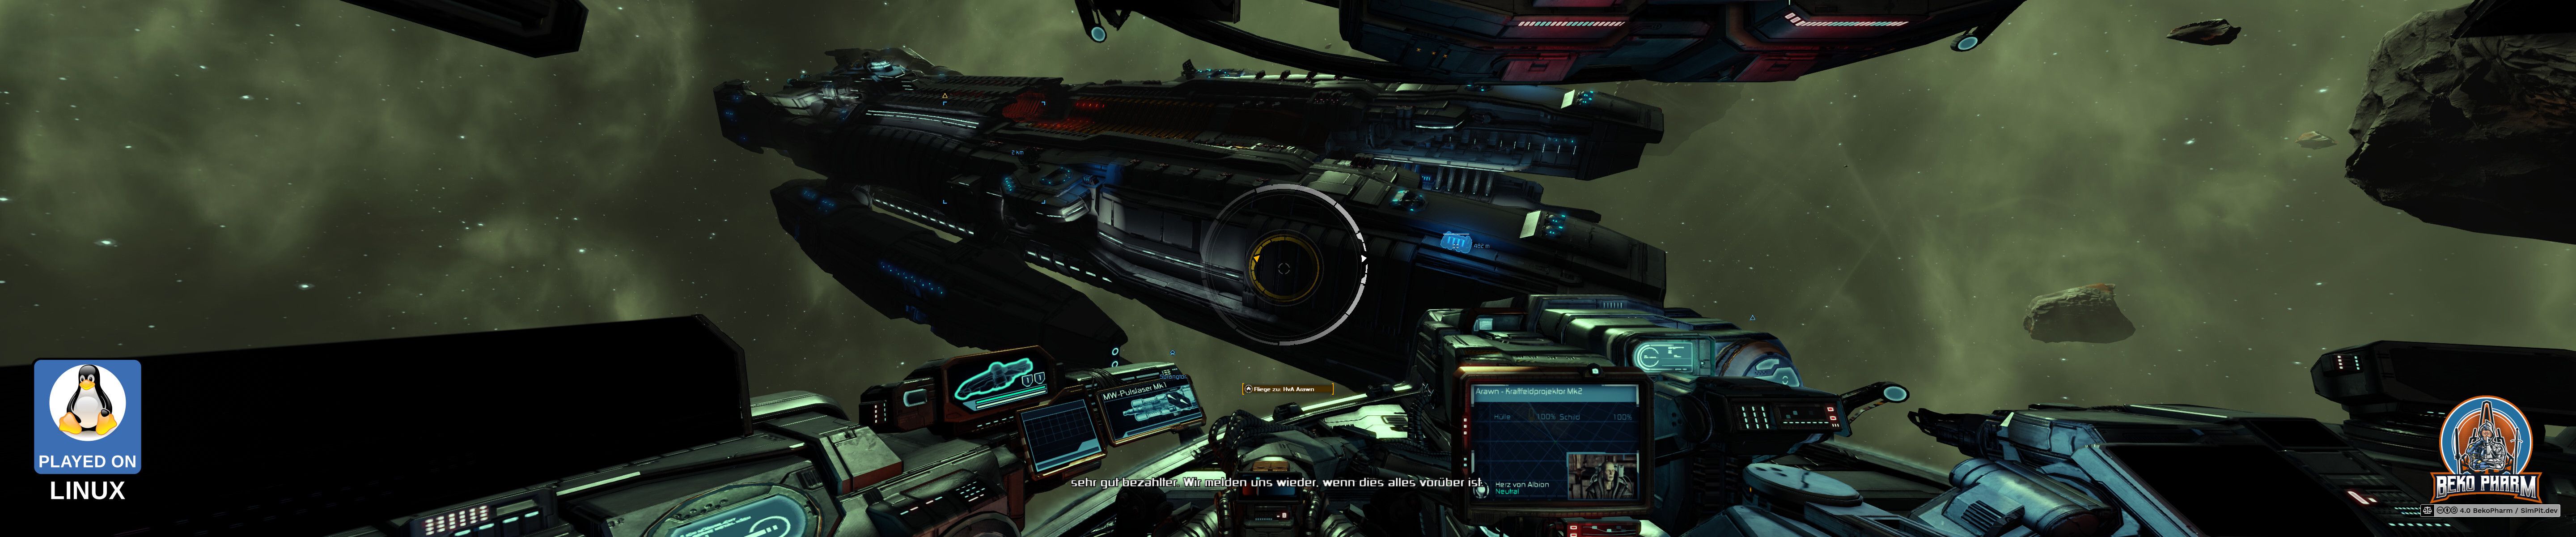
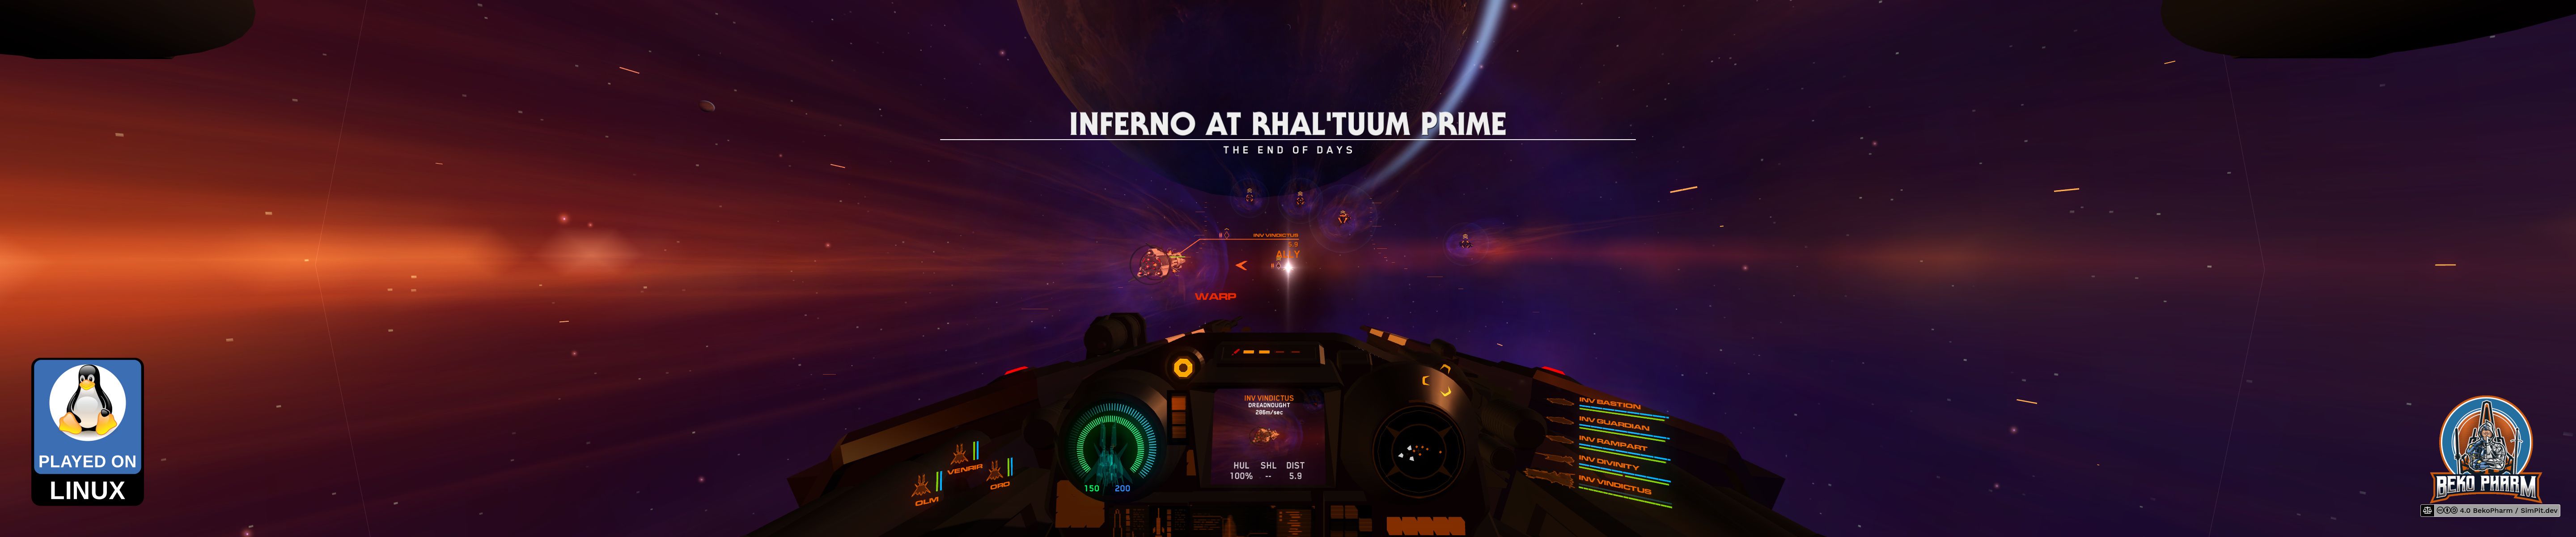
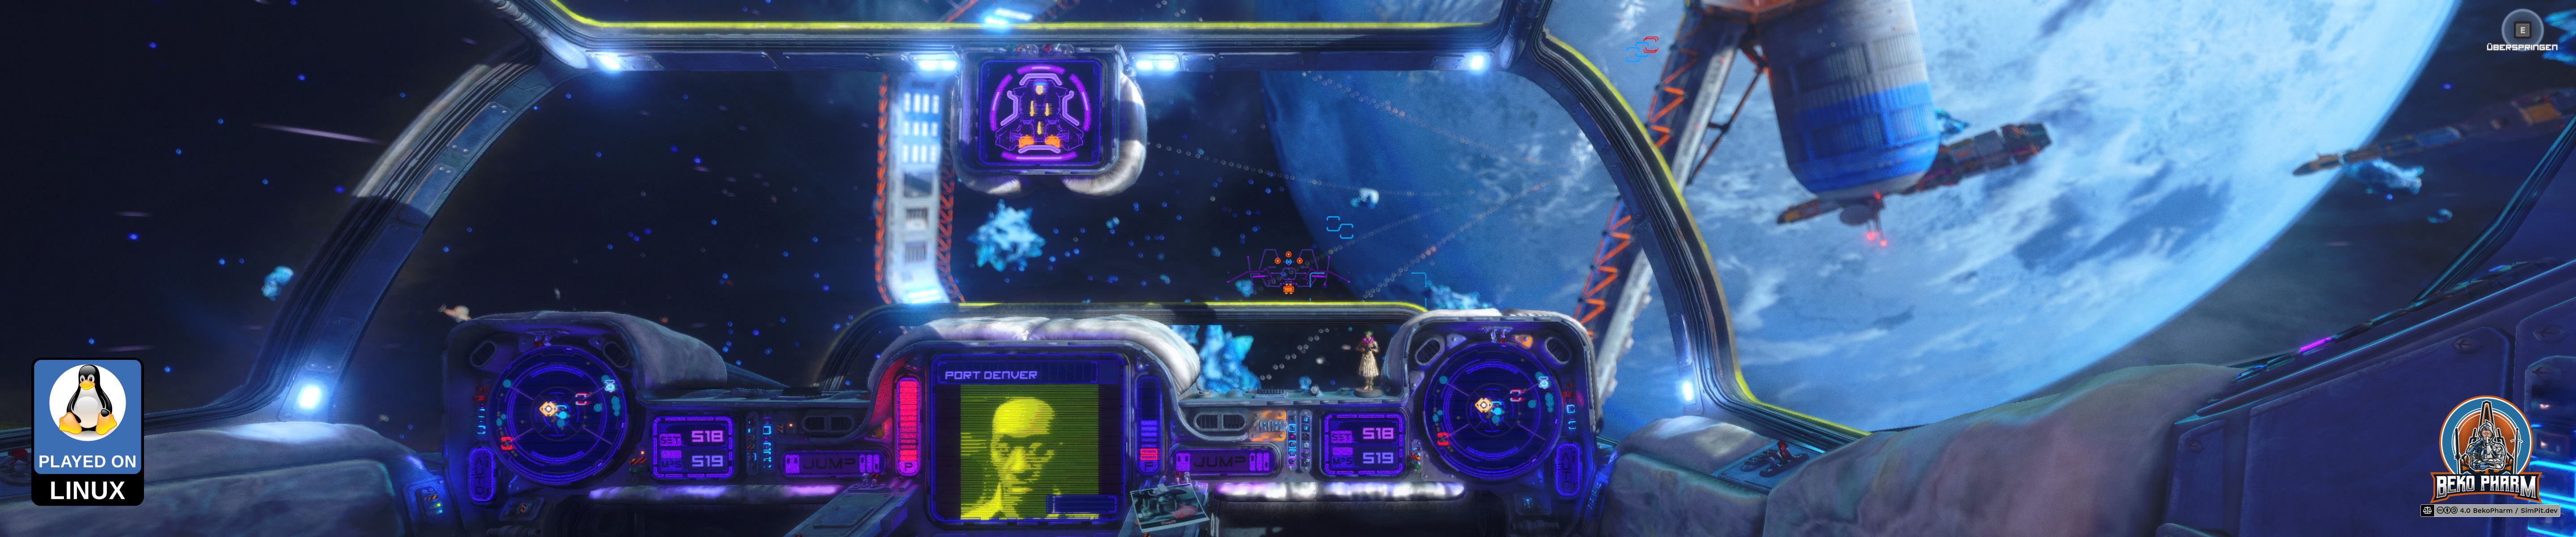
This SimPit (simulated cockpit) on a budget is mainly used to play Elite Dangerous, Star Citizen, X4: Foundations and plenty of other Space Pew Pew. It utilizes many techniques and principles also found in other simulated cockpits be it flying or racing. There are some operating system specific parts but most stuff is held pretty generic for anyone.
There be dragons
This is all work in progress and not a finished product.
Motivation
I like clicky and shiny buttons. Our modern world likes touch screens though. So I have to roll my own.
Features
DIY headtracker with Opentrack
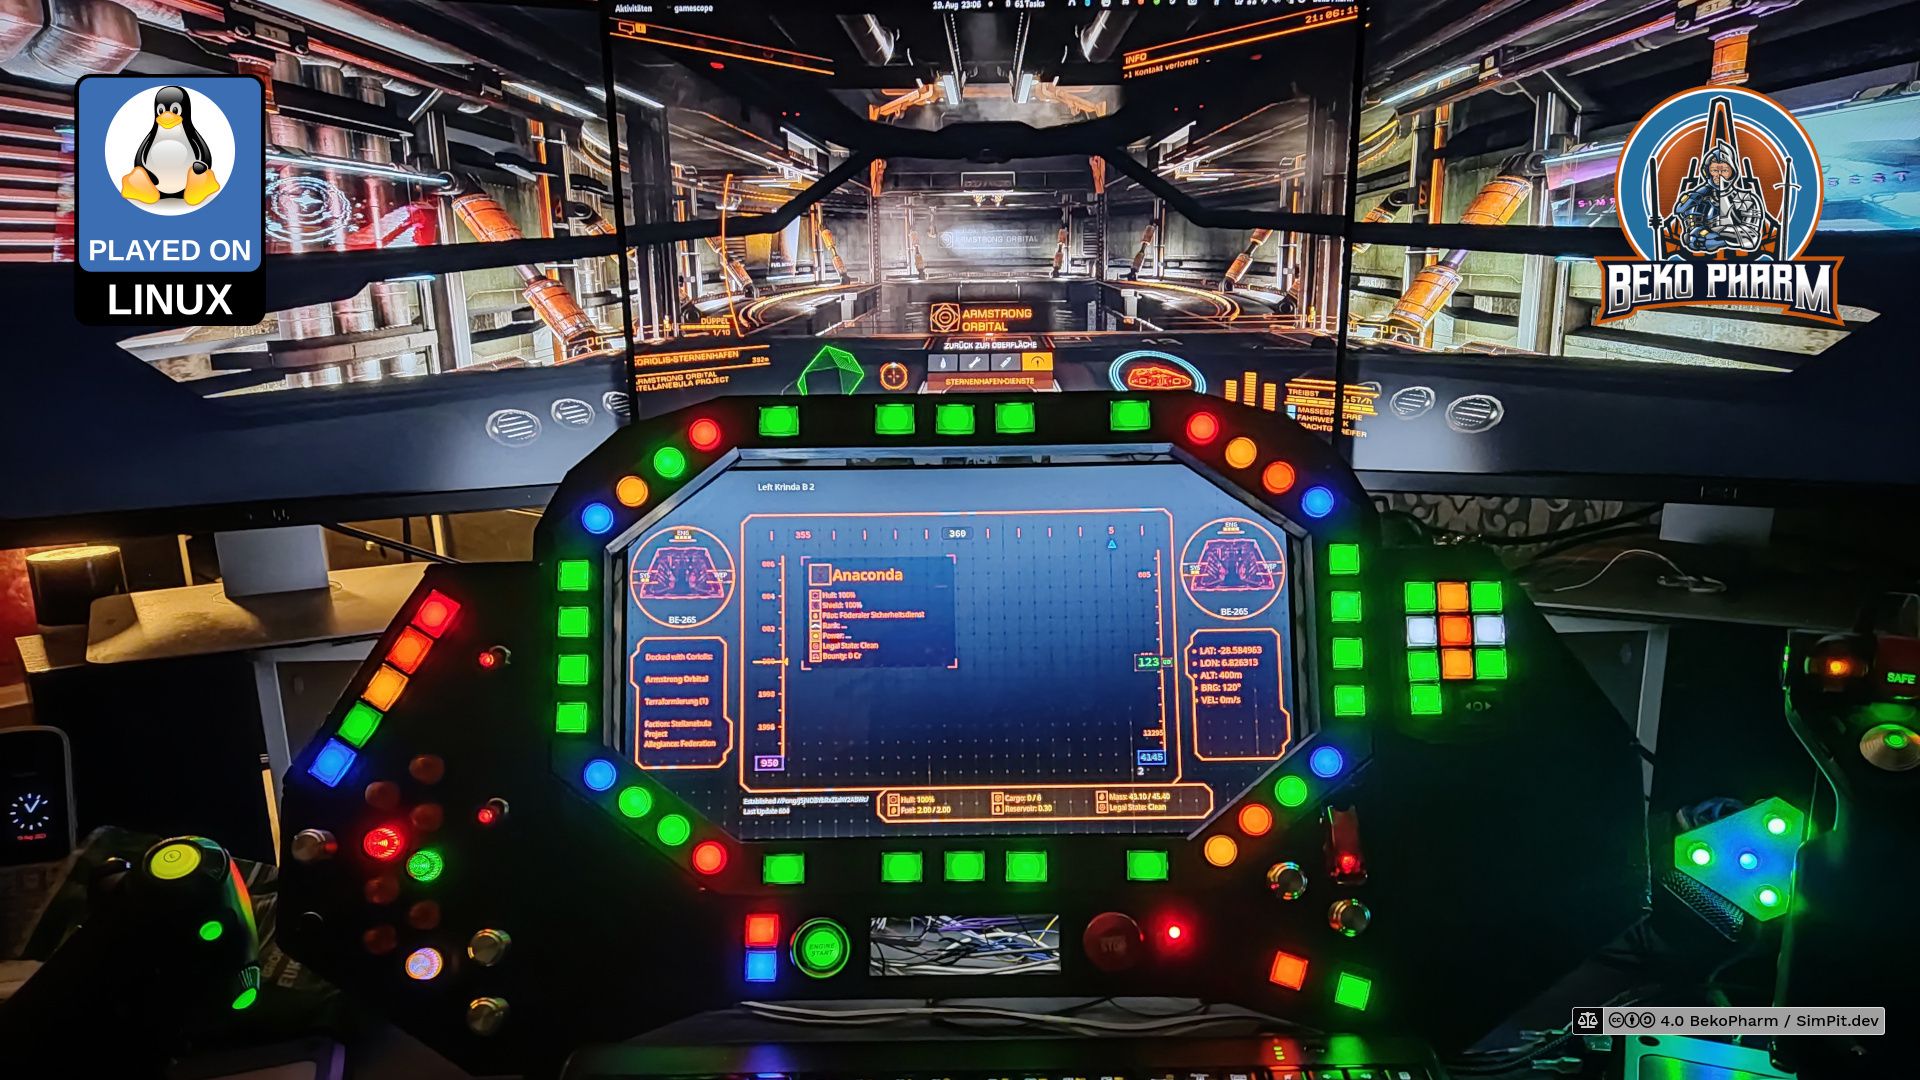
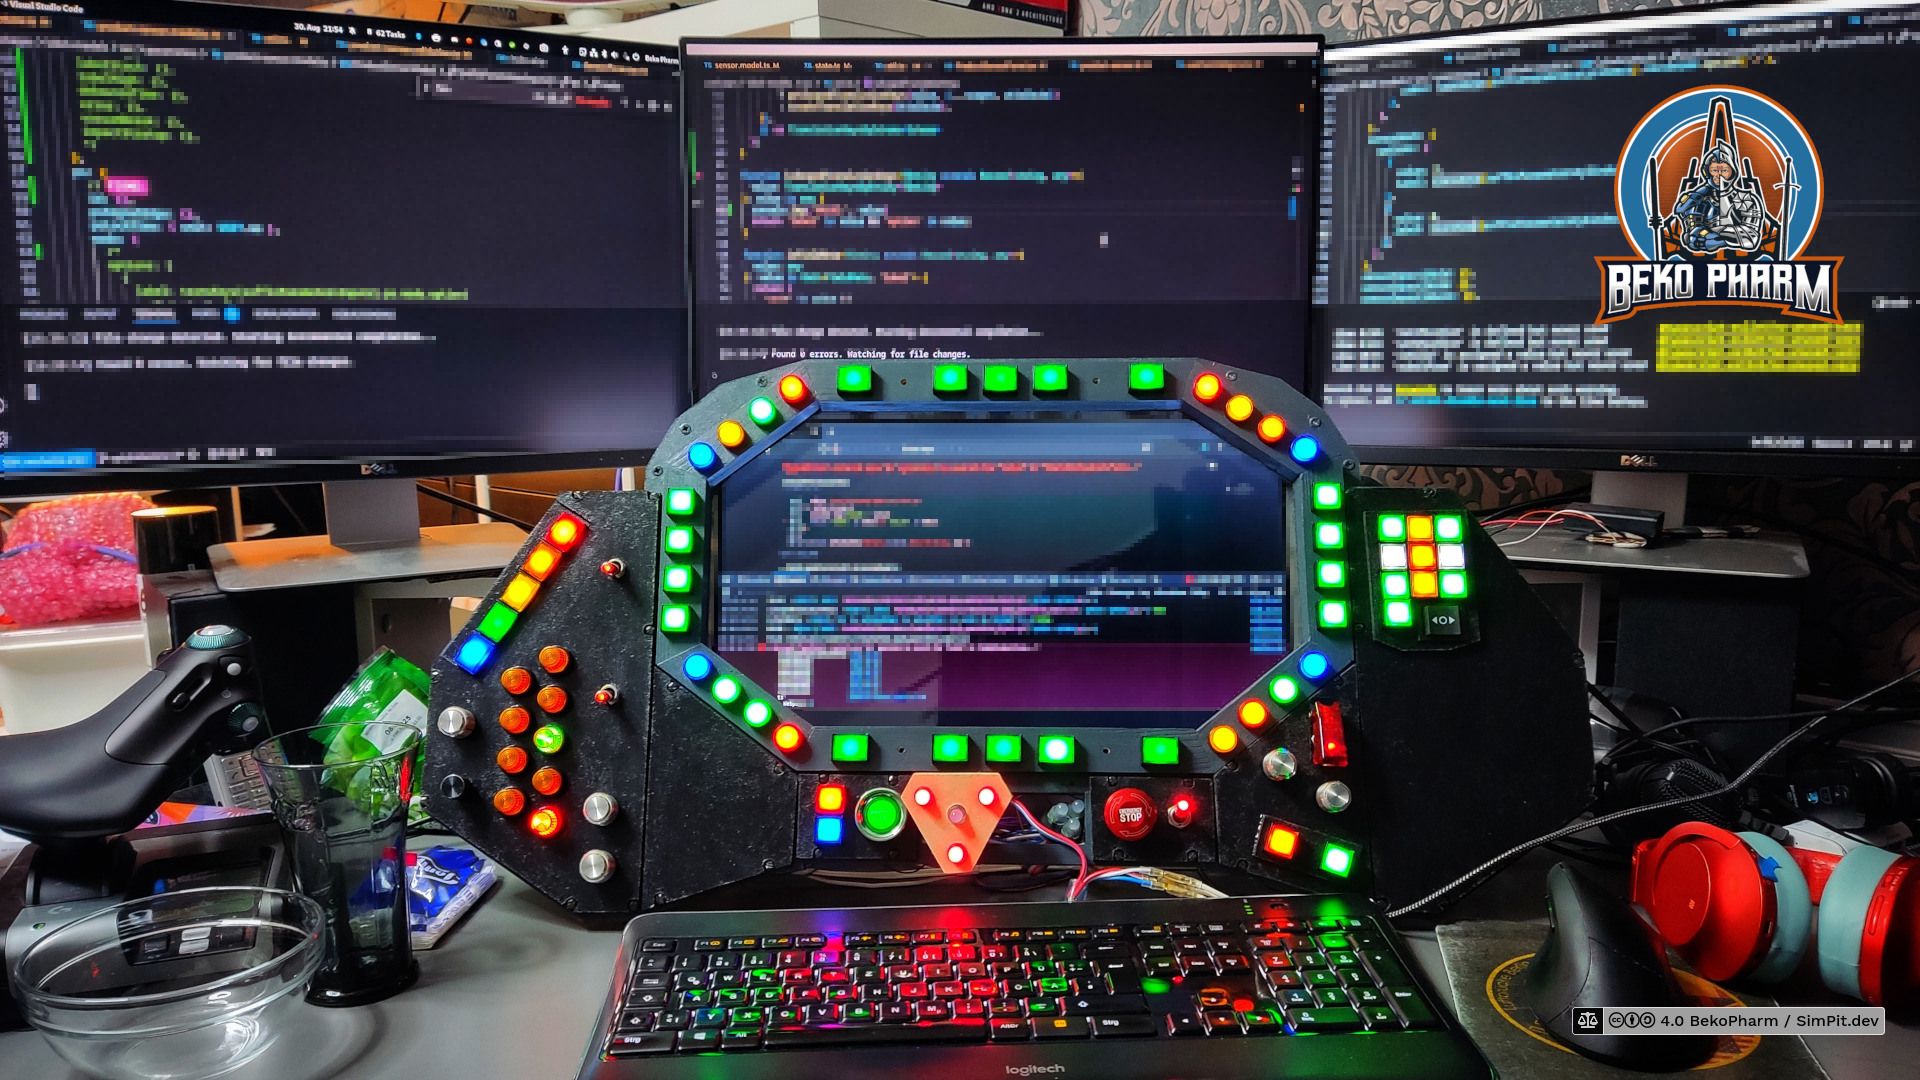
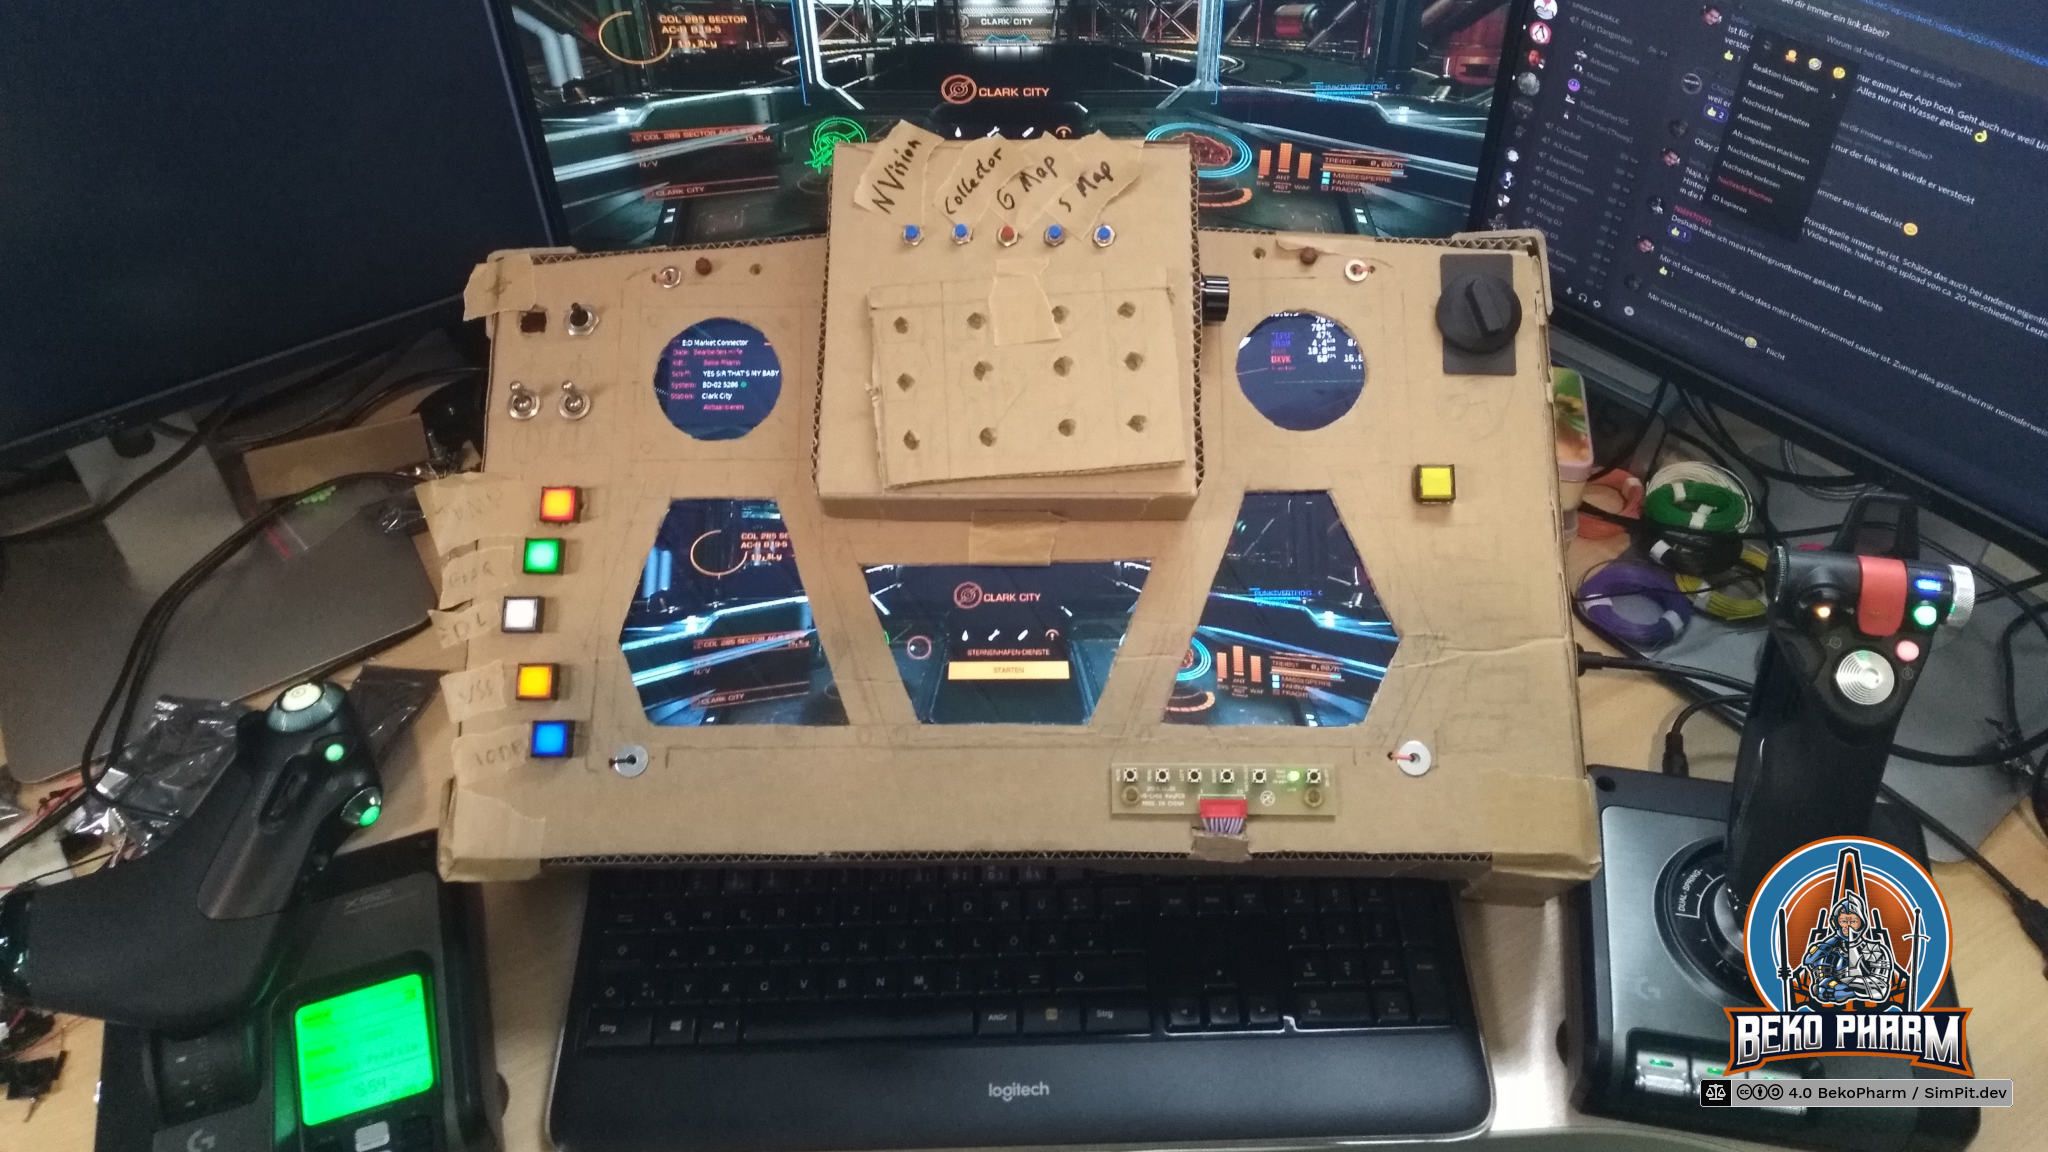
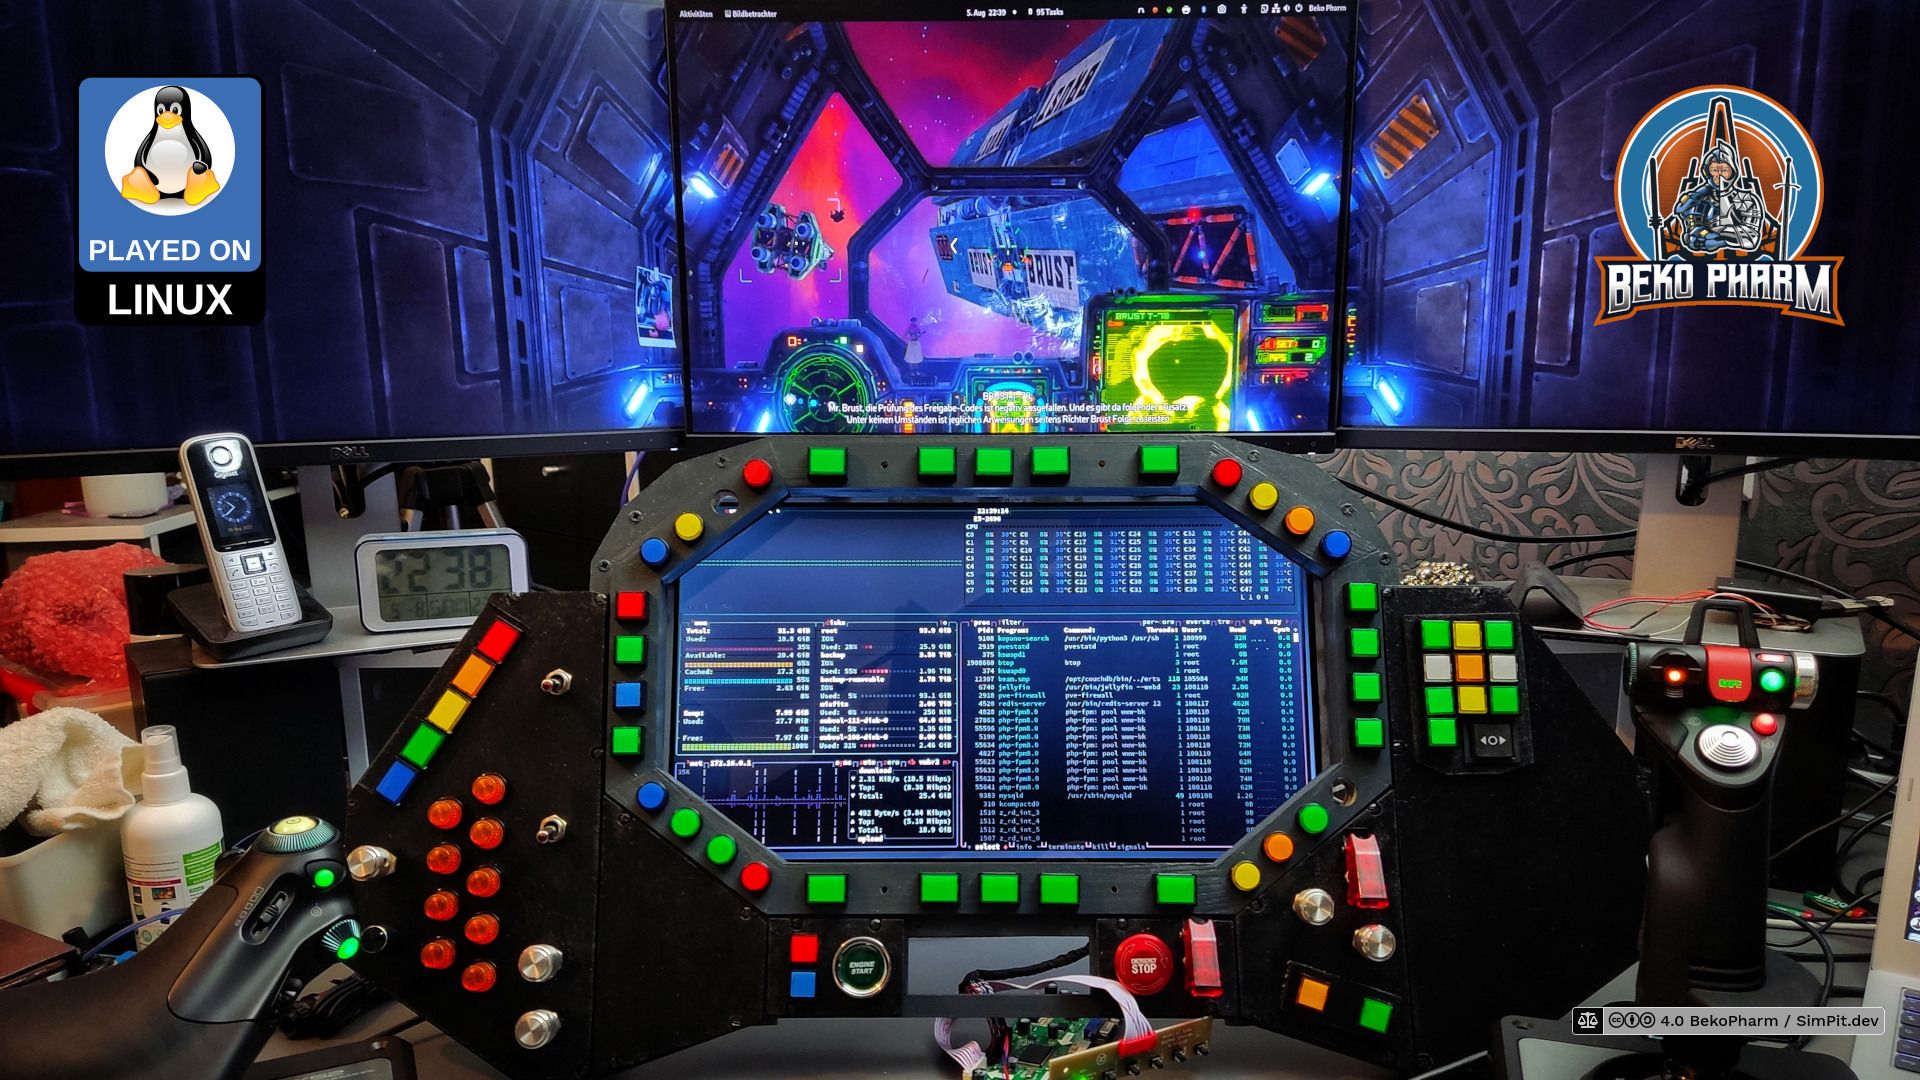
DIY button box with LCD ("MFD") display
DIY status indicators using a Neopixel
Lots of plumbing with Node-RED
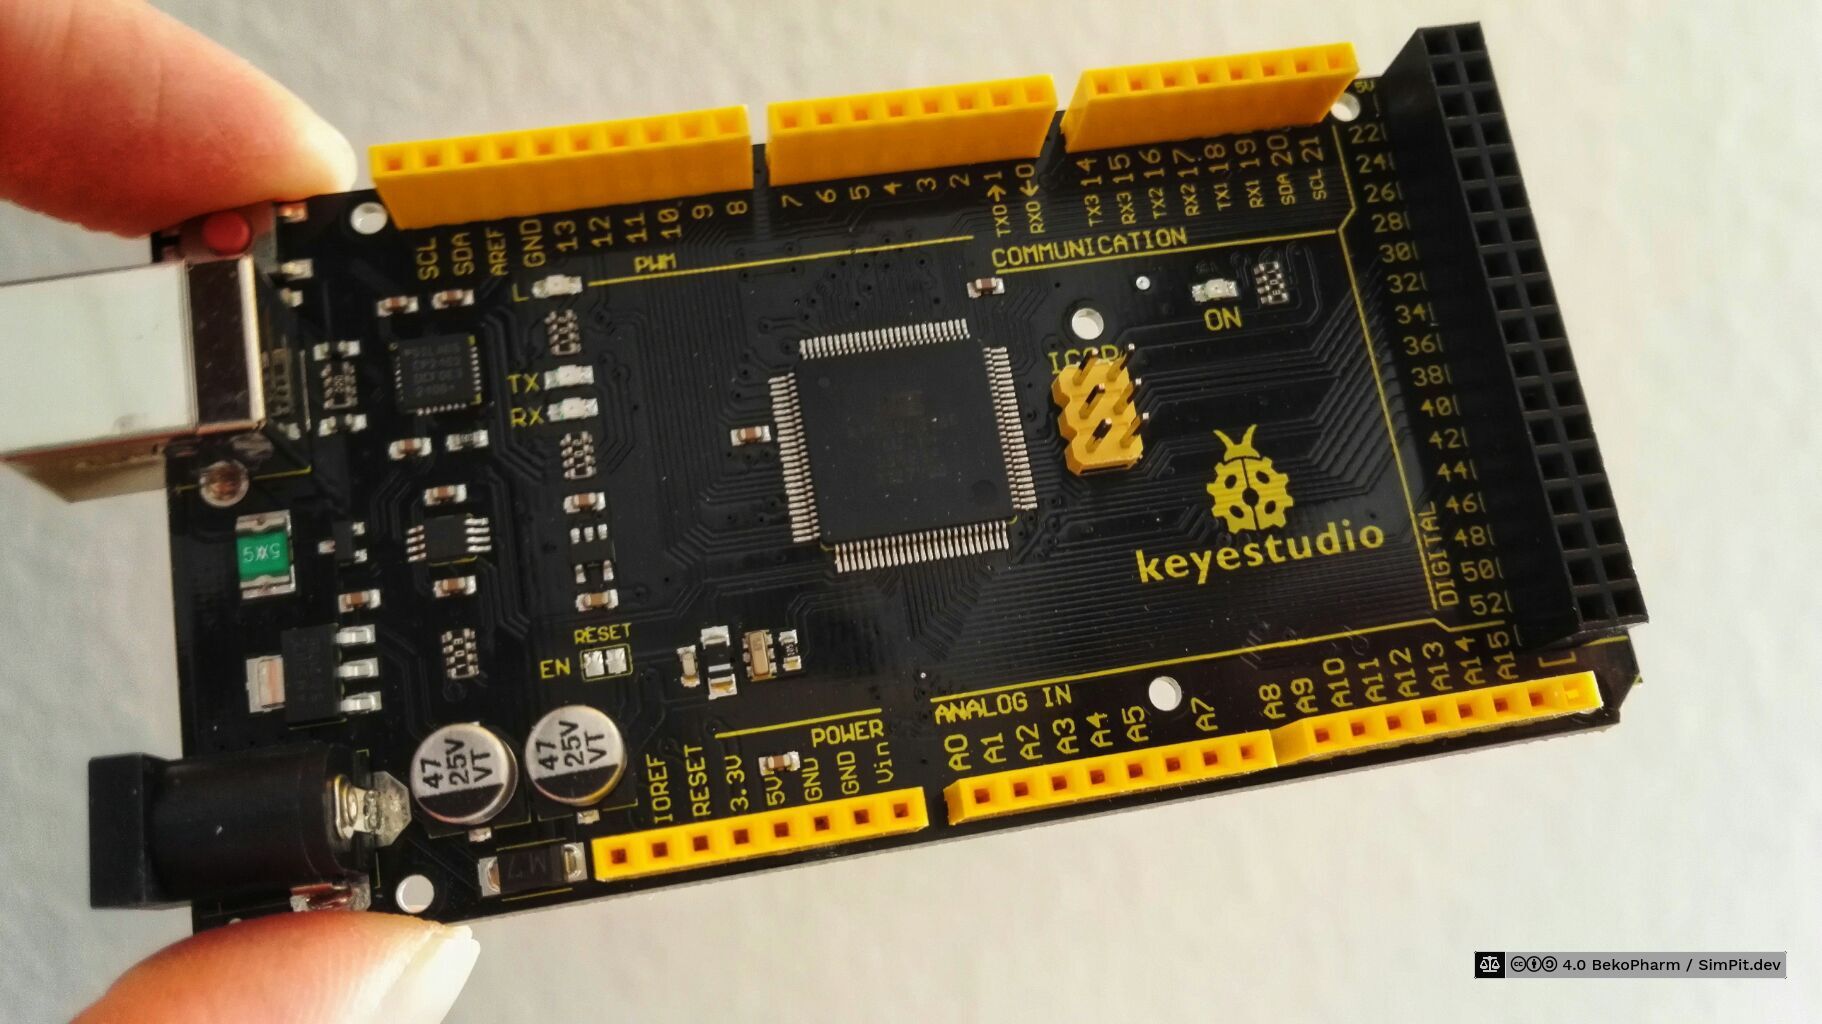
Arduino Mega with a custom Rust daemon for driving the joystick and LEDs
A custom “App” written in React to drive the MFD
…and a Linux PC to power all the crazy 🤪
Support
This is not a project aimed to be replicated 1:1. I encourage everyone to build something similar and we may discuss details e.g. on the Discord or some other platform. I merely show here what can be done but implementing anything yourself will be up to you.
What if I throw money at you?
No. This is a project of passion. I’m not interested or qualified in making this my job.
It’s a fascinating hobby and you may learn a lot on your own journey but it is also a rabbit hole where nobody touched ground before. There is always someone waving from below while chasing for immersion.
Credits
This project would not be possible without the work or inspiration of many others that also kept me motivated.
The second version of the Primary Buffer Panel was built directly on the basics developed for version 1. This time it features a wooden frame though and is no longer just cardboard. The idea is to eventually incorporate the panel in a full featured simulated cockpit [in the far future].
It’s design is based on a VF-1 Valkyrie cockpit of the Macross franchise - or Robotech as it is known in some parts of the world (but we don’t talk about this here). More under inspiration.
I was really happy with version 1 and yet, in the end I fell into the same trap as most of the Sci-Fi UI designers in PC games and movies do. All those “little” displays looked great, I had my hexagonal status indicators (nothing says Sci-Fi more like hexagons) but it was not easy to bring any meaningful content on the skewed “screen estate”. And skewed is a CSS literal here.
There was also the thing that I redesigned version 1 inside out so much by now, and moved it around a lot in the house, that it started to fall apart and had to be taped regularly. Yes, the phun of the Primary Buffer Panel falling off happened several times.
I eventually stumbled over a hand drawn design of a VF-1 Valkyrie cockpit of the Macross franchise while looking for inspiration for something with more “screen estate”.
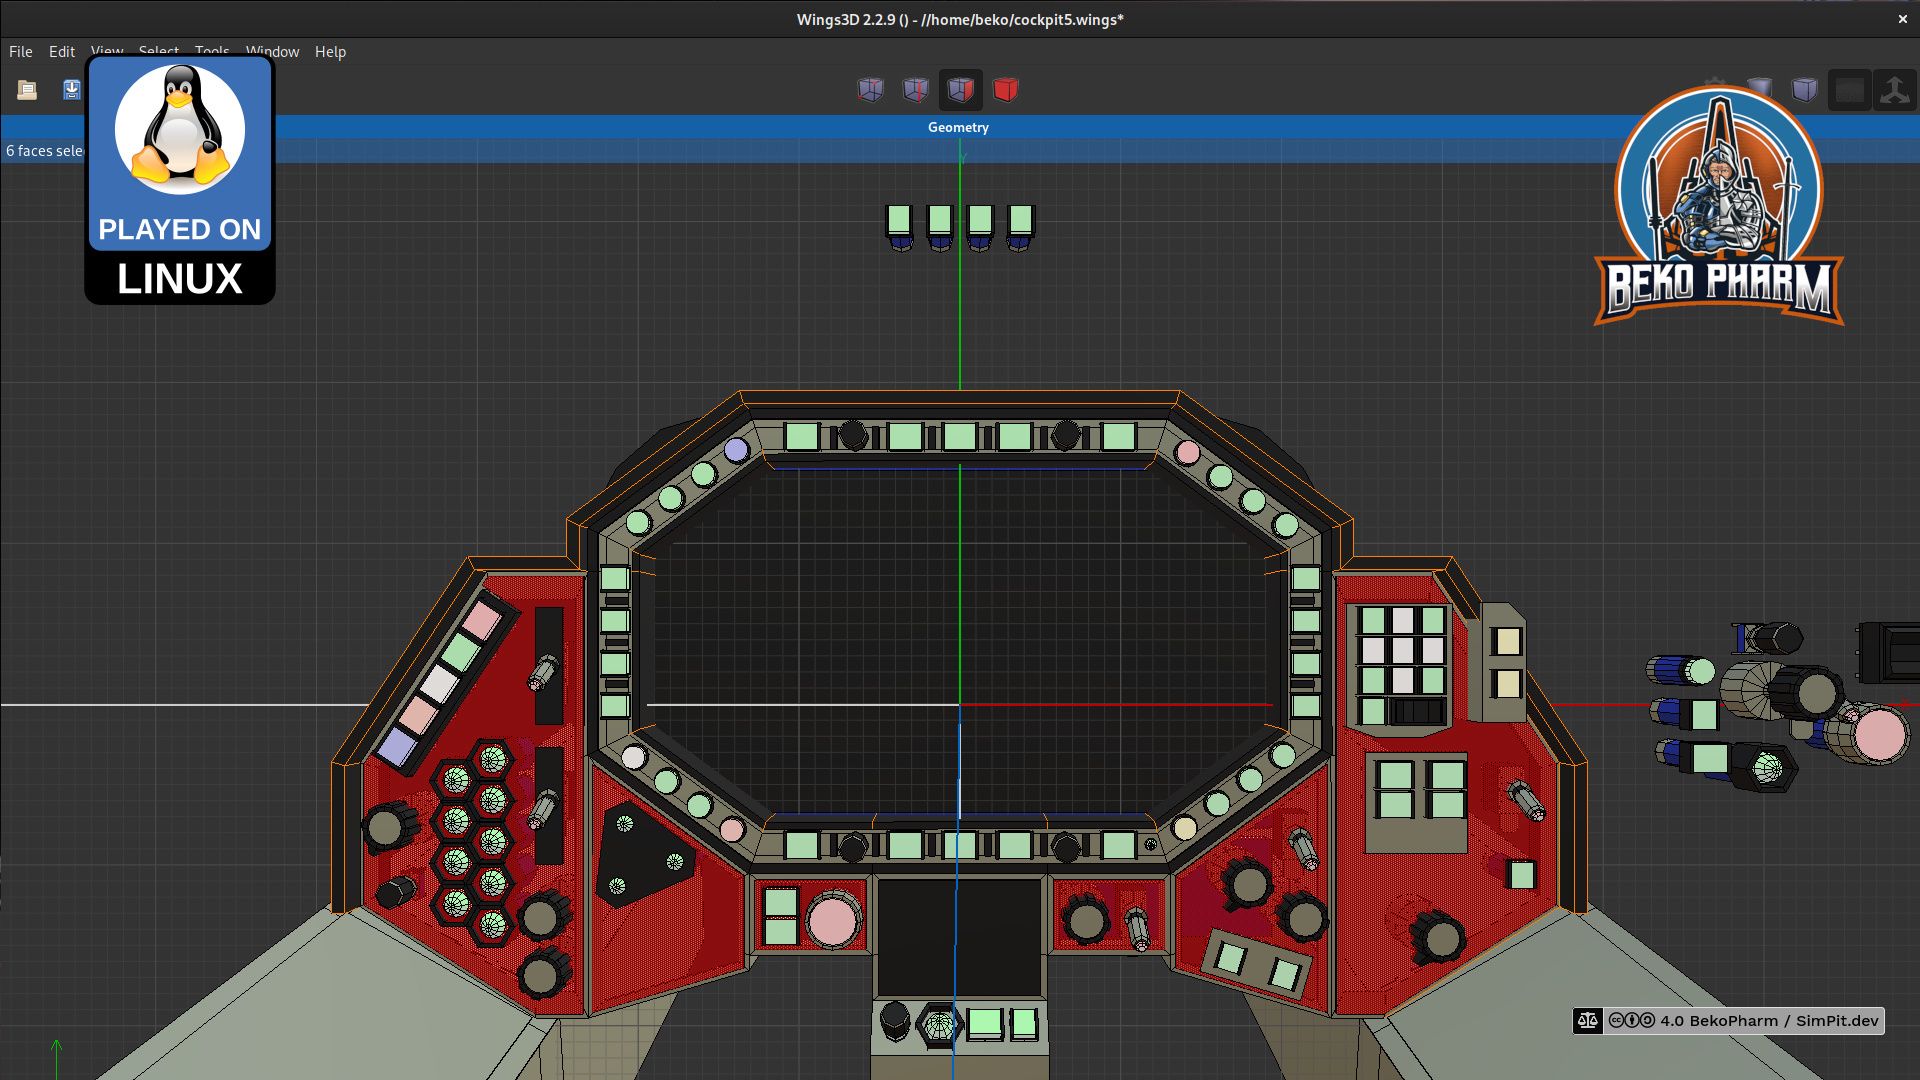
I created a 3D model of the upper cockpit panel in Wings3D where I started to shove around buttons and switches to my liking while keeping close to the original layout. This way I ended up with way more buttons (can never have enough) and get more “screen estate” out of the box while still maintaining a sane layout that would not be in the way of operating something with it later.
The 3D design was followed by months of doing nothing 😩 until I realized that this would go nowhere without starting. So I found myself sitting down each evening and work on some mock-ups. Even if it was only for one or two hours. At some point would my kids show up and ask questions or hand me tools. Who would have guessed.
It payed off that I went with mock-ups first. Even with a rough 3D model I run into several small issues that had to be corrected.
For the Mock-Up I had to export my 3D model somehow first. After messing with various online converters, that all failed to produce a usable result from exported OBJ files I eventually found out that Wings3D has an export to STL built in. Man did I feel stupid. From there I imported the STL into Inkscape and added various A4 papers to the scene to print everything and tape it together. This was the first time that I got an actual idea of the dimensions and wondered what I did get myself into.
It was time to raid our local hardware store where I got a bunch of pine wood for model building purposes. 13x13x1000mm, 19x29x1000mm to be precise - simply because it looked right to me and was available. I built the whole frame with those two sizes. My STL was not exact enough so I had to make stuff up on the go. It was a pretty straight forward process though.
The outer frame is glued but mostly held together by staples. I know what you’re thinking. Heck even my dad told me this would never hold. Hear me out though: First of all I was going to have most of the burden on the inner frame, that is also a lot thicker, and distribute the burden mostly over the covering panels that would be screwed on the top later. Yes, this was flimsy but it held up until everything was screwed together - even for the following photo:
Now things were coming together. The inner panel would hold a shiton of buttons and the LCD later. I can tell you that drilling all the precise holes was no fun whatsoever! I also had to get a new drill for this because I had none with the required size.
Getting this right was important because most of my buttons would not be able to be fastened with their own screw from the backside. The material is simply to deep for the short length of the screw threads. So every button would have to sit snug in it’s fitting. This worked fine for most holes but some needed encouragement to not wobble around by applying some sealing tape that I usually use for water pipe fittings. It’s not stupid if it works 😛
I also can not stress enough how important the cardboard mock-up was. A lot of stuff had to be shifted around slightly for a better fit. The outer frame may be thin but does still introduce an off limits area. In some cases I had to bend the pins of a switch or button to make it possible. Cardboard is very forgiving when it comes to such corrections.
The panels were realized with two layers of thin compressed wood glued together. I only have a shitty jigsaw so I had to rasp the borders into oblivion in the end. A step drill was also a tremendous help because a lot of the parts - again - to not have enough screw thread to be fastened otherwise. This is especially true for the rotary encoders where I found none with a longer shaft so far and have yet to find a way to make these longer. Sadly the advertised products in my mailbox promising to help with enlargement are of no help here 🤡
I’m going to replace the wooden panels with a backlit variant made of acryl glass eventually. The idea is to replace the panels 1:1 with the exact same construction method of two layers sandwiched together.
Next was the backplate that would add a lot of stability to both frames. It connects the inner and the outer frame with screws of various length. The lower support area for the LCD is also already on the picture. I considered adding a little more depth for the wiring of the buttons. Some would be sitting on the LCD corners. I opted to leave it at the depth it is and bend pins again later simply because it would look better this way. I’m also going to add an inner bezel for the LCD frame at a later point.
At this point I was in need of a “temporary” stand to work on this more comfortable. This temporary stand was kinda incorporated into the final construction later. I’m going to eventually build a full cockpit around this but for now it’s just sitting on my table. It got additional stabilizer bars later so it wouldn’t wobble on each button press any more. The 17.3" LCD is really a tight fit here and I’m glad that everything worked out so good. I was totally winging it at this point because my STL did not go into too much detail on the backside.
Everything visible was painted in the end. There is not much to say about this. Colours are anthracite-gray and black. The colors don’t really shine, like the picture may imply. The coat of paint was simply not dry yet.
I waited another day for the paint to dry and assembled all parts for the long and dull wiring process. Yes, there are still some empty spaces. For some I’m still waiting for additional buttons to be delivered and for some I’m simply uncertain what to put there. Some gaming sessions should reveal what’s missing. I also didn’t build the lower panel yet because this part would be in the way when put on a table. I’ll probably design a temporary button box on the side for the elements that I was going to put there.
This Arduino Mega proved itself in version 1 already. I got it thinking I’d never run out of free pins on that. I was wrong. It’s also not a HID but a Serial device. I know that it’s some bootloader can be replaced with the HoodLoader2 but I really don’t mind [any more]. There are probably cheaper clones as well but… would you just look at this beauty!
The communication is managed by a Rust daemon. I got the idea and the initial source code for this from github.com/gwilymk/arduino-joystick by Gwilym Kuiper who describes the idea in great detail in his article about Virtual Joystick on Linux. I wrote about this in more detail on my blog as well.
Windows user may either use the mentioned HoodLoader2 or adapt and work with e.g. vJoySerialFeeder but that’s really out of the scope of this article.
My extended source allowing for more buttons and rotary encoders is available at github.com/bekopharm/arduino-joystick. The snapshot there may be not up-to-date though. I’m tweaking this a lot and didn’t push any change for a while.
This page describes actions that may result in a fire hazard or an electric shock. Repeat at your own risk.
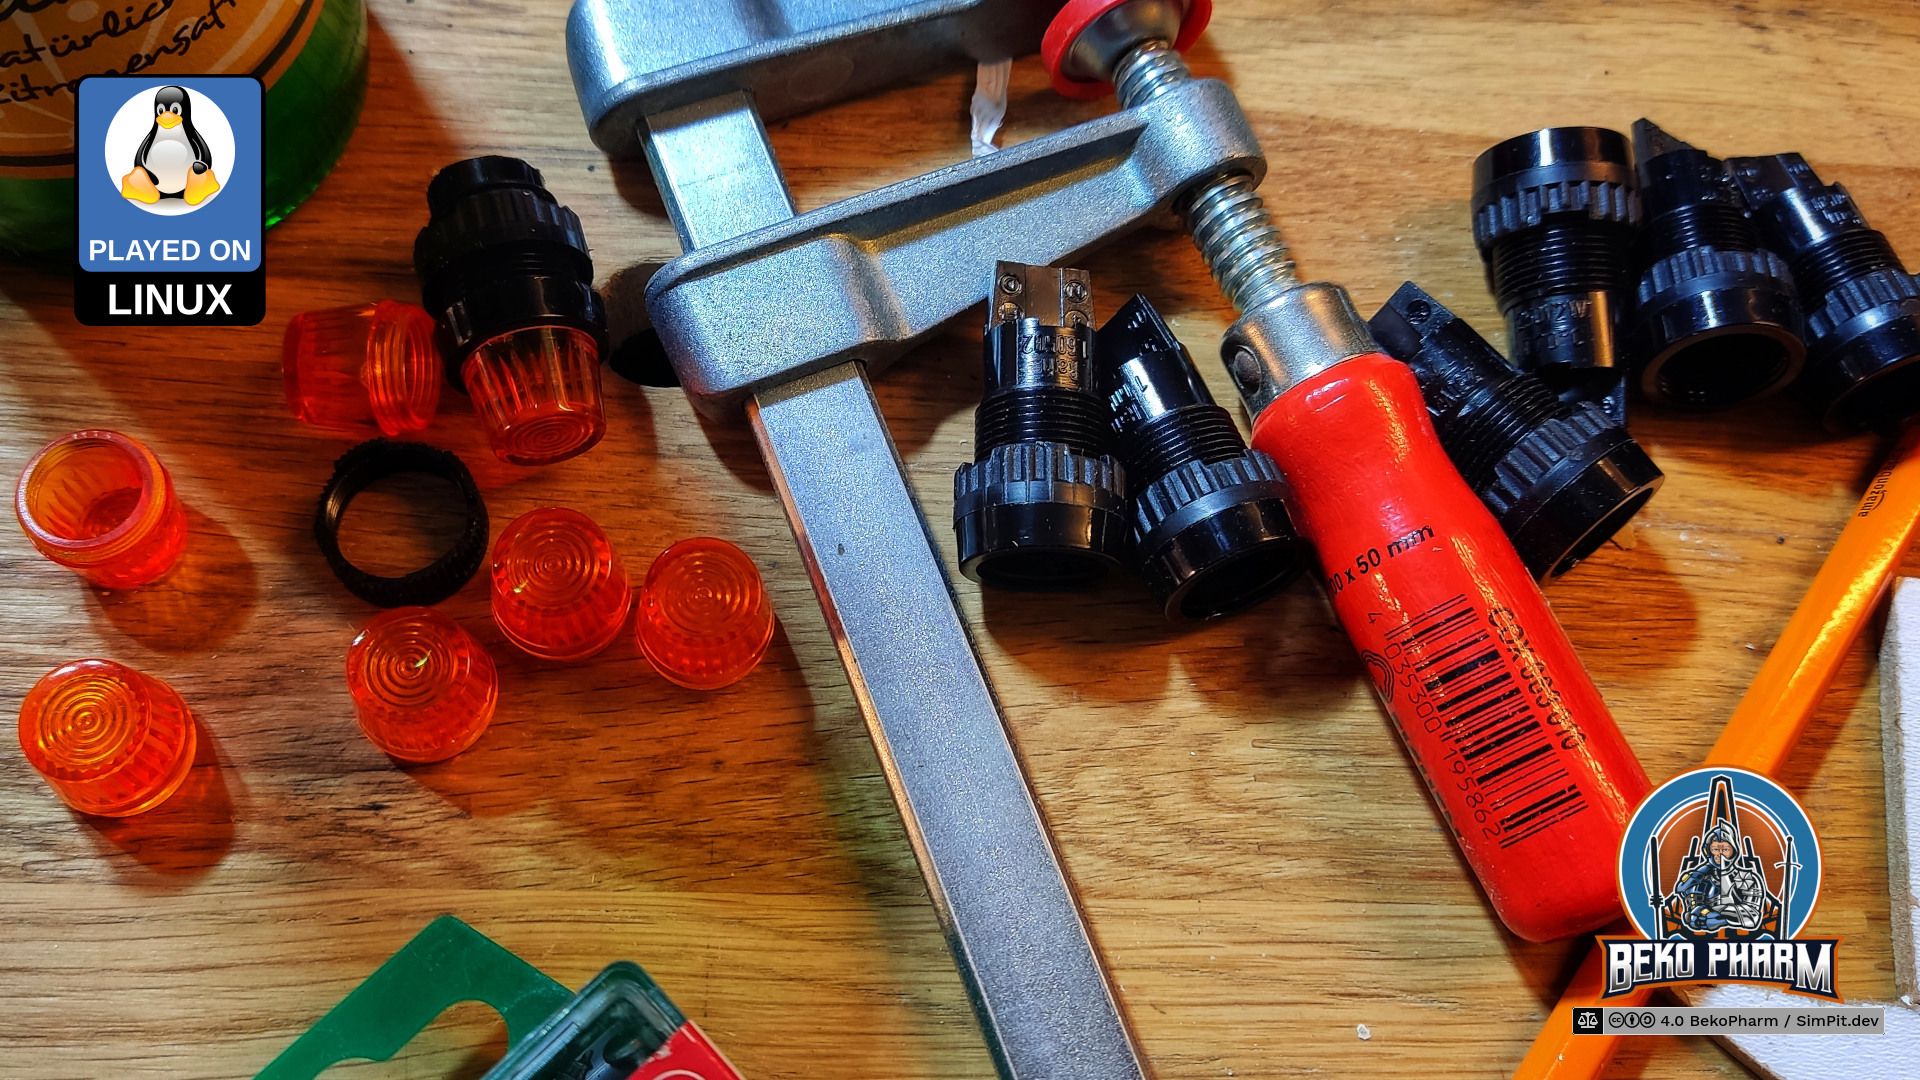
Every cockpit needs blinken lights. My status indicators were realized with a Neopixel. That’s a string of RGB LED wich indidivually addressable LED. This way only a single PIN is needed to configure all lights. It has to be a pin that can do pulse-width modulation (PWM) though so choices are limited.
There are various protocols for this. Mine consists of WS2811 modules where plenty of examples exist on the internet.
A dedicated connection is used for power and in theory all LED can be driven from that but in reality we have to keep ampere in mind so things don’t go up in flames. The string is also dead should one module break for good. Not really suited for a real *craft but hey, this is a toy and each string comes with plenty of leftoversreplacement parts 🙃
I went for this specific Neopixel because it came with the “classic” LED design. The diffusor is 12mm in diameter and the LED did fit almost perfect in their former hexagonal housings. For version 2 I got some fancy fittings that look absolutely stunning but were designed for old lamps with filaments. So fix this I had to saw the endings off.
After that I had an almost perfect fit for the LEDs. Almost, because the fitting is exactly 12mm in diameter on the inside as well but each LED has 3 tiny hooks to hold a LED in place when stuffed through a 12mm hole. A cutting knife made short work of that though.
I also prepared a small triangular panel for the landing gear. It has no housing yet and is supposed to go into the lower part of the frame but that part doesn’t exist yet. Here is a demo video how this looks.
The LEDs are controlled by Node-RED that does all the plumbing in the end. A custom Rust daemon talks via Serial to the Arduino Mega and listens via Websocket for changes from Node-RED and translates the buttons pushed to a virtual joystick device. The Arduino Mega reads changes for the status indicators and adjusts the LEDs as needed.
Links
Node-RED, Low-code programming for event-driven applications
This page describes actions that may result in a fire hazard or an electric shock. Repeat at your own risk.
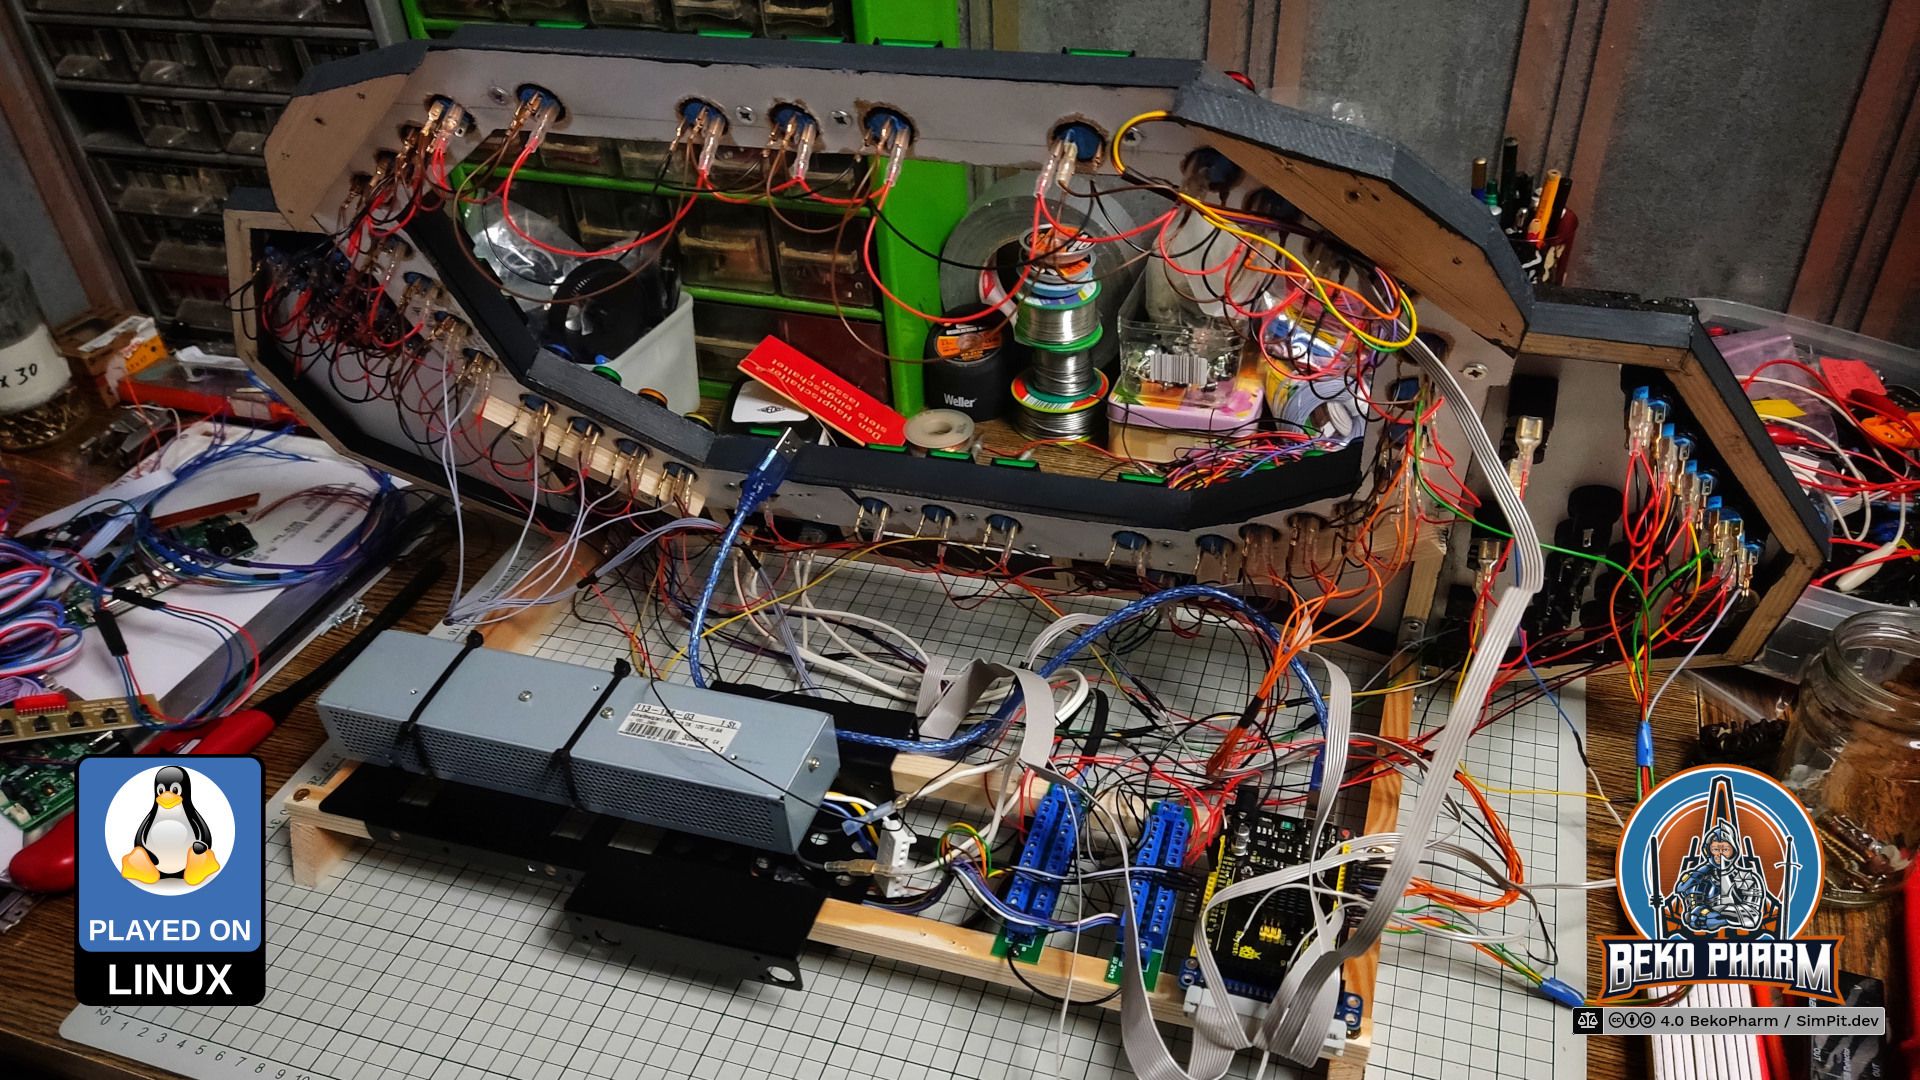
The last step in the construction was wiring everything up. That’s roughly ~250 connectors crimped and I usually remove the isolation with my thumbnail, which is a bad habit 🤪 I purchased crimping pliers just for this and I can totally recommend using such pliers. Used some leftovers from the frame construction to create two rails where everything else was screwed on. The black parts are 3.5" to 2.5" harddisk adapters I had laying around.
The following video demonstrates the dimming with most of the buttons connected already. It works by putting a potentiometer between the two power distribution rails. Stuff that can not be dimmed is connected to the first, stuff that can be dimmed is connected to the second.
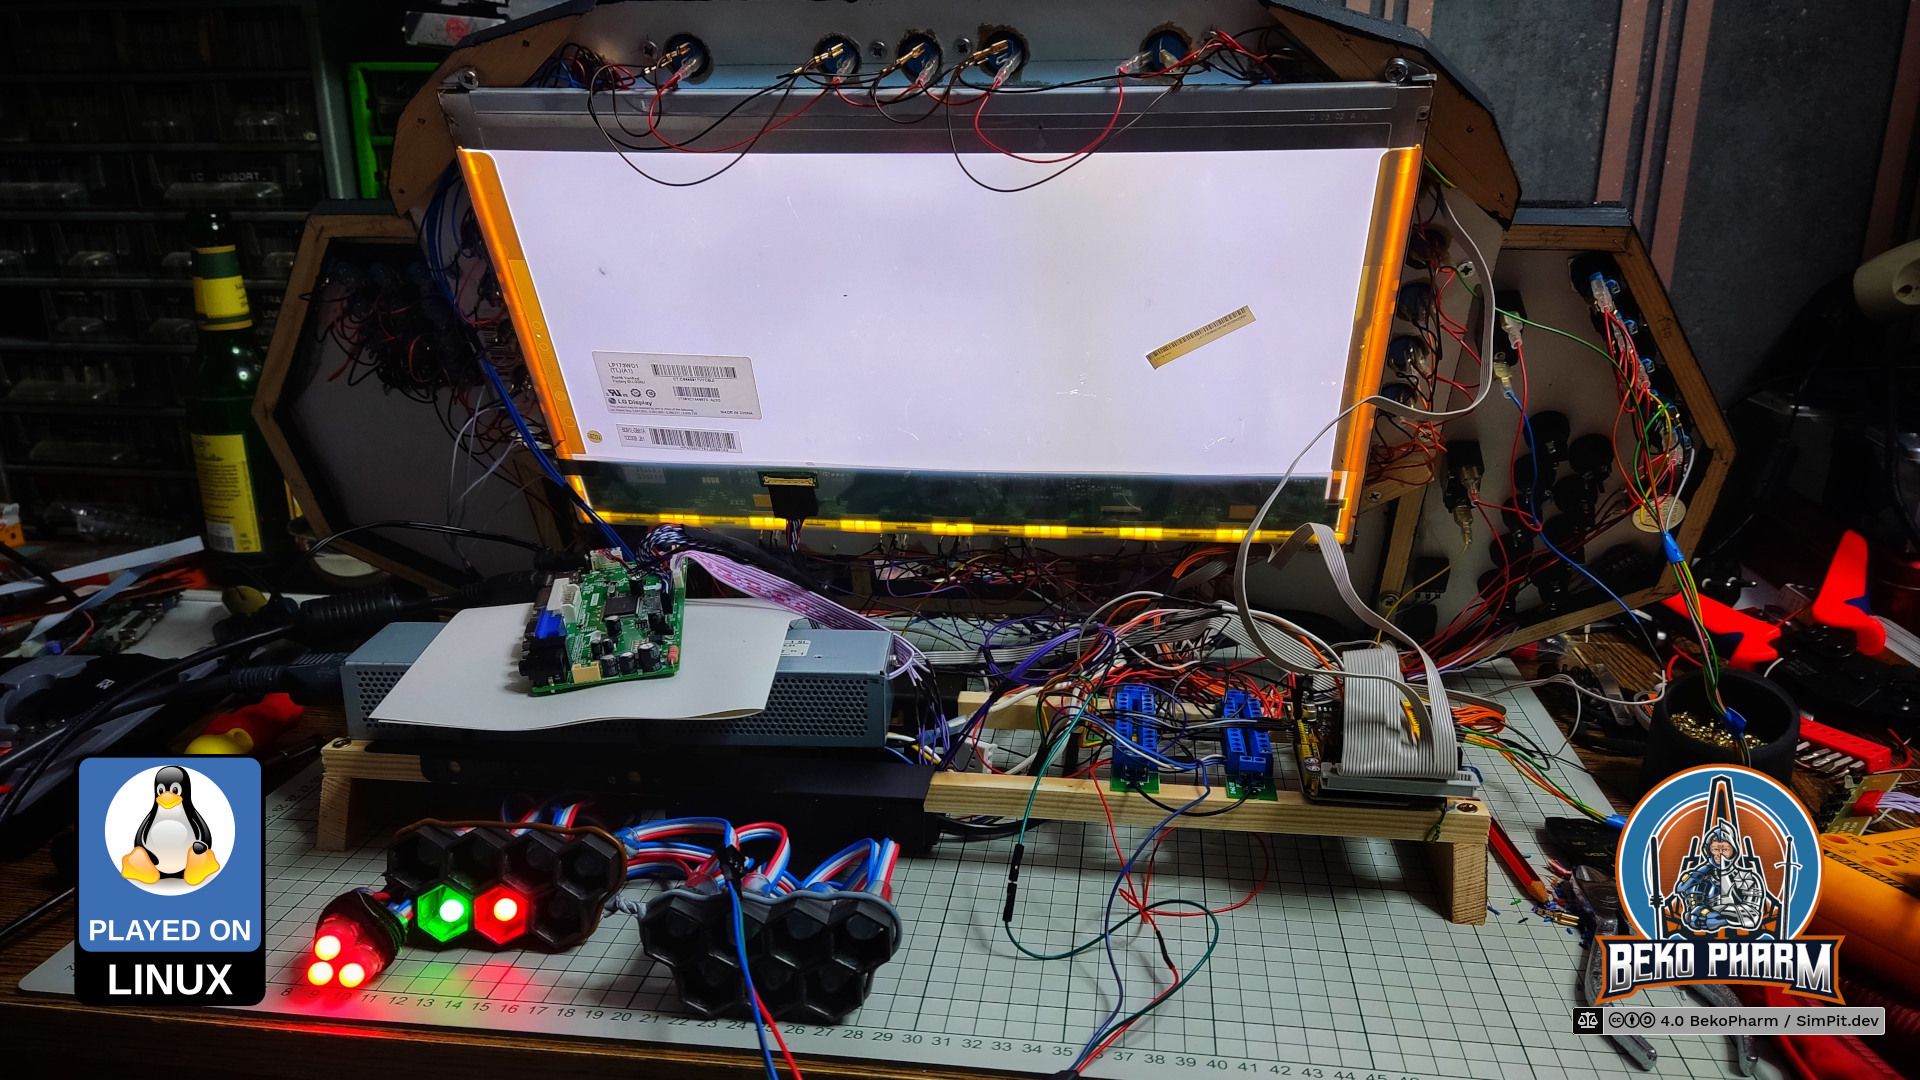
Next was connecting the LCD and see if everything survived the transplantation from version 1. The LCD is very bright on the backside, as you can see. The current version is still missing it’s planned glare shield that will also protect my other displays from the glare of the backside. That’s still to be done though.
After that came some rewriting of the custom joystick source code for the Arduino Mega. Many new buttons wanted to be read. I also removed the original buttons for the LCD controller and connected my own instead. Somewhere during connecting everything I noticed that I made an calculation error and a few buttons could not be connected because I was running out of free pins. So I’ll have to rewire some of the buttons into a button matrix (or use an IO expander - not yet sure what’s best for this).
The blinken lights were next. After that it was time to fix the wobbling. My “temporary” stand was no longer temporary and it was time to add some stabilizing bars. Convincingly this added exactly the space I was missing to fix the LCD controller board to the SimPit. Didn’t really plan this but with this I had all my connectors on the right side (my PC is also on my right).
Not too shabby considering I was winging it at this point.
The MFD (Multi-function display) is salvaged from an old laptop. It is not running GameGlass, like so many others SimPits out there do. Mostly because I’m not a fan of touchscreens or vendor lock-in. There is also the little detail that GameGlass is simply not available for my operating system and does not know about all the Space Pew Pew I usually do.
When I was evaluating what to use to program mine I was caught between the difficult choice to learn yet another fancy framework, like Raylib, that would do OpenGL ES 2.0 without X11 on the Raspberry Pi, or OpenFrameworks, or simply go with something I knew already.
In the end I just threw the might of my CoffeeLake at it and went with React since most of the data was already available via Node-RED over Websockets anyway. Also… Arwes is just so cool (alpha version or not) 🤩 and I had some experience with it thanks to my Streaming Overlay that I also wrote with Arwes. Connecting it to Node-RED was just a matter of installing Socket.IO to transport the messages. I rewrote the whole thing for version 2 though because the code for version 1 was a very hacky mess and the older Arwes version was deprecated. The core functionality is still the same though.
Sourcecode plz!
This is the part I’m hacking at most at the moment and I will release the source code to this at some point on my GitHub profile.
Use aside from gaming
At some point I decided that the additional screen would be very wasted when not used for other stuff as well and since I added some buttons dedicated to multimedia controls already anyway I slowly started to use other parts for my daily workstation use as well. Like… scrolling a website for example.
It also makes a great auxilary screen for programming.
This content was created for an older version and is outdated. Check version 2 for an up-to-date description!
Primary Buffer Panel v1 (the ugly)
The first version of the Primary Buffer Panel was a prototype made of cardboard. It’s an excellent forgiving material that allows for rapid prototyping. I played on this for almost two years and tweaked and extended it again and again. It was eventually disassembled and the parts salvaged for version 2
I learned a lot during that time. Especially what I wanted from a cockpit (and what not). I totally recommend this approach especially when the own build is for Sci-Fi Pew Pew and not a reproduction of something that exists. This is because what we usually get to see in Sci-Fi movies or games looks awesome on first glance but is usually not functional at all. As in ergonomics, options or even overview. I’m not a designer but the shortcomings of most panels become obvious when trying to operate one in a realgame scenario where pushing buttons is not just for effect.
Subsections of Version 1
Inspiration
1.0 4.0
Obsolete content
This content was created for an older version and is outdated. Check version 2 for an up-to-date description!
YouTube videos. Not kidding. While doing research on head tracking for version 0 I stumbled over the awesome SimPits of Jaguar’s Afterimage Flightand the great C-Pit 101.
Both inspired me to eventually try rolling my own and to make sure I’d really pull it off I grabbed my camera and started streaming the whole process on twitch.tv/bekopharm. Random trivia: Me cutting cardboard apparently sounded like some trash metal band. I disputed the strike but nothing came of it, as expected.
Later, already some weeks into the build, I also stumbled over Jon’s blog and his Creative Geek channel. Jon had the same idea to use Node-RED for the plumbing and I was delighted to see another Elite Dangerous cockpit made of cardboard in the wild.
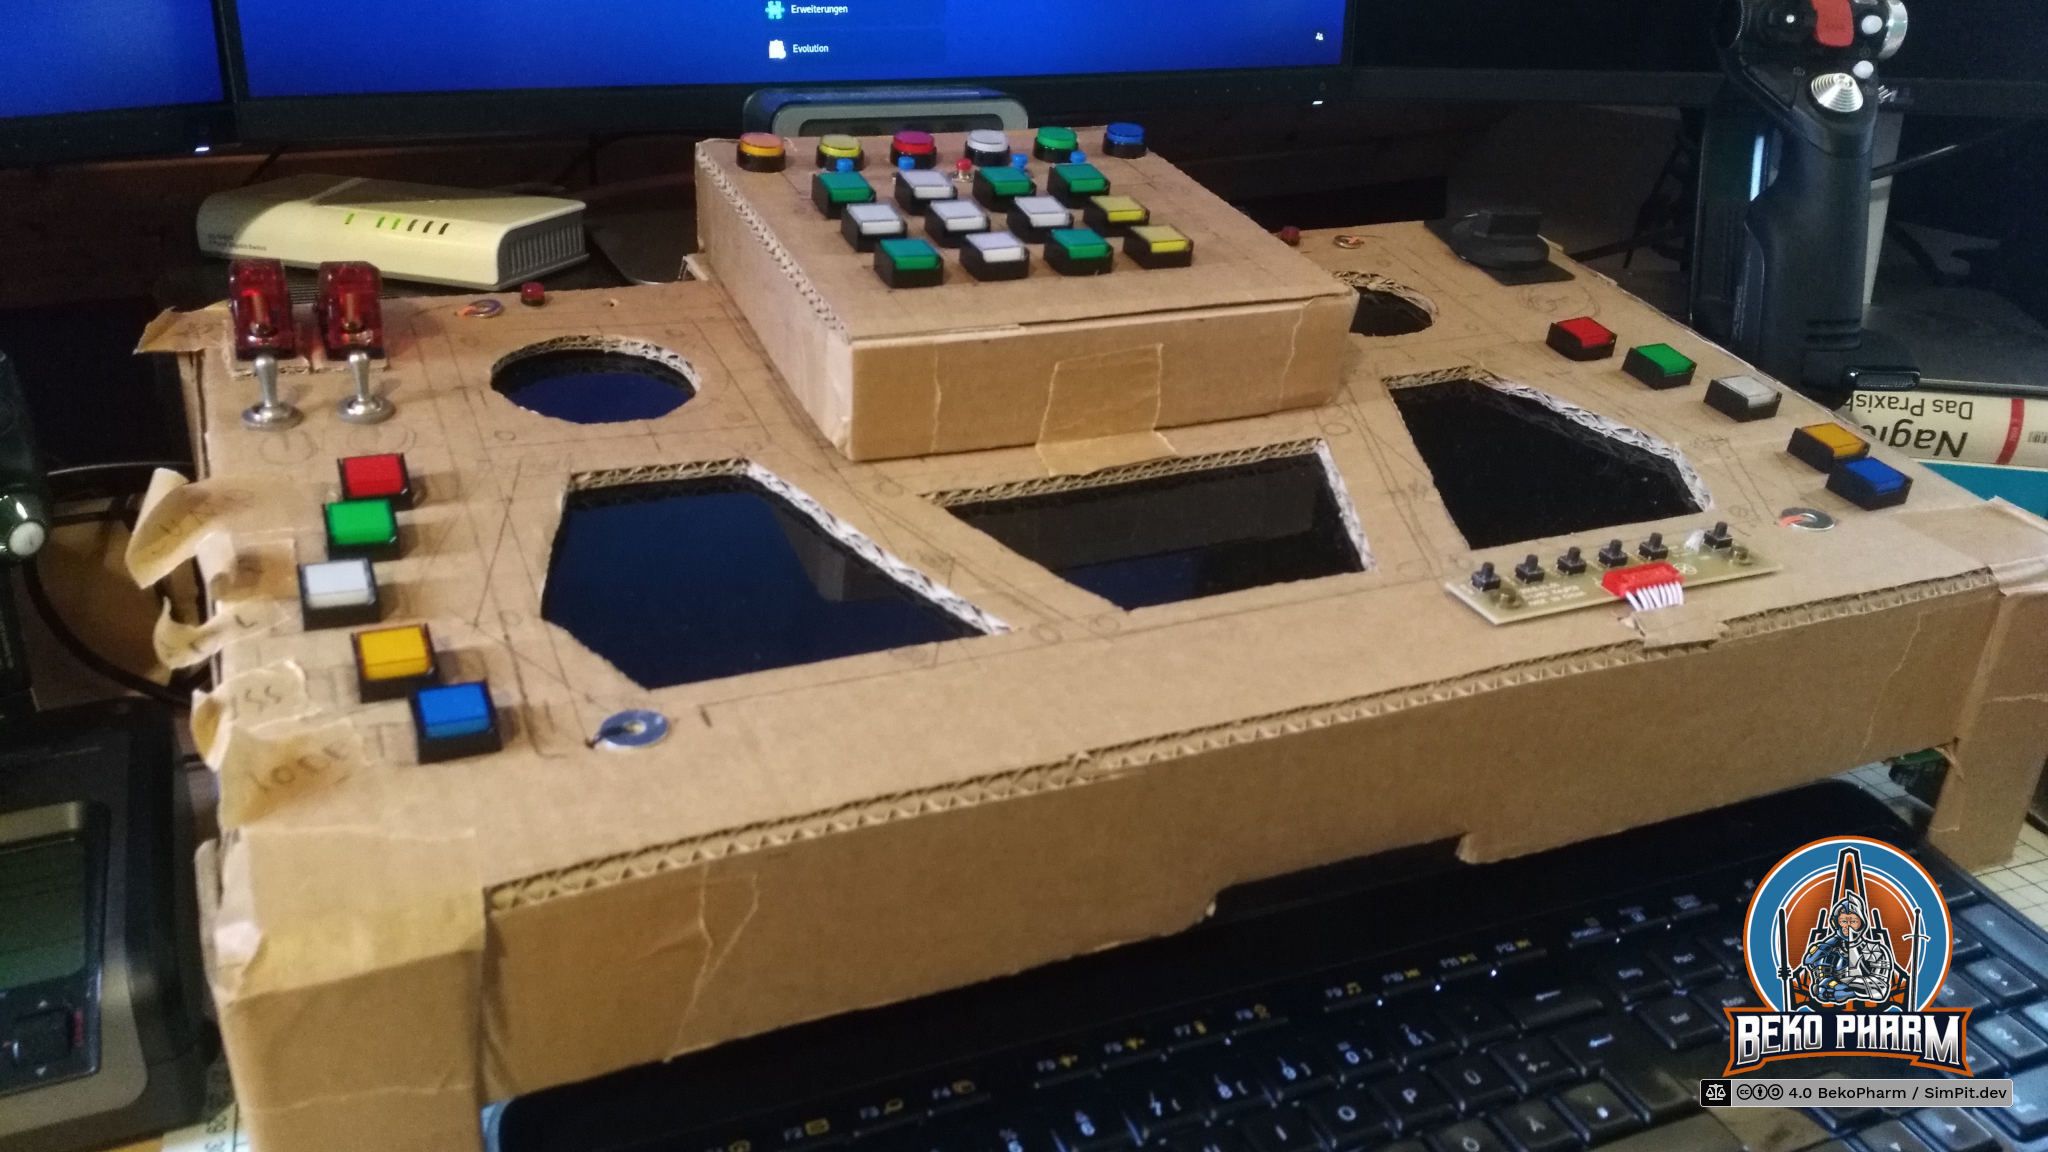
Yeah, and at some point I got tired of calling it just “button box”. It’s not. It’s a “glorified button box mock-up with a gorram LCD made from cardboard”. So I decided that it needs a name and as a nerd I came up with… Primary Buffer Panel!
This content was created for an older version and is outdated. Check version 2 for an up-to-date description!
When I started I was looking for something generic and not specific for a single game. After all I do play a lot of different Space Pew Pew.
I’m not a designer though and designing user interfaces is hard. For example what we usually get to see in Sci-Fi movies or games looks awesome on first glance but is usually not functional at all. As in ergonomics, options or even overview.
There are places that have some good pointers, on this topic, like www.hudsandguis.com, that also has a book (which I found lacking but I’m not really the targeted audience).
In the end I ended up with a wild mix of elements from shows like Battlestar Galactica, real jets and other planes and even from The Expanse and Alien.
Most important were the backlit buttons for me. Did I mention that I like “real” buttons? Something with tactile feedback? Blame my childhood for this. I grew up with buttons on everything and the most fanciest displays ever: Vacuum Fluorescent Displays. I even fiddled around with CSS effects to mimic a VFD (in places - all was just too much).
I also added hexagonal status indicators, because nothing says Sci-Fi more than hexagons, to the mix. In case you wonder if I used a 3D printer for that: Nope. That’s basically a plastic cap for protecting the bolts of the rim of a car wheel. I just cut off the cap and stuffed a LED inside. Didn’t even glue them together. A wire fixed all in place which allowed me to move the segments around. They were never attached to the panel.
For starting everything up I used a multi staged switch that I salvaged from an old heater. We all know that any plane/craft in movies starts after switching the three magic levers. This was mine 🤓
The panel itself was put on stilts for the extra room required. This had the nice bonus that the keyboard could slide under the panel when not needed.
The ICP in the centre was created with a dedicated new cardboard box that was attached to the button box with tape. This also acted as a hinge so I could “open” it to work on the buttons that went there. The backlit buttons took their time to arrive and I had salvaged place holders for quite a while. I also eventually got switches with integrated LED and safety that I used for fire and forget functions like launching a missile or activating self destruct.
In the beginning I even had tape with scribbles which button does what. The backlit buttons have a cap that can be popped open for an inlay but that is a lot of work and since I was not yet sure what comes where I just used my improvised post-its for quite a while.
This content was created for an older version and is outdated. Check version 2 for an up-to-date description!
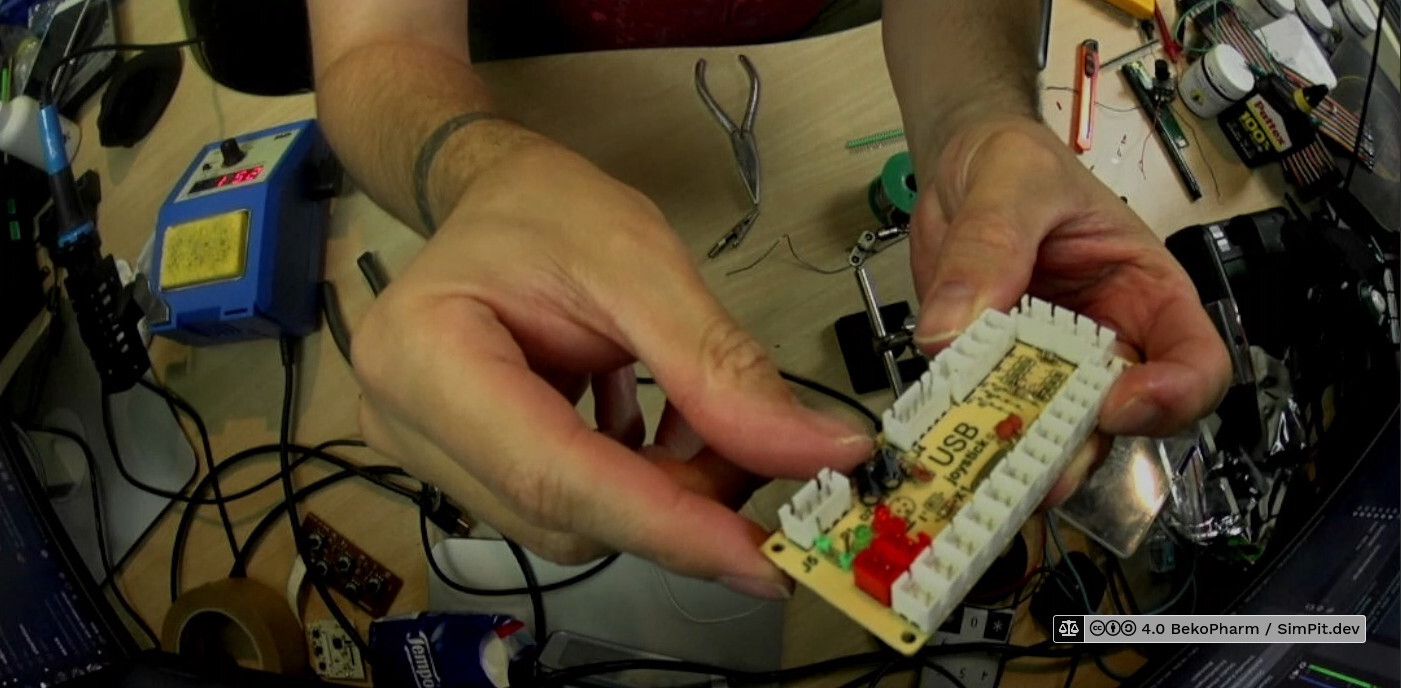
The initial controller for the cockpit was a CY-822A gamepad controller that is often found in “DIY arcade game kits” in various places. It’s a dead cheap PCB that is detected as a gamepad from most computers and while it’s kinda limited in possible inputs it does have a bunch of nice features, like a dedicated connector for backlit buttons. This is also a great place to hook in with a potentiometer to control the brightness of the backlit buttons.
There is also no reason to simply use two when the possible inputs are used up. This is a very decent little PCB that allows for a very easy DIY button without any soldering.
…we can, of course, even solder here.
CY-822A with analogue input
This is a brief description how to mod an CY-822A USB joystick controller into accepting analogue input. I’ve done this modification now with two of my PCBs and worked with both for an extended period of time without any problems. To achieve this two things have to be done.
Fire hazard
This page describes actions that may result in a fire hazard or an electric shock. Repeat at your own risk.
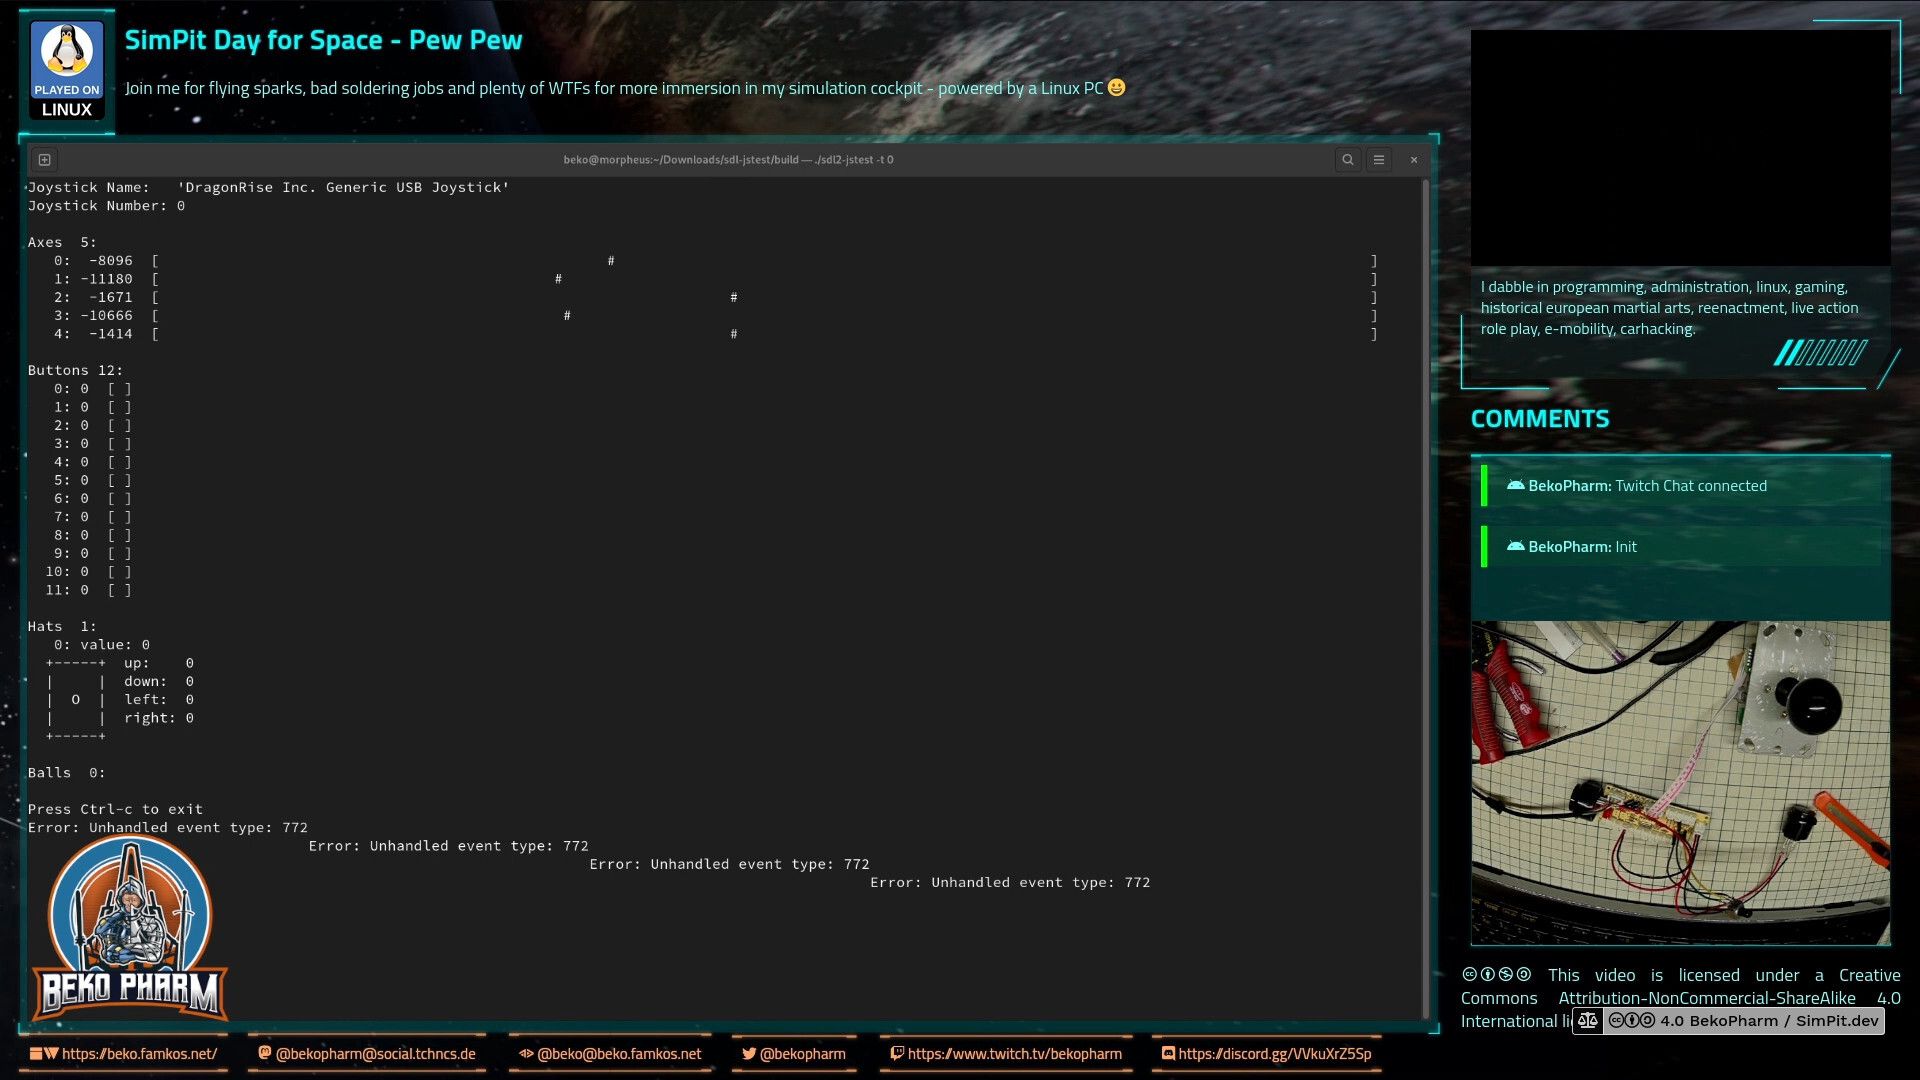
sdl2-jstest detected 5 axis
The PCB comes with 5 analogue axis according to my Linux PC and sdl2-jstest and while I’m not sure where the 5th is located a tiny modification will allow us to use at least 4 of the axis.
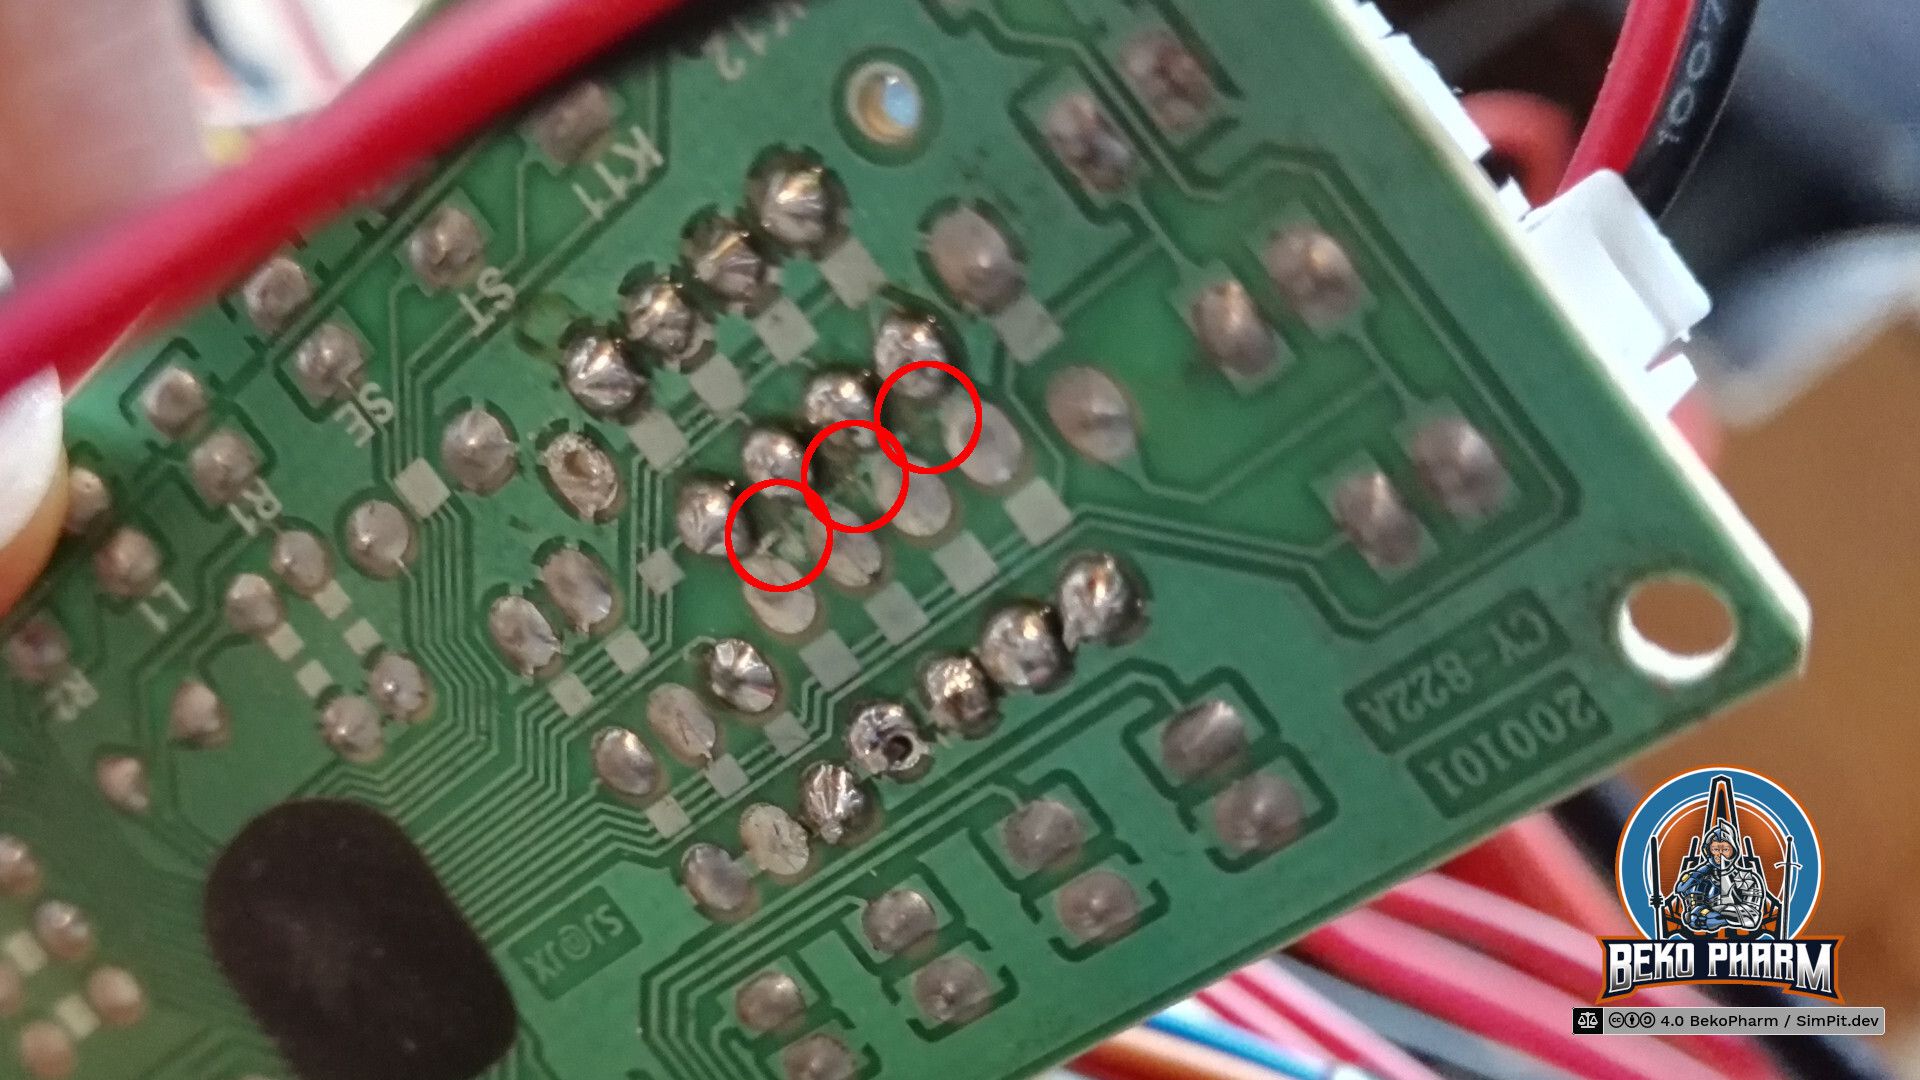
Locate the resistors R1 – R8 on the front that make up for 4 possible connections for analogue input with the use of potentiometers. There are 2 resistors with ~10k on the PCB that have to go. The 2 resistors hold 4 of the 5 axis perfectly still in the centre because the middle lane is bridged on the backside. This is the part where the conductor path has to be interrupted. Locate the central lane and simply scratch off the track with a sharp knife. Also clean all the holes of R1 to R8 so you can solder in some new pins for easier access. Use a multimeter to make sure that none of the 4 central soldering points are connected with each other any more. The upper and lower ones stay connected (Plus and GND).
Locate the central lane and simply scratch off the track with a sharp knife at the 3 indicated positions.
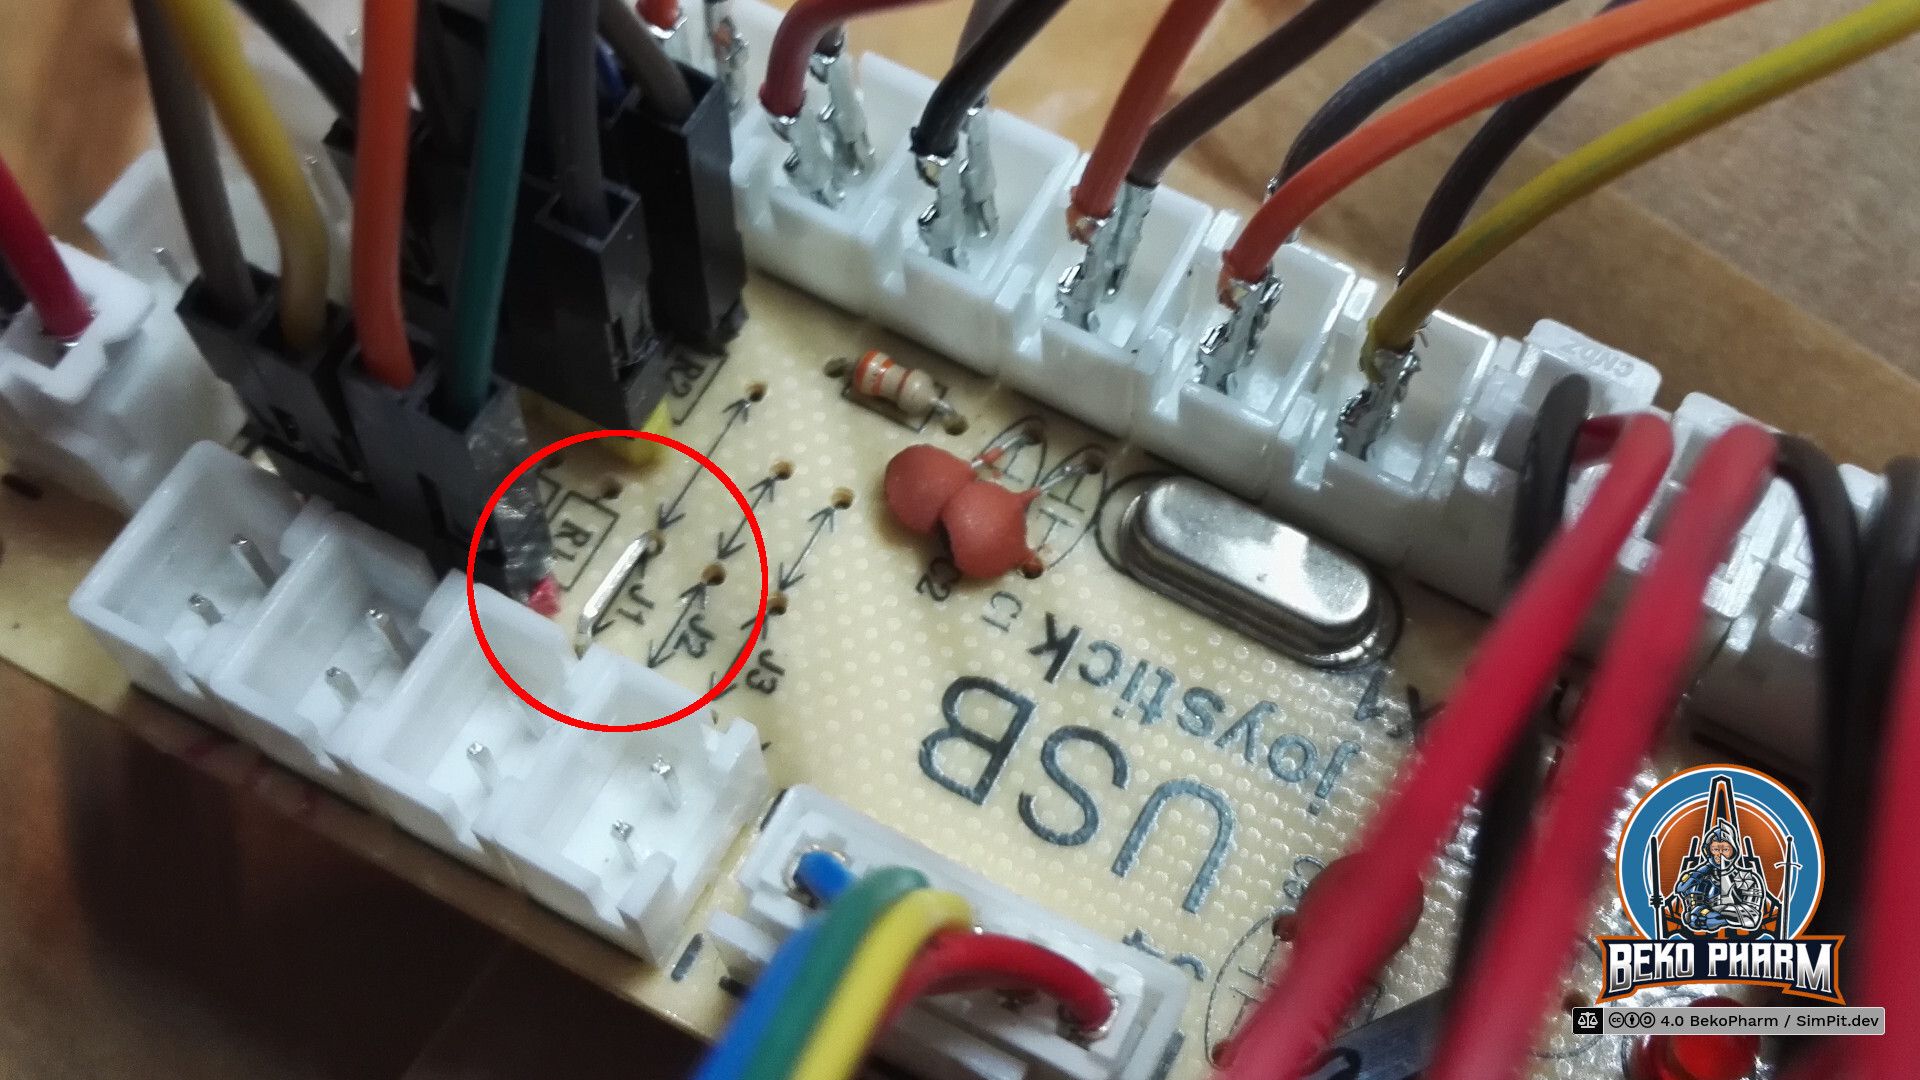
Next we want to remove the zero ohm resistor at J1 and add a wire bridge instead. Look for an resistor with a single black ring next to R2, remove it, and solder in the wire bridge next to R1. This is basically a jumper setting but with a bridge. I’ve no idea why the designer went with a zero ohm resistor and not with a bridge. My only guess is that this was cheaper for the assembly machines.
Anyway, this will make the board boot in analogue mode so we do not have to use a mode switch on power on every time. This serves two purposes: Axis are now read from input and actually send as joystick events on the USB wire while the former digital joystick connector (5 pins) is now mapped to Up/Down/Left/Right buttons – so no extra buttons are needed here any more (but can still be added, of course).
Any potentiometer should do – mine are 100k – 200k10k. YMMV.
Now it’s time to connect potentiometers as analogue inputs. This is pretty straight forward. Just make sure that the central connector goes to the centre of each axis. Change the upper with the lower pin if the direction is not as desired.
Please note that any axis that has no input attached will report a lot of jitter making your game/app go nuts. This is what the former resistors at R1 and R2 were there for. Make sure that all inputs get a potentiometer (or a resistor) to prevent this!
This content was created for an older version and is outdated. Check version 2 for an up-to-date description!
I was looking for a simple way to get data from Elite Dangerous forwarded to my cockpit but all the programs I found online are closed source solutions that have to be bought and are – as usual – Windows only. Best it would get is Android support and requires a tablet with touch functions. Nothing of this I want! The idea is to use something system agnostic that can be adjusted easily, because I want to use this for different games and not depend on a single vendor, hoping support will last and the thing work with my setup [in the future].
Using Node-RED to get status information
This was when I remembered Node-RED from usage in home automation because this is basically the same. You get a zoo of hardware, that somehow all interacts with a dashboard. All the data is on the wire and can be accessed via a web-browser. Fun enough I wasn’t the first with this idea because when I started searching for “Node-RED for simpit usage” I stumbled over the YouTube channel of Jon Back who did exactly this before (and even also used cardboard for prototyping). Encouraging and big shout out for the pioneer work!
So after installing Node-RED on my Linux PC and on my Raspberry Pi I connected the two installations via Websockets. That’s basically just entering an IP. While using MQTT is probably a better solution that I may evaluate in the future this was the easiest one because it doesn’t need an additional service.
Why I installed it twice? Well Elite drops a lot of the current game status in various JSON files, like a timestamped Journal and a Status file that holds most of the ship data I’m interested in most. The file is updated on changes and it’s easy to watch for such a change on a local filesystem. I also intend to make the receiving side as dumb as possible so I don’t have to update the code too often. I’m still uncertain what I’ll use in the end – an Arduino is also in consideration. This way I can hopefully connect other games easily as well by keeping the resulting data structure more universal and let the sender to the hard work of hammering the data into shape.
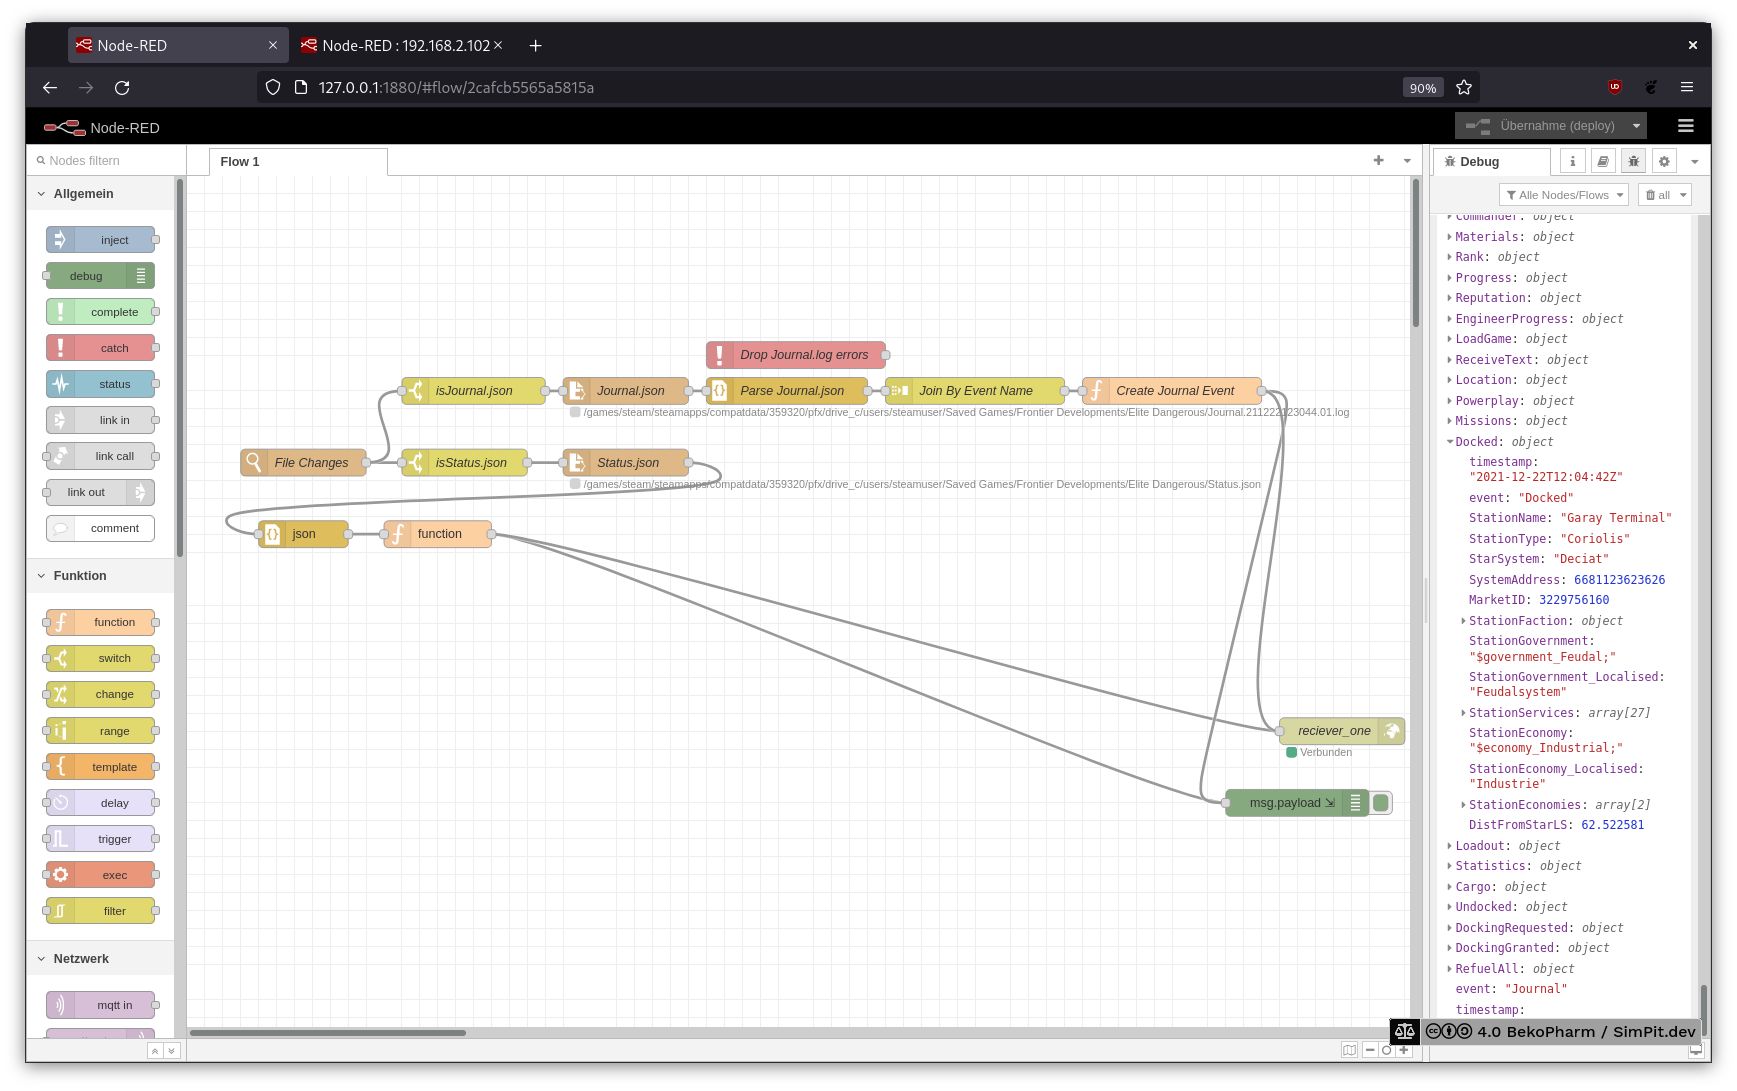
The sender flow
Short explanation what’s going on: File Changes listens for changes in my ED folder where the JSON files are located. Switches check for the file name forward it to a file opener. This one reads the file (Journal line by line) and passes the data to a JSON parser. This one forwards the parsed JSON data to a function that creates the desired data structures. Finally it is send to the receiver.
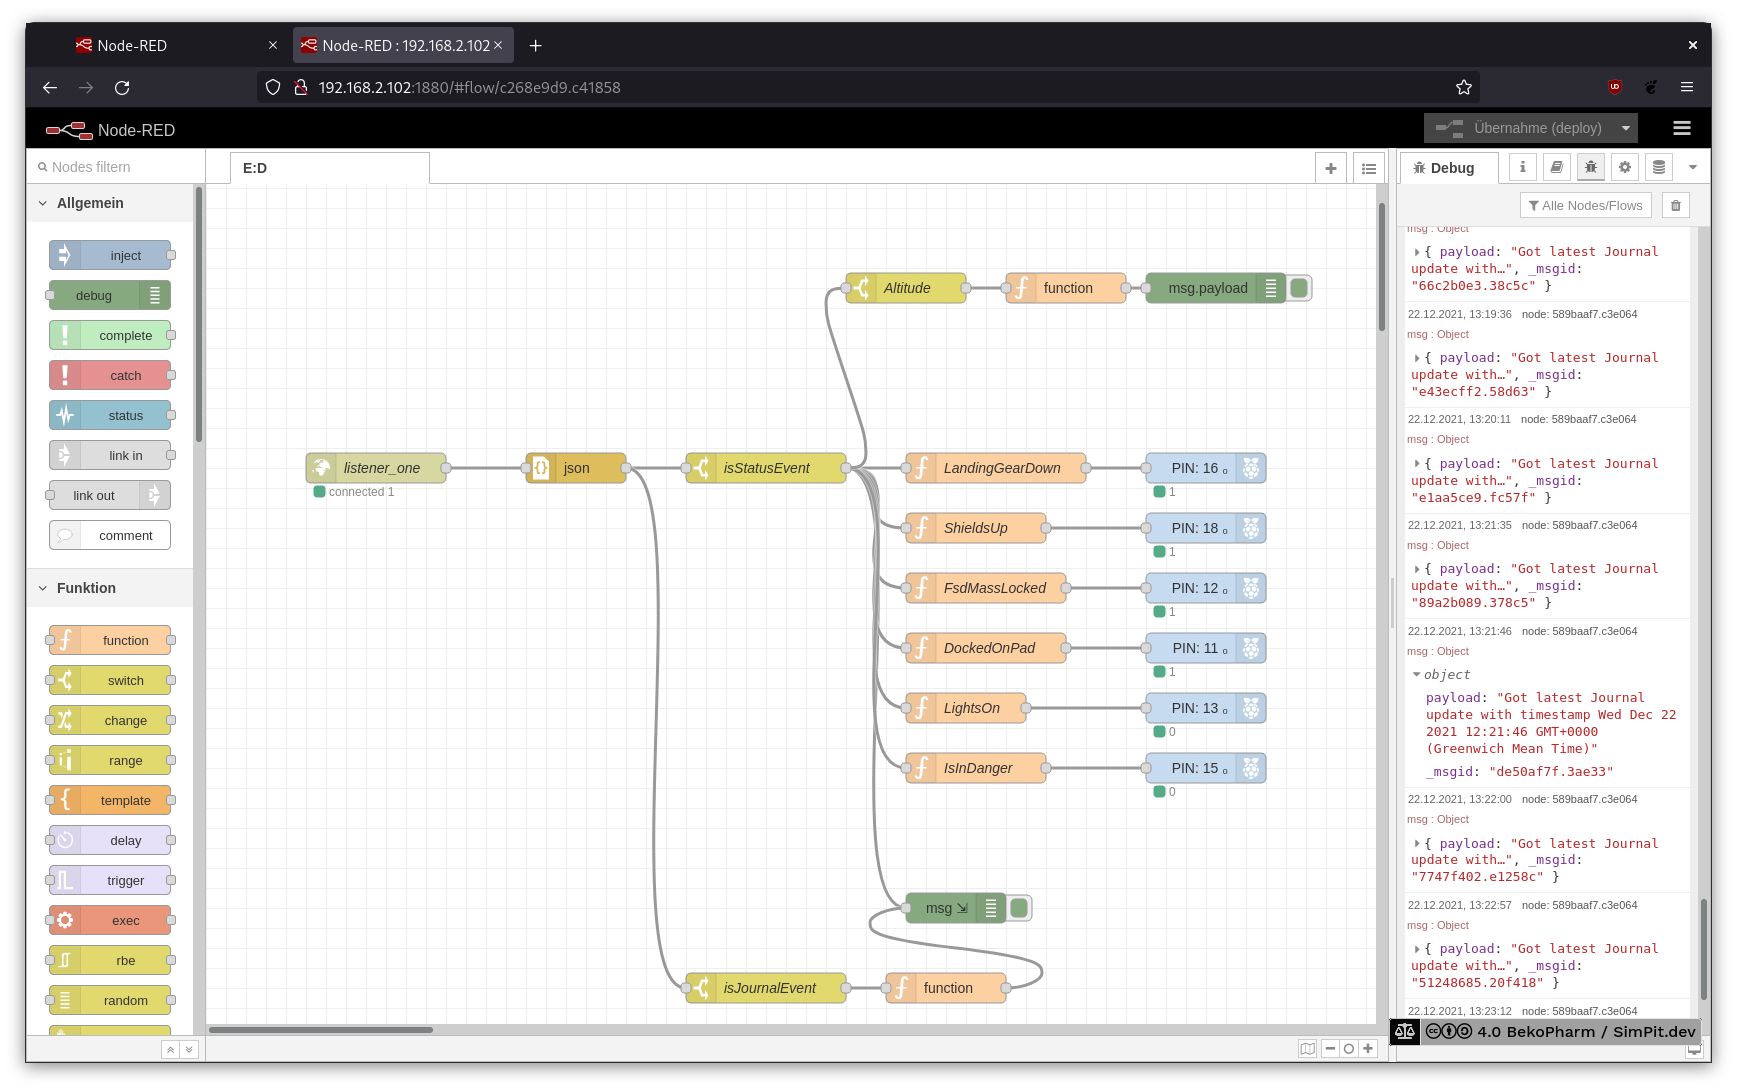
The receiving Node-RED process on the Raspberry Pi does something similar.
The received data is once more parsed as JSON and checked based on the event string what type of message it got. If a status event is found it’s forwarded as 0 or 1 to a GPIO where a LED will be enabled or disabled. See the short demo video of the Primary Buffer Panel in action:
This is a proof of concept that uses only a tiny bit of the available information to drive some LED I have on my custom GPIO breakout board. Later I ordered a Neopixel, a LED strip with WS2811 modules, and rewrote the receiving part.
This content was created for an older version and is outdated. Check version 2 for an up-to-date description!
Fire hazard
This page describes actions that may result in a fire hazard or an electric shock. Repeat at your own risk.
Every cockpit needs blinken lights. My status indicators were realized with a Neopixel. That’s a string of RGB LED wich indidivually addressable LED. This way only a single PIN is needed to configure all lights. It has to be a pin that can do pulse-width modulation (PWM) though so choices are limited.
There are various protocols for this. Mine consists of WS2811 modules where plenty of examples exist on the internet.
A dedicated connection is used for power and in theory all LED can be driven from that but in reality we have to keep ampere in mind so things don’t go up in flames. The string is also dead should one module break for good. Not really suited for a real *craft but hey, this is a toy and each string comes with plenty of leftoversreplacement parts 🙃
I went for this specific Neopixel because it came with the “classic” LED design. The diffusor is 12mm in diameter and the LED did fit almost perfect in their hexagonal housings. The housings are not 3D printed. That’s basically a plastic cap for protecting the bolts of the rim of a car wheel. I just cut off the cap and stuffed the LED inside. Didn’t even glue them together. A wire fixed all in place which allowed me to move the segments around. They were never attached to the panel version 1.
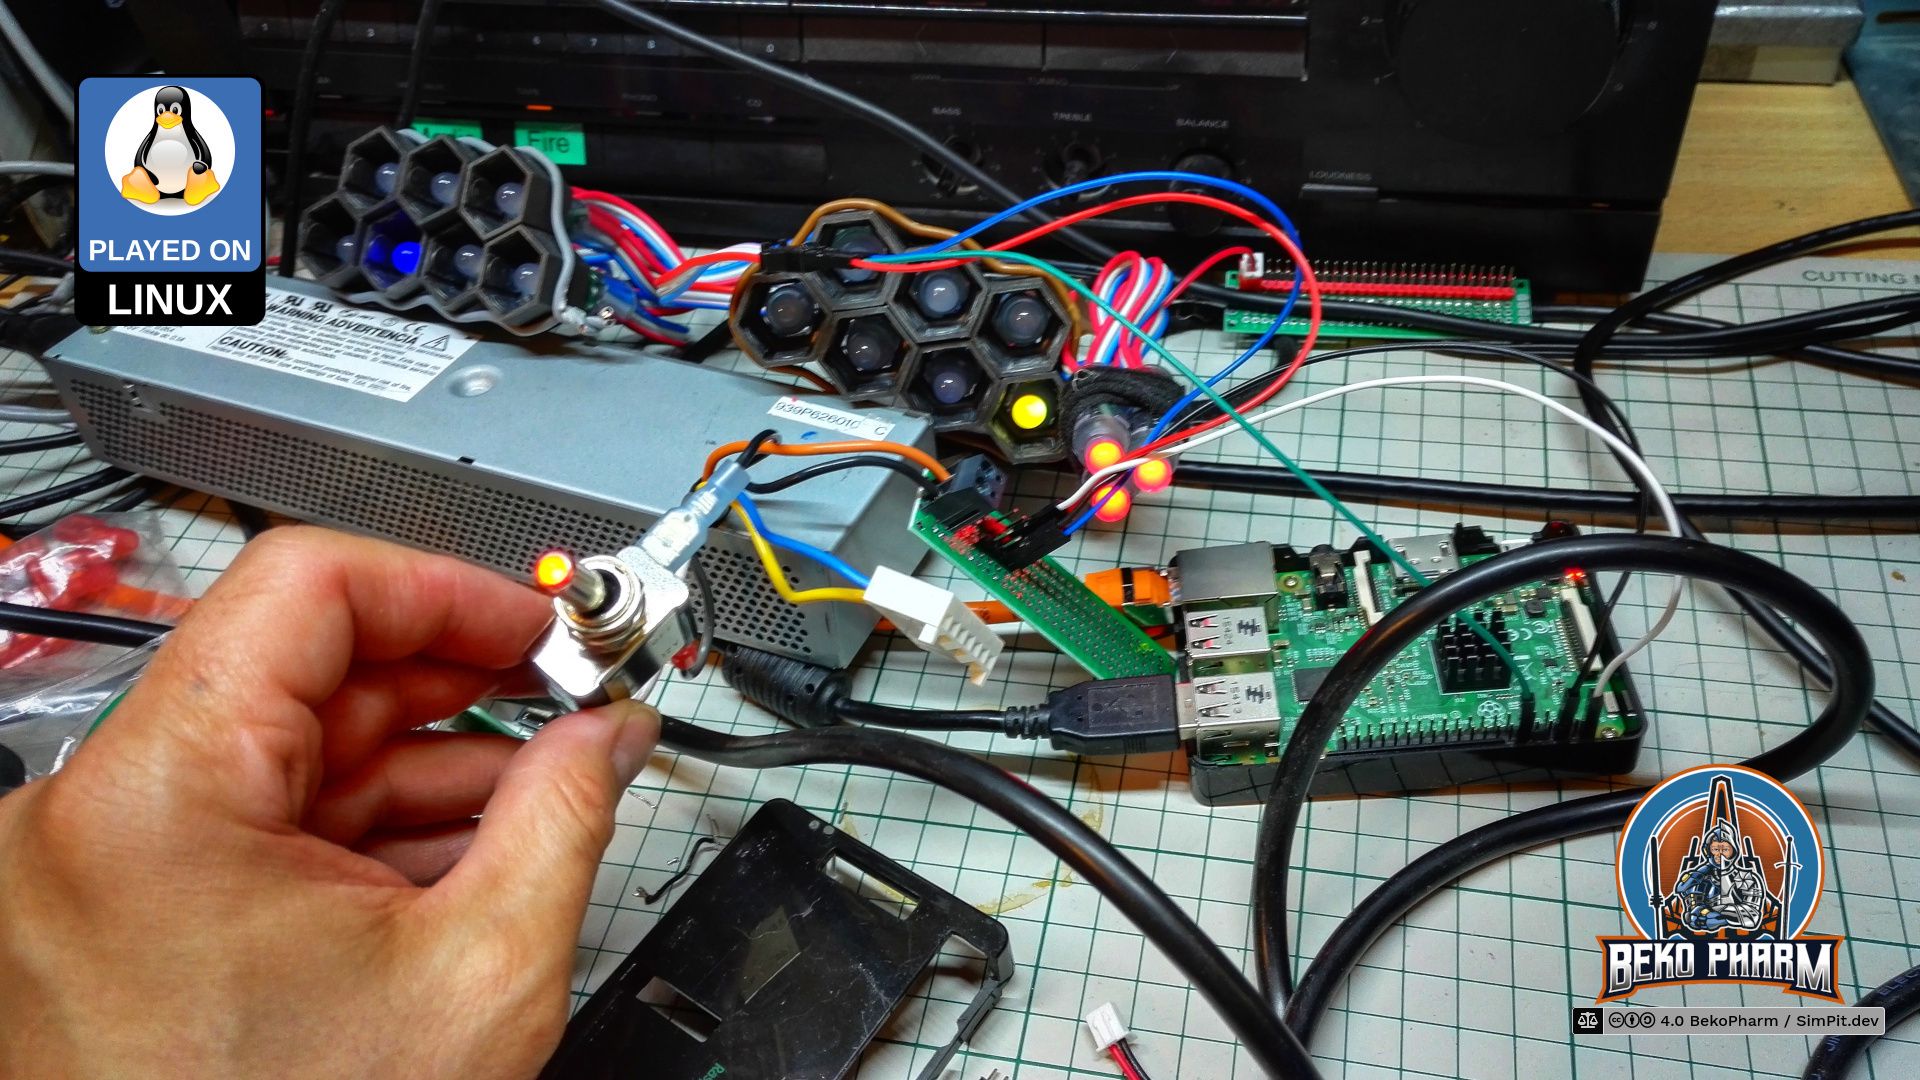
On this picture you can see that I used a cheap external power supply (PSU) to drive both, the Neopixel and the Raspberry Pi. The specific model is a VOLTEK SPEC7188B with a 5V rail rated for 3.7A and a 12V rail rated for 600mA. More than enough juice to drive all LED in my setup. A tricke line is pulled to GND to start it - the perfect place for a chunky switch for a satisfying sound. Bonus with a fancy LED.
The LEDs are controlled by Node-RED that does all the plumbing in the end.
Links
Node-RED, Low-code programming for event-driven applications
This content was created for an older version and is outdated. Check version 2 for an up-to-date description!
Fire hazard
This page describes actions that may result in a fire hazard or an electric shock. Repeat at your own risk.
Oh wow, I really do not want to show this but here we go. Please understand that this project reignited my interest in electronics. Something I have not touched (or licked) since childhood and it took quite a while to figure everything out again and get used to soldering.
So most of this is straight forward. In the beginning I used a CY-822A as controller for the buttons. This is basically a gamepad for the PC and does not require any soldering. I modded it somewhat in the end to get analogue inputs but that’s it.
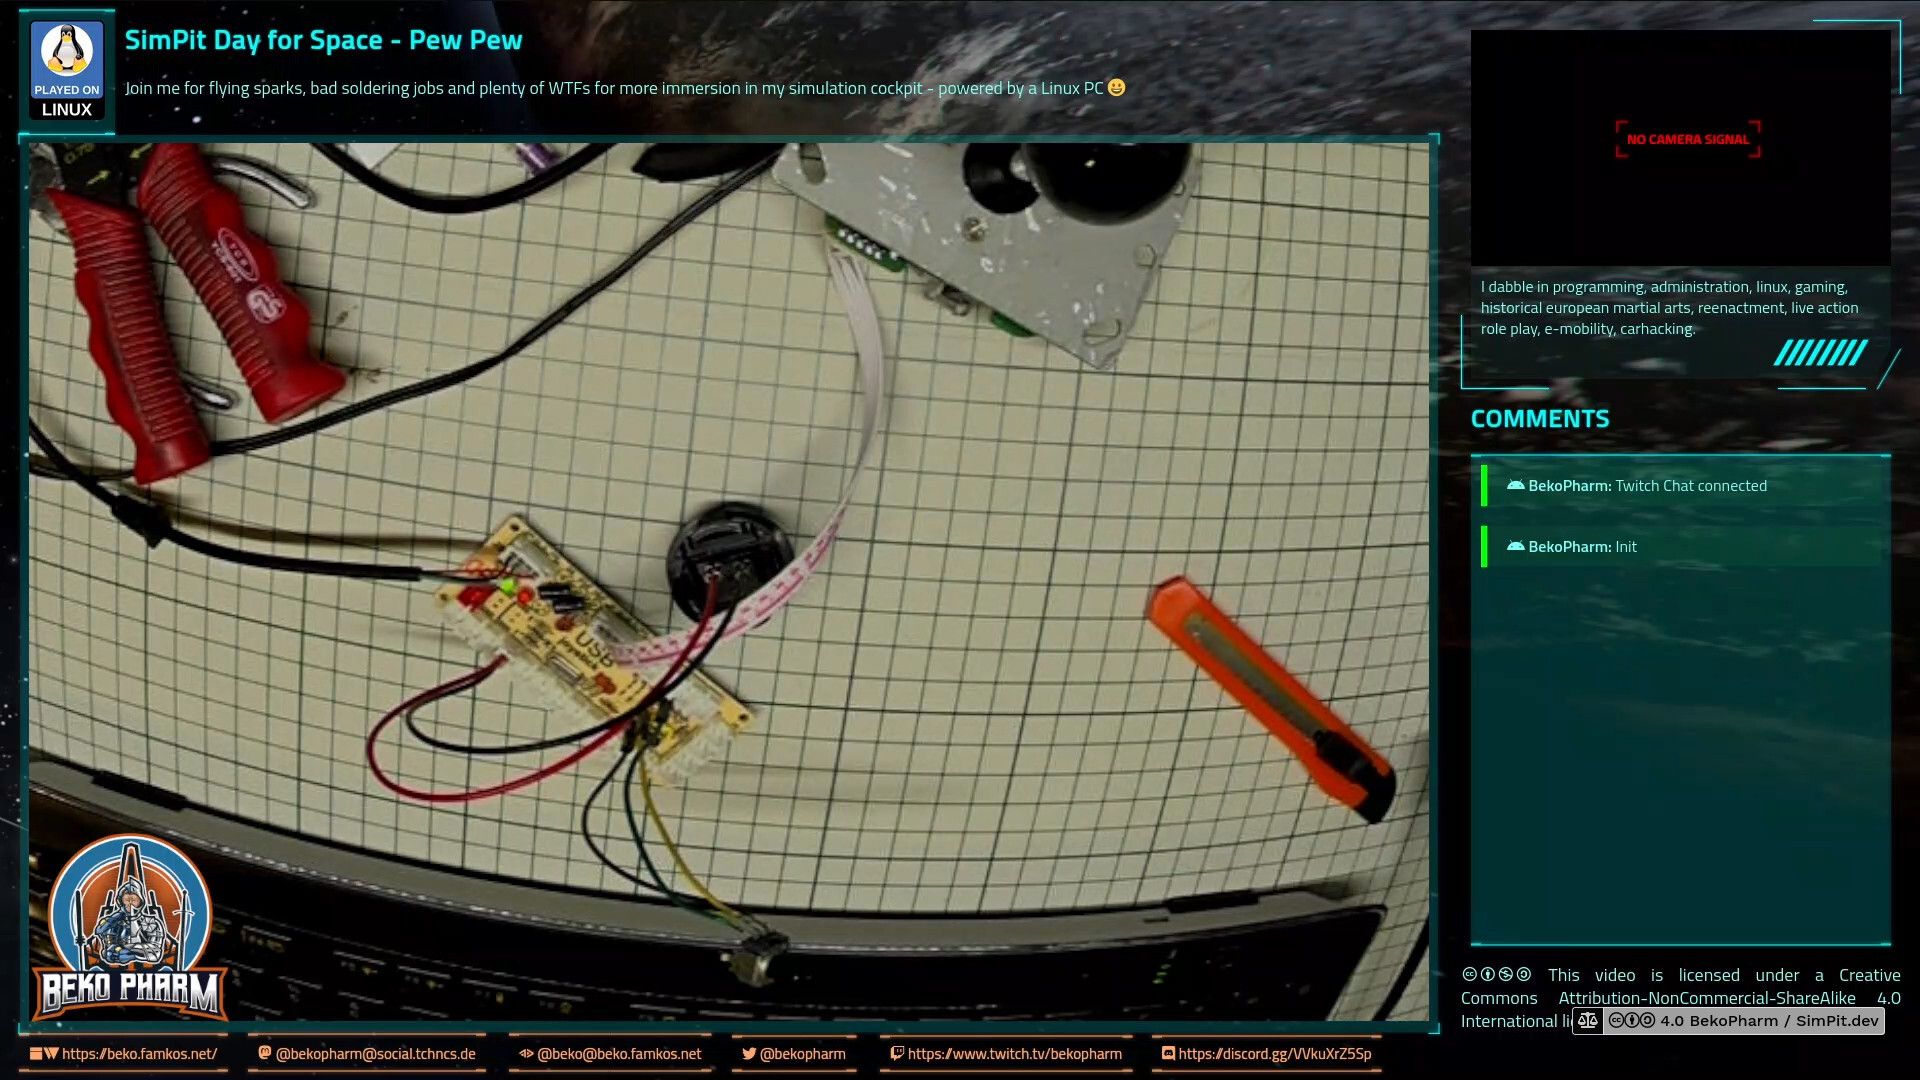
Test setup of the CY-822A with backlit buttons. Test was done with uninsolated connectors. Don’t do this at home!
Buttons
Each button is simply plugged into to a free connector and that’s it. My model came with two red connector to connect backlit buttons. I attached a lot more button LEDs with a DIY power distribution board to that figuring that USB 2 would allow for 500mA so there way plenty of wiggle room. Each LED needs ~30mA.
Add a potentiometer to that power distribution and you get dimmable LED.
Most of my push buttons are momentary switches labelled as Heschen but I kinda doubt that this is really the manufacturer. I found those when I was looking for a cheaper version of the Harmony XB6 series, that I really like. The Harmony line is almost 100% more expensive though and designed for real world scenarios and kinda out of question for a low budget toy.
Officially they are 12V but do fine with 5V. Dimming works. Each LED has it’s own VCC/GND but most models I got do not even care so they are very beginner friendly. The LED is always the same just coated with colored varnish. The removable caps are colored too. They come in various shapes, round, square, four-sided and also in latching editions.
I won’t go into details about potentiometers but I wrote some on this here. You’ll find plenty of tutorials on this on the internet as well.
Display
The 17,3" display is salvaged from an old broken laptop. The exact model of mine is a LP173WD1-TLE1 by LG Display. That’s a pretty generic model using Low Voltage Differential Signaling (LVDS). Such displays need a LCD Controller to drive it. Such a 3rd party controller can be obstained for ~30 EUR depending on it’s features. There are a bunch of basic models on the market and the only difference is usually the flashed firmware and the power configuration for the backlight of the specific display. So if you have a broken laptop around salvage this and check for the exact model number and pin count on it’s backside.
As you can see mine here does HDMI, DVI, SVGA. A speaker could also be connected. The controller is powered by 12V and the vendor claims it needs 3A but in reality 1.5A are more than enough though I didn’t test it’s limit with full brightness yet. This may as well be attached to an external PSU.
ICP from the inside
Here is a peek under the hood of my “ICP”. Now isn’t that ugly? Anyway. The shiny potentiometer was used for dimming all LED on the panel. They have their own circuit so I could switch this to an external PSU later and might even switch it to 12V someday. The other potentiometers are just various axis.
What about rotary encoders?
Version 1 had no rotary encoders at all. The CY-822A was modified to be able to deal with 4 potentiometers as analogue input but that’s it.
The buttons could all share a common ground saving some wires but it was easier this way because I had to plug the wires into an existing connector in the end anyway.
Rewiring
The whole box survived several design changes and different button loadouts until I settled with it’s layout. I also replaced the CY-822A with an Arduino Mega in the end because I was running out of possible inputs on two CY-822A controllers. This is explained in more detail in version 2 however.
The rewiring also introduced a more professional power distribution and a somewhat better cable management. The only really important thing here is that the Arduino Mega is powered from an external PSU as well.
Do not let magic smoke escape
Attention though: My model here has a VIN that is not secured by a diode so the moment the external PSU is shut of it would allow all the LED to draw power from VIN resulting in an early death of the Mega. I added such a diode to the wire connected to VIN to make sure that all the extra consumers are never drawing power from the Arduino. That pin is not even rated in my datasheet!
This content was created for an older version and is outdated. Check version 2 for an up-to-date description!
The MFDs (Multi-function display) are in reality just one display that I salvaged from an old laptop. It is not running GameGlass, like so many others SimPits out there do. Mostly because I’m not a fan of touchscreens or vendor lock-in. There is also the little detail that GameGlass is simply not available for my operating system and does not know about all the Space Pew Pew I usually do.
When I was evaluating what to use to program mine I was caught between the difficult choice to learn yet another fancy framework, like Raylib, that would do OpenGL ES 2.0 without X11 on the Raspberry Pi, or OpenFrameworks, or simply go with something I knew already.
Improving situational awareness by putting the video feed of a wingman / gunner on the central MFD.
In the end I just threw the might of my CoffeeLake at it and went with React since most of the data was already available via Node-RED over Websockets anyway. Also… Arwes is just so cool (alpha version or not) 🤩 and I had some experience with it thanks to my Streaming Overlay that I also wrote with Arwes. Connecting it to Node-RED was just a matter of installing Socket.IO to transport the messages. It was all a very hacky mess but it got the job done.
The source is not available and the used alpha version of Arwes is deprecated. I rewrote the hacky mess with version 2 that is also using the next gen of Arwes.
While seeking through the available data in the Status JSON of Elite Dangerous I noticed that I don’t get any airspeed from Elite. That’s not so important in space but kinda interesting in planetary flight to satisfy the flight sim gamer in me as well. I noticed though that I do get timestamped latitude, longitude and altitude values so shouldn’t it be possible to “simply” calculate this, right? Right?
An Auto Flight System for Elite?
This was when I dived into the rabbit hole of calculating airspeed and heading on planetary objects using a spherical coordinate system and while I didn’t nail it exactly how Elite does it the result is close enough. The game provides the required data to go crazy here – most important the radius of the current object. In theory I could start writing some primitive AFS (Auto Flight System) routines now, which I’m totally going to explore at some point in the future just because 🤓
Checking my maths – yes, altitude is added to the mix so airspeed is mostly correct as long as no rapid course changes are made.
Conclusion
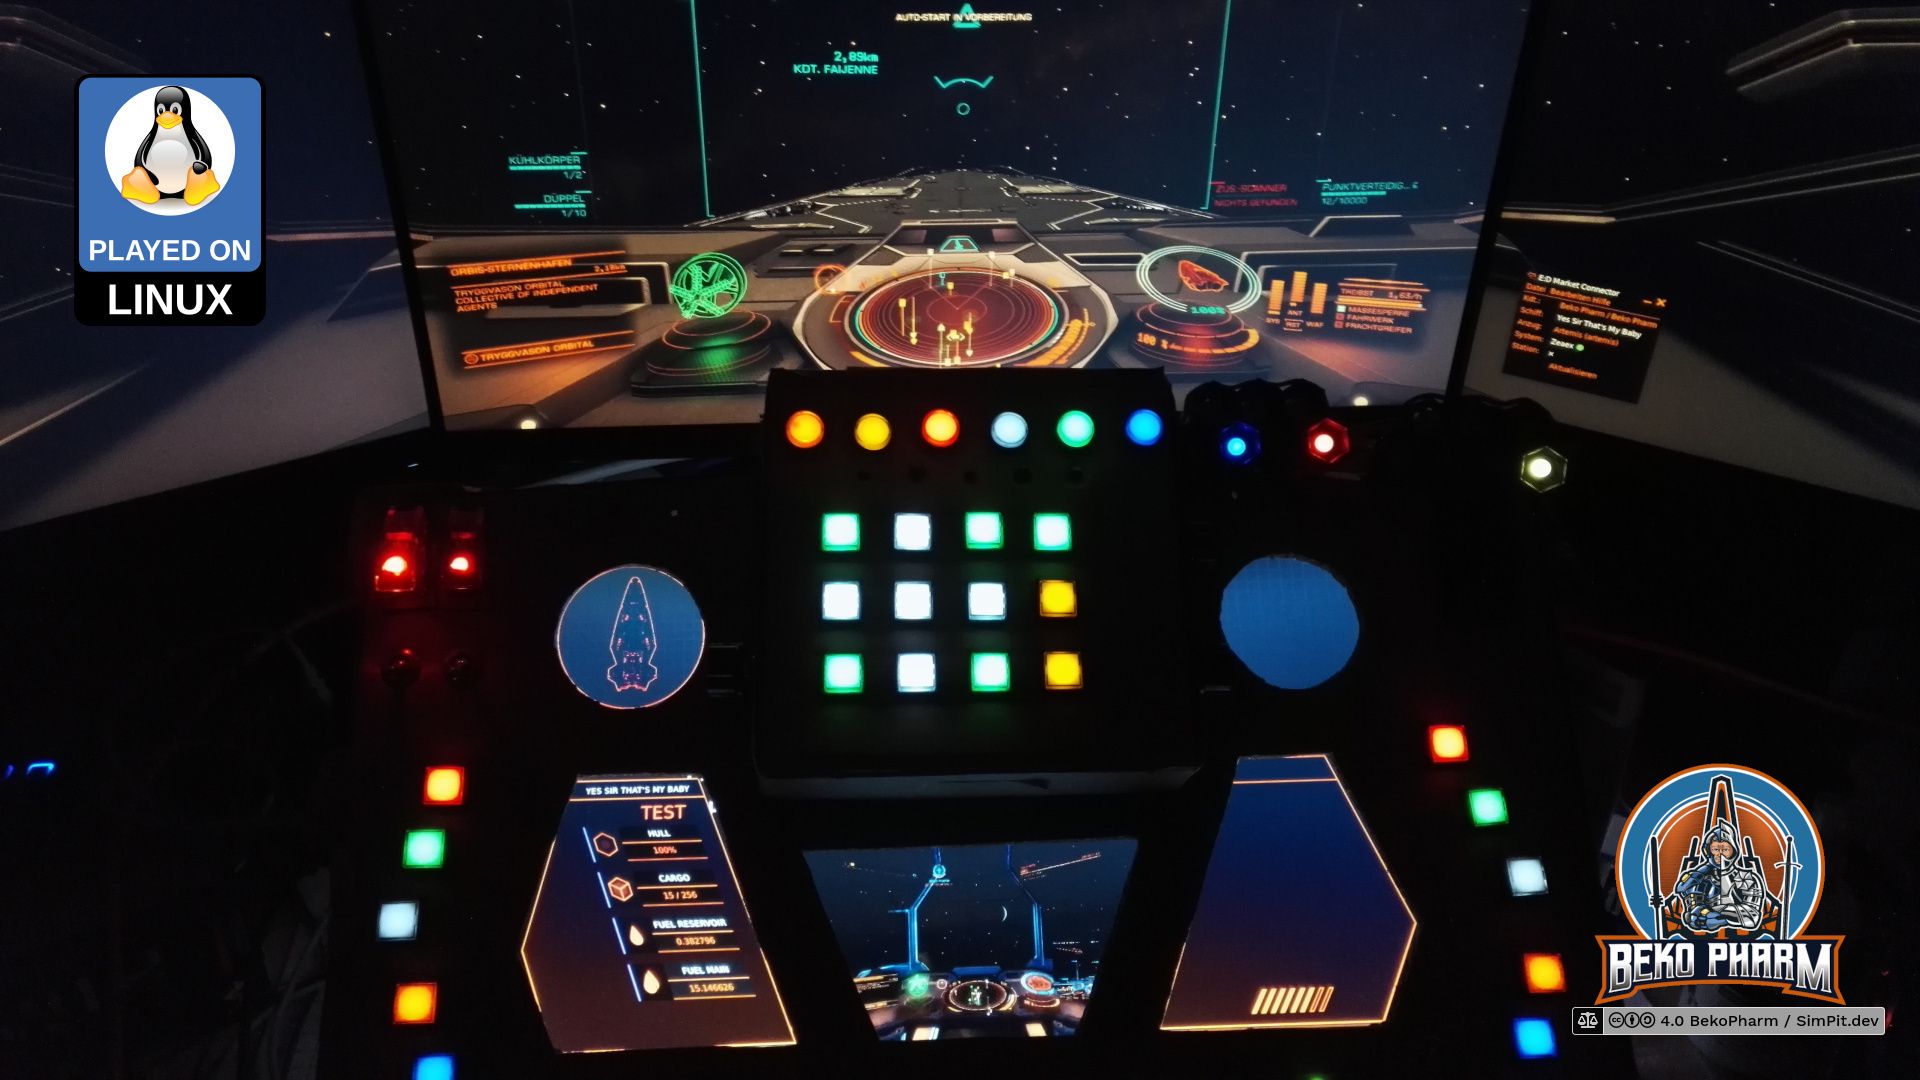
After spending way too much time with this and the Pythagorean theorem (Yes mum, a game made me do maths. MATHS! 🤯) I settled with some calculations and data for my current ship to the right and targeted ship data on the left. This is sort of tricky because many game events update different parts of the data so timestamps have to be kept in mind and a game specific parsing strategy is required. See the last part of the demonstration video here to get an idea how this looks.
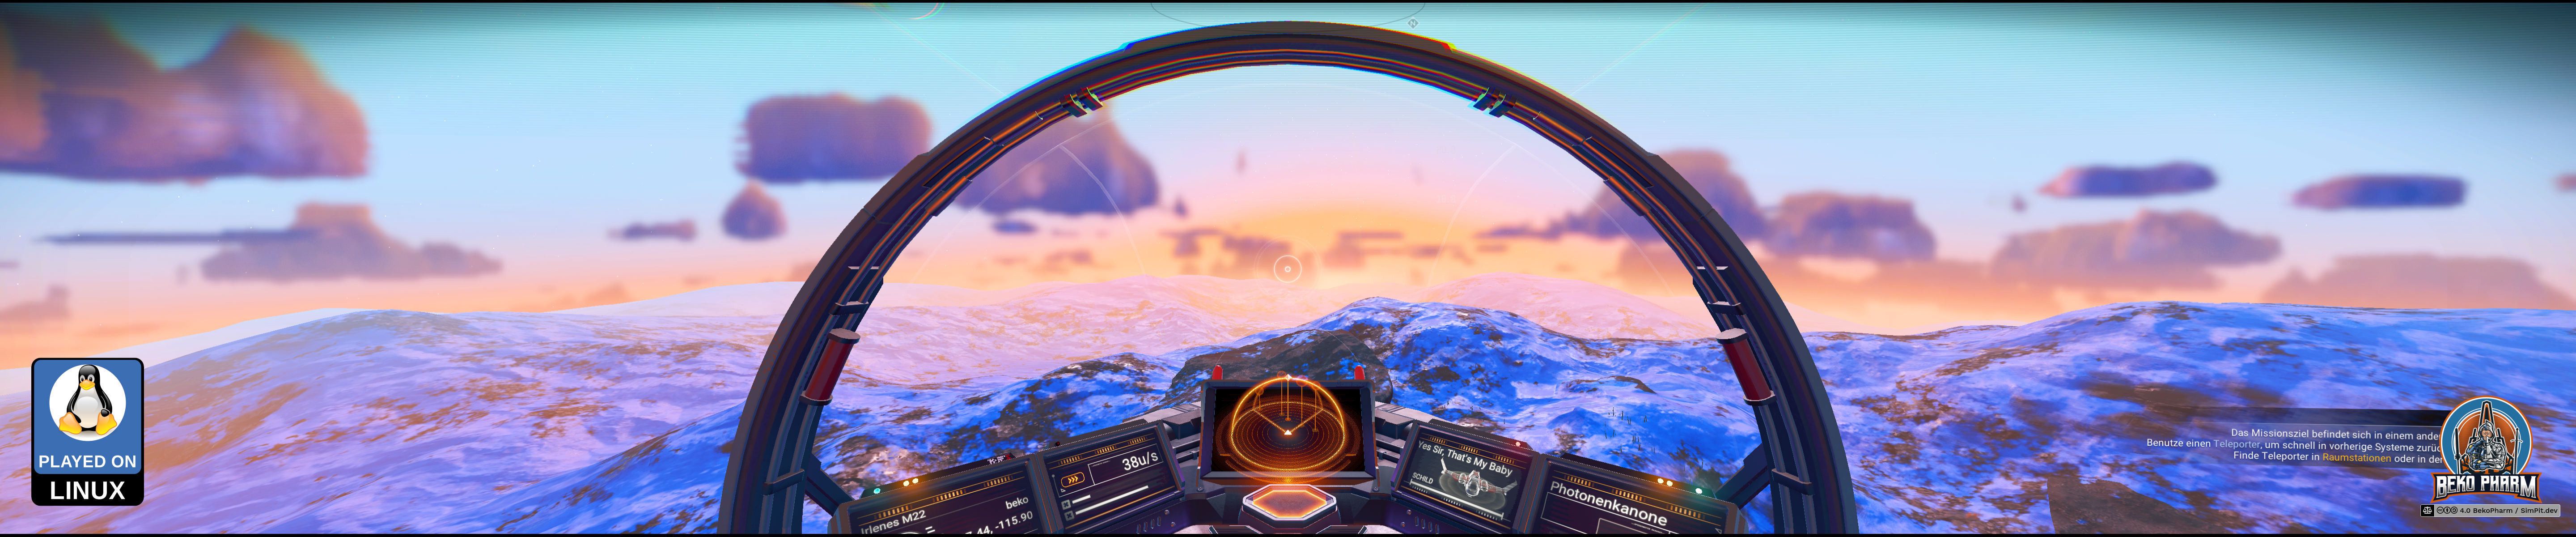
The Primary Flight DisplayPFD is loosely based on a modern aircraft instrument and is added to the MDF automatically near planetary surfaces e.g. when descending on a planet in Elite Dangerous or when hooning around in Fly Dangerous.
Not a pilot
Far from it. In fact I don’t even enjoy “real” flying. Aviation does have a certain effect on me though and I’m even sometimes found at an airfield.
And while I can crash a virtual Cessna anywhere nowadays, and even got some other virtual planes in the air, I’m not qualified for any real flying.
Please keep this in mind for everything on this page especially when I describe any flight systems of mine.
This reduces the screen space for other system messages somewhat but is totally worth it. It comes also with the proper visuals for selected airspeed, heading and altitude. The vertical speed is still missing but on my list. I went totally overboard with showing a Mach indication over 0.5 Mach as well 🤓 (Yes, yes you Mr. Smartguy over there. I know this is not 100% correct, doesn’t work for other planets and we don’t even have pressure values from a Pitot Tube. Go get yourself a juicebox. This is for a game!)
The following video is from the development of the PFD and is fed with random mock data.
On precision
Flight instruments usually display data in realtime. This is not possible with some games like Elite Dangerous that drop data only after a certain threshold was reached. Other games, like Fly Dangerous have a real hose of a data stream going and allow thus for way more precise data. In the end it’s just a game though so who cares how exact this gimmick is when we race around with speed that would leave us splattered all over the next bulkhead in reality.
I’m still tweaking this while gaining more experience. It works pretty decent already though, which can be observed in this demo playing Fly Dangerous.
There is also an unlisted demo video in 4K available on YouTube. It’s from an earlier development phase though and a lot more clunky so keep that in mind: https://www.youtube.com/watch?v=MC-XpirO920
I’ve yet to record a better demonstration of this.
This is one of the oldest parts of my SimPit. This DIY head tracker is made of cardboard and in use for over two years now. It may be ugly but it gets the job done.
I wrote a detailled blog post on it’s construction and also made a video of the making process.
I get asked often how this is configured and while there is no one-size-fits-all setting I do have some pointers on this. The most important part is setting up the camera correctly. For this I use v4l2ucp which allows me to tune various parameters. We want as manyFPS (frames per second) as possible. For this I dial the Exposure way down and disable any automatic gain and focus. Cameras tend to maximize this when they only get darkness and this kills the FPS on most webcams. Some other parameters like Contrast or Gamma may be tweaked as well to make the detection for Opentrack easier.
More settings are available in Opentrack. The part that gets often overlocked are the Mapping properties where a Max input and curves can be configured for each axis. Make use of this! Especially for Pitch where only small movements are usually desired to have a greater effect while Yaw wants total opposite settings of this with a triple head setup 🖥️🖥️🖥️.
This works on Linux???
Hell yes. I jumped many hoops for various games to this day and have a pretty good track record by now. I demo a lot of that on my YouTube channel and on the blog. I’m also going to add some game specific chapters here and add head tracking notes whenever needed.
On Linux PC I did usually compile Opentrack with the Wine Glue, patch in my custom appdata folder for Proton and hope that it’s still ABI compliant to Just work™. Alas recent Proton is sandboxed within pressure vessel and the usual approach of memory mapping is simply no longer working, if I got the gist of this right.
So my current strategy is to download and drop the Windows build of Opentrack into the game folder and chain-load the EXE with the game where the OpentrackEXE would listen on UDP while my native OpentrackBIN would send via UDP. A task not made easy with Proton but it is possible. The following snippet may give you some pointers. You will have to adjust it for your needs:
#!/bin/bash
# 359320 is a Steam game app ID, in this case 359320 = Elite Dangerousexport STEAM_APP_ID="359320"export STEAM_COMPAT_DATA_PATH=/games/steam/steamapps/compatdata/$STEAM_APP_ID
export STEAM_COMPAT_CLIENT_INSTALL_PATH="$HOME/.steam/steam"cd "/games/steam/steamapps/common/Elite Dangerous/opentrack2/install"python3 /games/steam/steamapps/common/Proton\ -\ Experimental/proton run opentrack.exe
Why running Opentrack twice? The native build performs a lot better with my webcam and every frame really counts here. Reading data via UDP is not much of a burden for Proton. This also saves me the trouble of fiddling with Wine Glue, a painful compile process nobody should endure involving installation of many many additional 32-bit libraries. Hilarious but it works.
Compiling with Wine Glue
You have been warned but this is how it basically works once all required developer packages are installed, that includes the wine-devel packages for i686 (and libevdev if you want virtual joystick support). On Fedora Linux you’d for example also need cmake git qt5-qttools-devel qt5-qtbase-private-devel and procps-ng-devel opencv-devel libevdev-devel. Adapt to your own needs.
git clone https://github.com/opentrack/opentrack
cd opentrack
mkdir build
cd build
ccmake ../
make -j4
make install
./install/bin/opentrack
The important part is to tick the SDK_WINE option or we don’t get the precious Wine Glue. Here, have a video:
How Opentrack works
Please do keep in mind that I never touched any head tracking before so I had to grasp the theory behind all this first.
Funny enough a Kerbal Space Program extension on GitHub provided me with the idea how TrackIR is supposed to function: https://github.com/pizzaoverhead/KerbTrack/blob/master/KerbTrack/TrackIRClient.cs#L45 so let’s clear that one up: The code looks for the registry entry Software\\NaturalPoint\\NATURALPOINT\\NPClient Location that points to the NPClient.dll (or NPClient64.dll) which in turn in loaded by the executable if found and accessed.
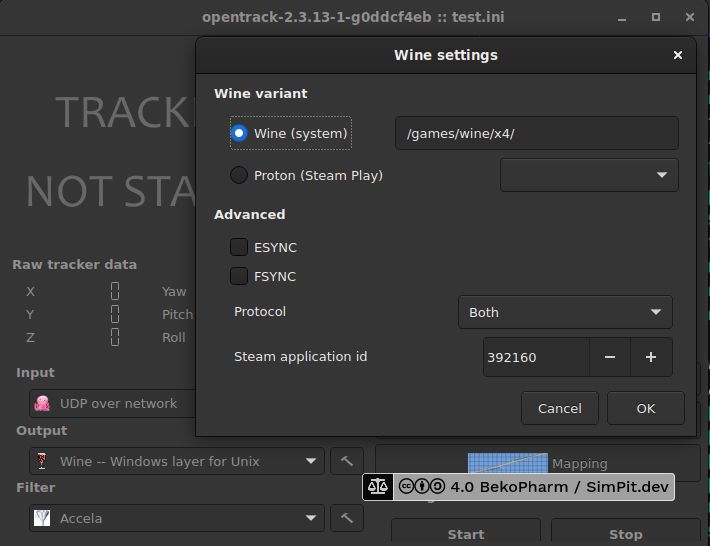
So what Opentrack does is once it’s started and configured to use Wine - Windows layer for Unix as Output: It “injects” the key [Software\NaturalPoint\NATURALPOINT\NPClient Location] to the user.reg of the configured Wine/Proton prefix on start. The also started opentrack-wrapper-wine.exe.so is used for the shared memory mapping – means from my understanding from the Opentrack binary to some Wine process. TrackIR.exe is just a dummy that may also be run with Wine but does nothing. It’s apparently for games that check for a process with that name before they initialize head tracking features. Neat, huh?
For this to work you have to click on the little hammer symbol next to Output so make sure that your Wine Prefix is properly configured or Opentrack may insert the registry key to the wrong Wine prefix.
MoltenGamepad is a flexible input device remapper, geared towards gamepads. The development of this slowed down but it is perfectly functional. I use it mostly to slice my X52 Pro into several virtual gamepads for games that do not support joysticks (or fail to detect mine).
What I didn’t scratch yet is it’s command support via FIFO or socket for controlling a running instance via scripting but that is totally on my bucket list.
This software has to be compiled from source which is usually just invoking make after installing required dependencies. There is a helper script in installation/check_installation.sh that sets up required udev rules and allows running this software as user.
Launch parameters
Example to start with two virtual gamepads:
./moltengamepad –num-gamepads 2 –mimic-xpad
Once started press first a mapped button for the first gamepad to assign it. After that press a mapped button for second gamepad to assign it:
No moltengamepad.cfg found.
driver: wiimote driver initialized.
driver: x52_pro_controller driver initialized.
plug: x52_1 added
plug: x52_2 added
stdin: ready to read commands from standard input. Try "help" for more info.
slot: x52_1 assigned to slot virtpad1
slot: x52_2 assigned to slot virtpad2
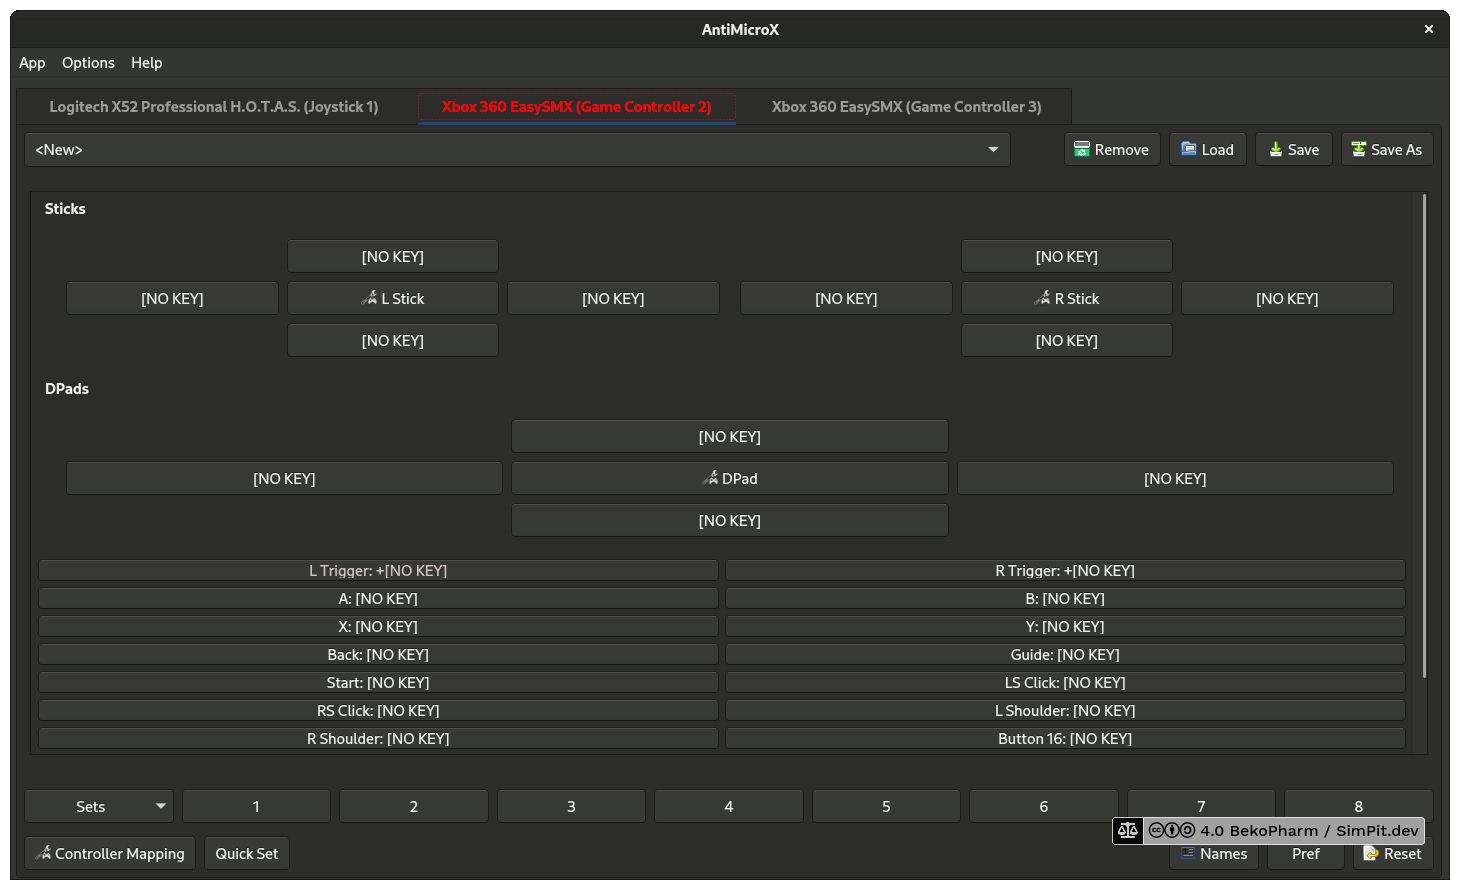
And this is how it looks e.g. in AntiMicroX:
Configuration
The configuration is dropped in ~/.config/moltengamepad/gendevices/x52-pro.cfg. I do this automatically via a script depending on the game I’m starting. I know this is not how this is supposed to be done but wrapping my head around a configuration for MoltenGamepad was a pain in the neck to begin with because not many examples exist.
[events="superset" vendor="06a3" product="0762" driver="hid-generic"]

# 06a3:0762
# Options file is license as WTFPL http://www.wtfpl.net/
# Slices most of an X52 Pro into 2 virtual gamepads

name = "x52_pro_controller"
devname = "x52_"
exclusive = "false"
change_permissions = "false"
flatten = "false"
rumble = "false"
split=2
1.device_type = "gamepad"
2.device_type = "gamepad"

# btn_east = "cross", "The cross (X) button"

# Event mappings

# 1.key(288) = "cross", "Primary fire button"
1.btn_trigger = "left_trigger", "Gun Button Step 1"
# 1.key(302) = "right_trigger", "Gun Button Step 2"
1.btn_trigger_happy15 = "bbb", "Gun Button Step 2"

1.btn_thumb2 = "a", "A button"
1.btn_top = "b", "B button"
1.btn_top2 = "x", "C button"
1.btn_thumb = "y", "Safety fire button (Fire 2)"
1.btn_pinkie = "guide"
1.btn_base2 = "button_16"

1.abs_x = "left_x", "Left stick X axis"
1.abs_y = "left_y", "Left stick Y axis"
1.abs_rz = "right_x", "Right stick X axis (Z axis)"
1.abs_z = "right_y", "Right stick Y axis (Throttle axis)"
1.abs_hat0x = "leftright", "HAT POV up"
1.abs_hat0y = "updown", "HAT POV right"
1.btn_trigger_happy4 = "right_thumb", "POV2 up"
1.btn_trigger_happy5 = "right_shoulder", "POV2 right"
1.btn_trigger_happy6 = "left_thumb", "POV2 down"
1.btn_trigger_happy7 = "left_shoulder", "POV2 left"

2.btn_trigger_happy3 = "left_trigger", "Scrollwheel click"
2.btn_dead = "right_trigger", "Mouse button (click)"
# 2.btn_trigger_happy15 = "x", "I button"

2.btn_base = "a", "D button"
# 2.btn_base2 = "b", "E button"

2.key(719) = "left_shoulder", "Function button"
2.key(722) = "left_thumb", "Function page up"
2.key(723) = "left_thumb", "Function page down"
2.key(726) = "right_shoulder", "MFD select button"
2.key(724) = "right_thumb", "MFD select button up"
2.key(725) = "right_thumb", "MFD select button down"

2.abs(004) = "left_x", "Left stick X axis"
2.abs(003) = "left_y", "Left stick Y axis"
2.abs(040) = "right_x", "Mouse X"
2.abs(041) = "right_y", "Mouse Y"
2.btn_trigger_happy8 = "up", "Throttle POV up"
2.btn_trigger_happy9 = "right", "Throttle POV right"
2.btn_trigger_happy10 = "down", "Throttle POV down"
2.btn_trigger_happy11 = "left", "Throttle POV left"
2.btn_trigger_happy17 = "start_stop", "Start/Stop"
2.btn_trigger_happy18 = "back", "Reset"

# Aliases

# 1.btn_trigger = "primary"
alias primary a
alias secondary b
alias third x
alias fourth y

alias start start_stop
alias select back
alias mode guide

alias thumbl left_thumb
alias thumbr right_thumb

# right shoulder
alias tr right_shoulder
# right trigger
alias tr2 right_trigger
# left shoulder
alias tl left_shoulder
# left trigger
alias tl2 left_trigger
[events="superset" vendor="06a3" product="0762" driver="hid-generic"]

# 06a3:0762
# Options file is license as WTFPL http://www.wtfpl.net/
# Maps _some_ buttons of an X52 Pro to a virtual gamepad for No Man's Sky

name = "x52_pro_controller"
devname = "x52_"
exclusive = "false"
change_permissions = "true"
flatten = "false"
rumble = "false"
device_type = "gamepad"

# Event mappings

btn_trigger = "a", "A button (Fire Weapons)"
btn_thumb2 = "a", "A button (Fire Weapons)"
btn_top = "b", "B button (Boost)"
btn_top2 = "x", "C button (Langing/Exit Ship)"
btn_thumb = "y", "Safety fire button (Fire 2)"
btn_pinkie = "guide"

abs_x = "left_x", "Left stick X axis"
abs_y = "left_y", "Left stick Y axis"
abs_rz = "right_y", "Right stick Y axis (Throttle axis)"
abs_hat0x = "leftright", "HAT POV up"
abs_hat0y = "updown", "HAT POV right"
btn_trigger_happy4 = "right_thumb", "POV2 up"
btn_trigger_happy6 = "left_thumb", "POV2 down"
btn_trigger_happy5 = "right_shoulder", "POV2 right"
btn_trigger_happy7 = "left_shoulder", "POV2 left"

# hat from throttle:
btn_trigger_happy8 = "up", "Throttle POV up"
btn_trigger_happy9 = "right", "Throttle POV right"
btn_trigger_happy10 = "down", "Throttle POV down"
btn_trigger_happy11 = "left", "Throttle POV left"

btn_trigger_happy17 = "start_stop", "Start/Stop"
btn_trigger_happy18 = "back", "Reset"

# thumb button
btn_trigger_happy15 = "b", "B button (Boost)"

alias primary a
alias secondary b
alias third x
alias fourth y

alias start start_stop
alias select back
alias mode guide

alias thumbl left_thumb
alias thumbr right_thumb

# right shoulder
alias tr right_shoulder
# right trigger
alias tr2 right_trigger
# left shoulder
alias tl left_shoulder
# left trigger
alias tl2 left_trigger
A lot of my inspiration and motivation comes from other simulated cockpits out there. Too many exist to list all (and at some point do most projects often go very quiet…) so I’ll keep this list restricted to mostly Space Pew Pew as this is my focus. I’m the only one doing all this crazy on a Linux PC though, from what I can tell.
It’s fascinating to see other constructions and how everyone uses materials or software best known to them to scratch their own itch. Every SimPit is highly individual and made for a certain purpose. All unique and all beautiful in their own way. I hope mine inspires someone else to create someting very unique on their own too.
A collection of cockpit building how-to’s and ideas
This cockpit has not just shiny buttons in my favorite color but also some really awesome transistions on the MFDs. It’s used to play Elite Dangerous, X4: Foundations and Star Citizen. It was one of the first SimPits I stumbled over that inspired me to roll my own.
Come see my SimPit builds, and other games and play related maker things. There’s building and thinking going on. This is a channel for the creative geeks, the ones that not only consume, but also create geek culture, in one form or another.
Jon is one of a kind. I found his channel Creative Geek when I was evaluating Node-RED for my plumbing pipeline and was delighted to find another Elite Dangerous cockpit made with cardboard. In the meanwhile he constructed a whole cockpit (with two seats!) that does not only feature blinken lights but also really geeky stuff like a smoke machine. For the little extra when damage becomes critical 🤯
I’m just a middle-aged guy, father of two children, DIYer with various assortment of skills and a marketing professional from Finland who got carried away with building a home / virtual / simulation cockpit (or just simpit) and playing some games with it. Mostly I play Star Citizen and DCS but I’m planning occasionally try other games like FS2020.
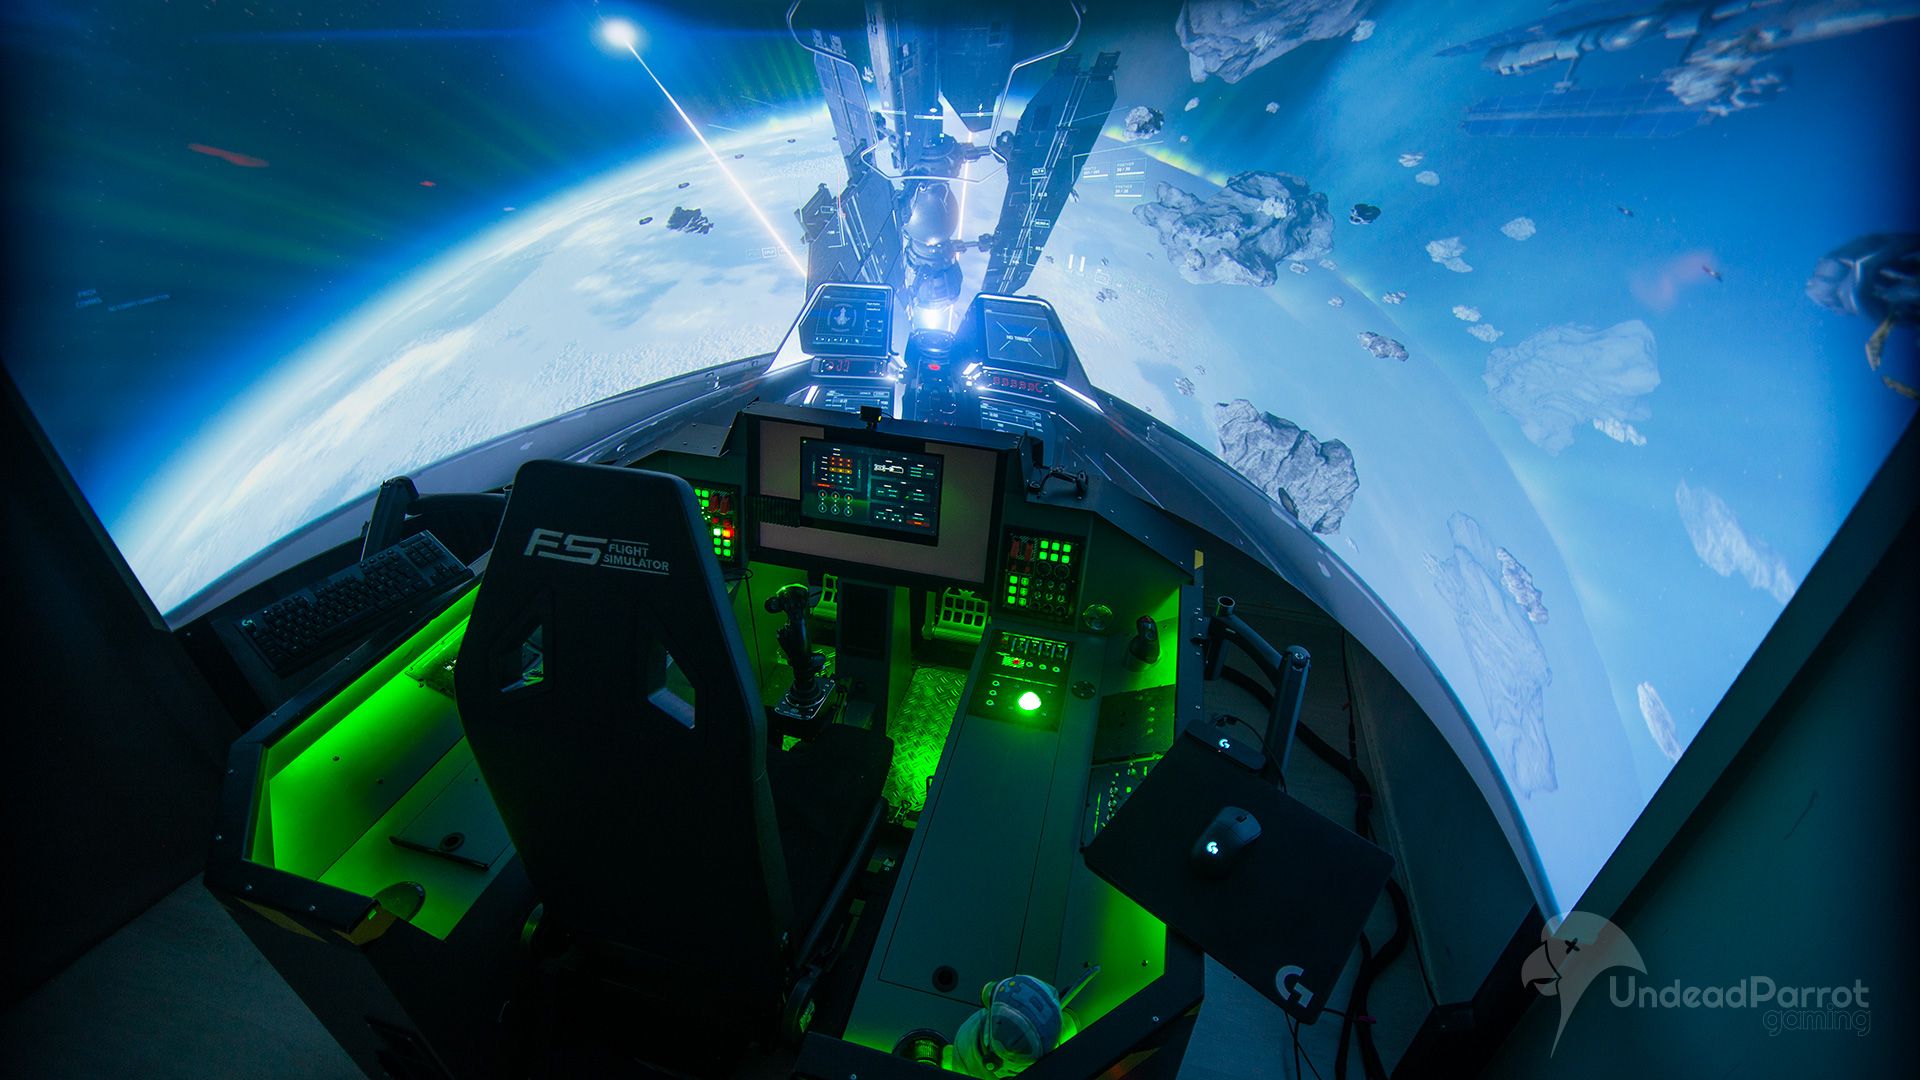
Here is another amazing SimPit for Space Pew Pew by UndeadParrot that evolved quite a lot over the time. The latest iteration features two projectors and a curved canvas for the total immersion - all DIY and with public available construction plans!
Playing games using the ultimate Simpit setup. Including multiple viewpoint streams and teamplay.
I love everything about this setup. The targeting computer, the alignments of the buttons, that FTL key (in the older videos), the constant evolving of the SimPit and the detailled description how everything was made. Absolutely underrated channel.
I wasn’t the first building a VF-1 cockpit. Here is another awesome Macross inspired SimPit by Thomas "JarJar" Ganshorn that I learned of on the XWVM Discord. The project has a dedicated SimPit channel and JarJar kindly provided me with lot of images of this build when I showcased my own build progress 👍
There are a bunch of videos showcasing Elite Dangerous with my Primary Buffer Panel on my YouTube and PeerTube accounts.
Launch parameters
Like most games does this one also not detect a screen layout but only the primary display on a Linux PC so it won’t offer the maximum resolution possible e.g. with a triple head setup 🖥️🖥️🖥️. This can be worked around in multiple ways, e.g. with configuring a virtual desktop in the WINEPREFIX, by adding a virtual monitor to the system or simply by making use of gamescope, the SteamOS session compositing window manager.
Here is an example how games may be started from Steam by adding the following commands to the start parameters (That’s basically the same for e.g. Lutris btw).
This is not needed if only one monitor is used for gaming.
I launch Elite Dangerous from Steam and for most people it’ll be just click Play. Elite had this atrocious overloaded and slow launcher though so I switched to MinEdLauncher instead, which would also kindly chainload further 3rd party apps for me.
The new launcher Elite Dangerous got a few weeks ago is a lot faster and also very minimalistic. Good thing we have choices though. Here are a bunch of ways I launch Elite depending on what I’m going to do:
Launch within gamescope for proper screen size, show MangoHud overlay, use MinEdLauncher and launch directly into Elite Dangerous: Odyssey:
Start MinEdLauncher from a gnome-terminal and launch directly into Elite Dangerous: Odyssey while allowing access to the Vulkan rendering for recording in OBS Studio
Star Citizen does not export any kind of API to fiddle with. Sadly I doubt it’ll ever happen. Heck they even added EAC recently and the moment someone even mentions this they get dogpiled by competitive players whining that this would make bots possible. No, this is not how computers work. Bots happen with or without a provided API.
Anyway, this is why I can not really show live game data on the MFD or control the status indicators properly. I can only guess based on button presses what they should currently display but that is off fast. Heck, even the game itself has broken status indicators, like stuck missile warnings or a broken Altimeter.
There are a bunch of videos showcasing Star Citizen with my Primary Buffer Panel on my YouTube and PeerTube accounts.
Launch parameters
This is one of the few games that I do not have on Steam for obvious reasons. Lutris has me covered though and the Star Citizen Linux User Group (LUG) does a very of a good job in maintaining the lug-helper scripts collection for easier installation and configuration of Star Citizen on Linux PC. It also takes care of the still persisting EAC issue for Linux gamer: https://github.com/starcitizen-lug/lug-helper
Referral Code
Yeah no. Fck this 💩. Get on the hype train or leave it. Personally I got the Aurora starter package for my birthday and that’s it. It’s an awesome tech demo, a great walking simulator and a bug feast with a very… unhealthy community forum. It’ll also probably never finish.
I’ll keep watching from the sides but I won’t pour any money into this until the focus shifts more to simulation that is not even more PvP. This includes an often requested API.
Ah yes… my favorite space sandbox. One of the games I keep blogging about a lot. This is the game I hacked a LUA plugin for to get game data out of the game. I’m also sideloading LuaSocket for the communication with my plumbing pipeline. I’ve yet to write up in detail how I managed to do this but the socket server implementation is already avaiable on https://github.com/bekopharm/x4-projects/wiki/Quick-manual
There are a bunch of videos showcasing X4: Foundations with my Primary Buffer Panel on my YouTube and PeerTube accounts.
Launch parameters
Nothing special. The game does offer the proper resolutions even for a multihead setup in windowed mode. I usually run it like this so sound and rendering doesn’t stop when the game looses window focus:
./X4 -nosoundthrottle -nocputhrottle -skipintro
It also allows resizing of the game window so this can even be scripted e.g. with wmctrl when the game is already running:
wmctrl -x -r X4.X4 -e 0,0,109,5760,1100
Takes a few second to re-init rendering though.
Head tracking
The head tracking is explained in great detail here. Sadly I’d have to settle with Wine because the native Linux version has no head tracking capabilities. I tried to feed this via UDP from my own extensions but the camera setter function is sadly not exposed in the API and will probably never be (I asked).
Best I can do is triggering the camera hotkeys for each corner via a virtual joystick device from Opentrack. Something still on my list to test is emulating mouse input for a free lock-around. This does usually block other joystick axis though so it may not be feasible.
The current solution works, albeit it’s not perfect.
This game works internally basically like X4 so it may be possible to get everything going but frankly I never bothered. In fact many X4 extensions re-use content from Rebirth and it’s modding wiki is one of my most important sources for X4 too.
I mostly list it here because I do start it on occasion for it’s story. It also looks a lot more alive than X4 and is not that resource hungry. There’s also a VR version but I don’t own any VR hardware so I never tried.
Launch parameters
Like most games does this one also not detect a screen layout but only the primary display on a Linux PC so it won’t offer the maximum resolution possible e.g. with a triple head setup 🖥️🖥️🖥️. This can be worked around in multiple ways, e.g. with configuring a virtual desktop in the WINEPREFIX, by adding a virtual monitor to the system or simply by making use of gamescope, the SteamOS session compositing window manager.
Here is an example how games may be started from Steam by adding the following commands to the start parameters (That’s basically the same for e.g. Lutris btw).
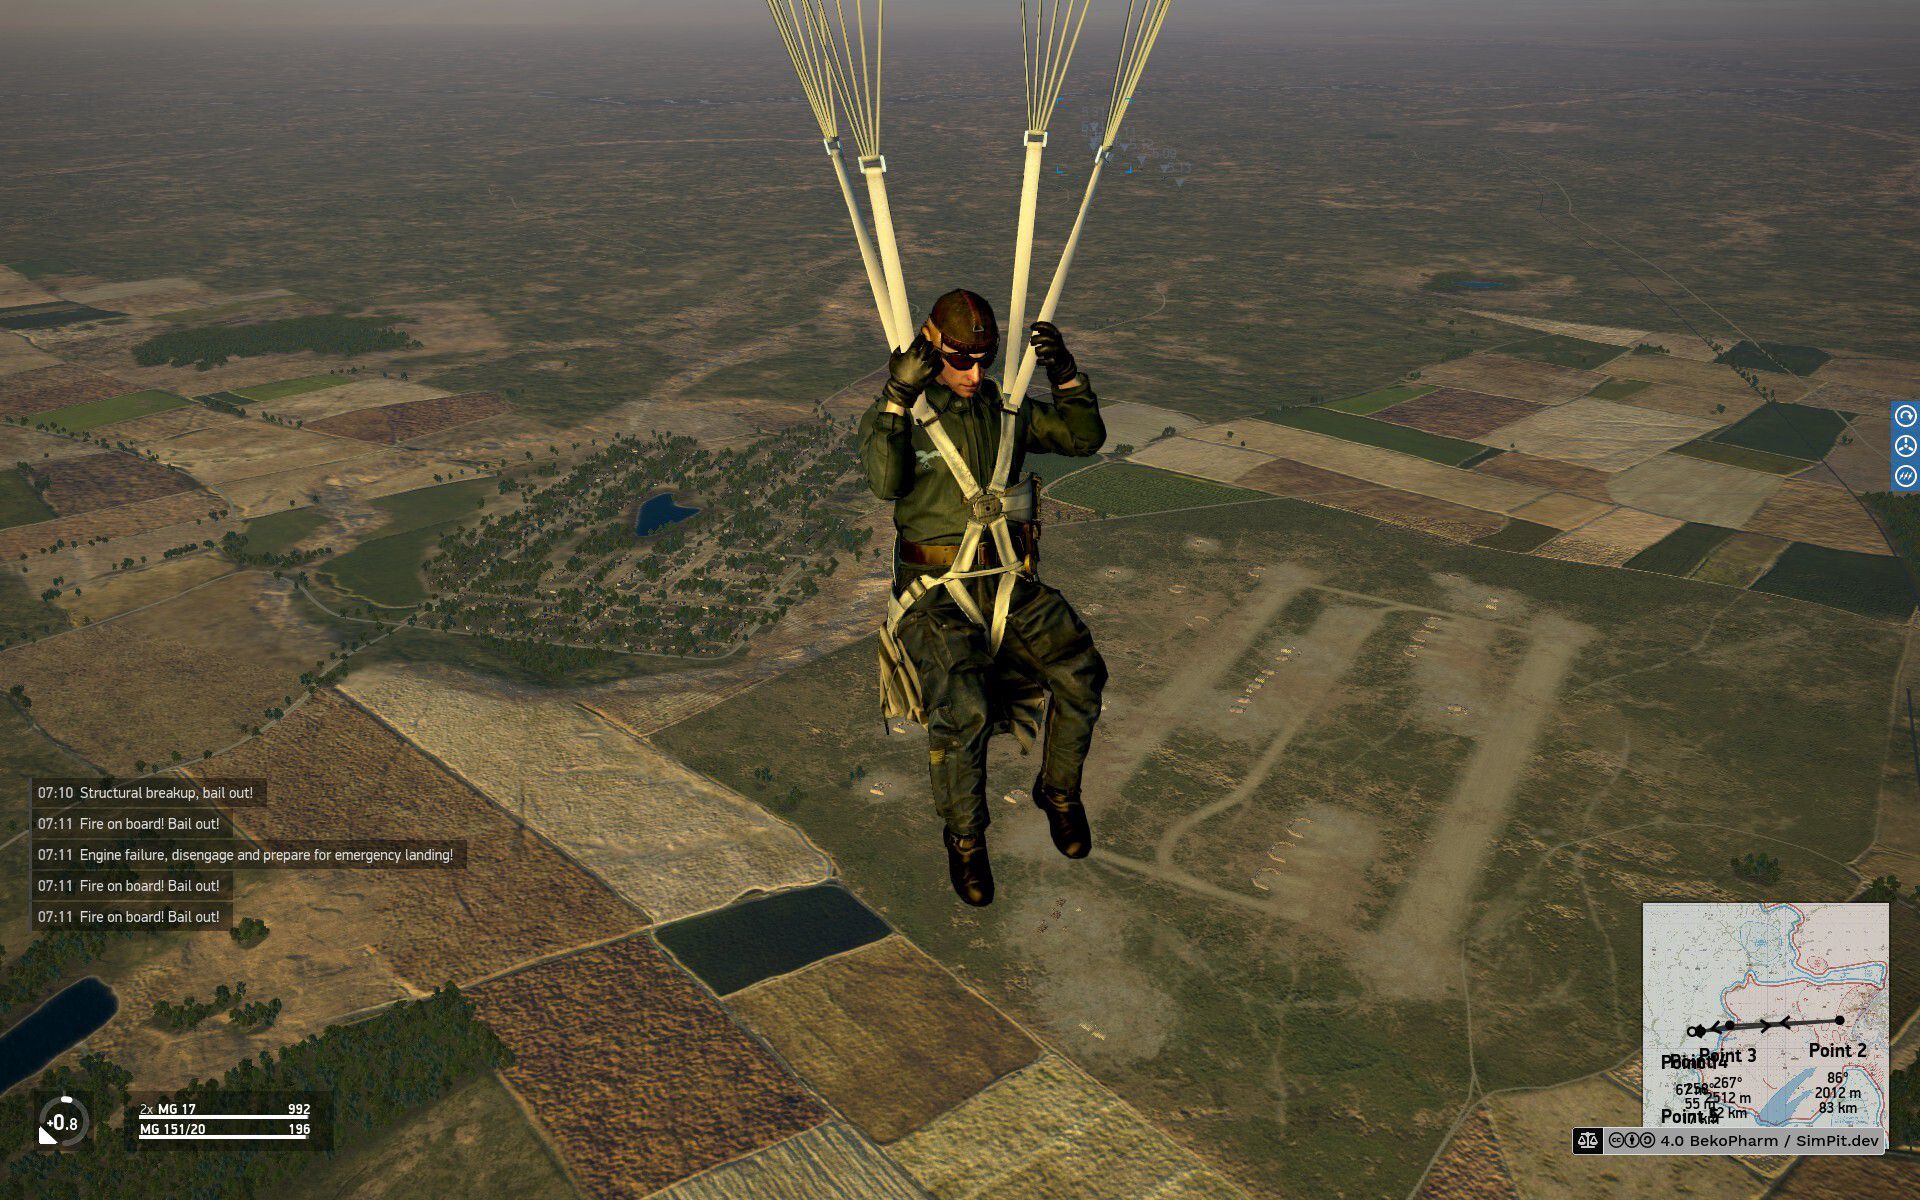
I honestly can’t tell any more. I think most of this worked but I didn’t play it for years. I’ve yet to try this once more but my sporadic interest in this period is usually very short. Nevertheless I did play it sometimes usually with me ending parachuting down to the ground (or dying in a burning cockpit) 🤷
Launch parameters
Like most games does this one also not detect a screen layout but only the primary display on a Linux PC so it won’t offer the maximum resolution possible e.g. with a triple head setup 🖥️🖥️🖥️. This can be worked around in multiple ways, e.g. with configuring a virtual desktop in the WINEPREFIX, by adding a virtual monitor to the system or simply by making use of gamescope, the SteamOS session compositing window manager.
Here is an example how games may be started from Steam by adding the following commands to the start parameters (That’s basically the same for e.g. Lutris btw).
I don’t think House Of The Dying Sun has any API to connect to at all. I never bothered. It’s fun but very very short. I’m also unsure if this game supports HOTAS or any joystick at all.
Head tracking works flawless.
There are a bunch of videos showcasing House Of The Dying Sun on my YouTube and PeerTube accounts.
Launch parameters
This remaps a X52 joystick to a gamepad and starts the game in Steam.
SDL_GAMECONTROLLERCONFIG=“03000000a3060000620700001101000016991890,Logitech X52 Professional H.O.T.A.S.,platform:Linux,a:b2,b:b3,x:b4,y:b1,back:b9,start:b8,guide:b10,leftshoulder:b30,rightshoulder:b6,leftstick:b7,rightstick:b15,leftx:a0,lefty:a1,rightx:a5,righty:a2,lefttrigger:b0,righttrigger:b5,dpup:b19,dpleft:b22,dpdown:b21,dpright:b20,” %command%
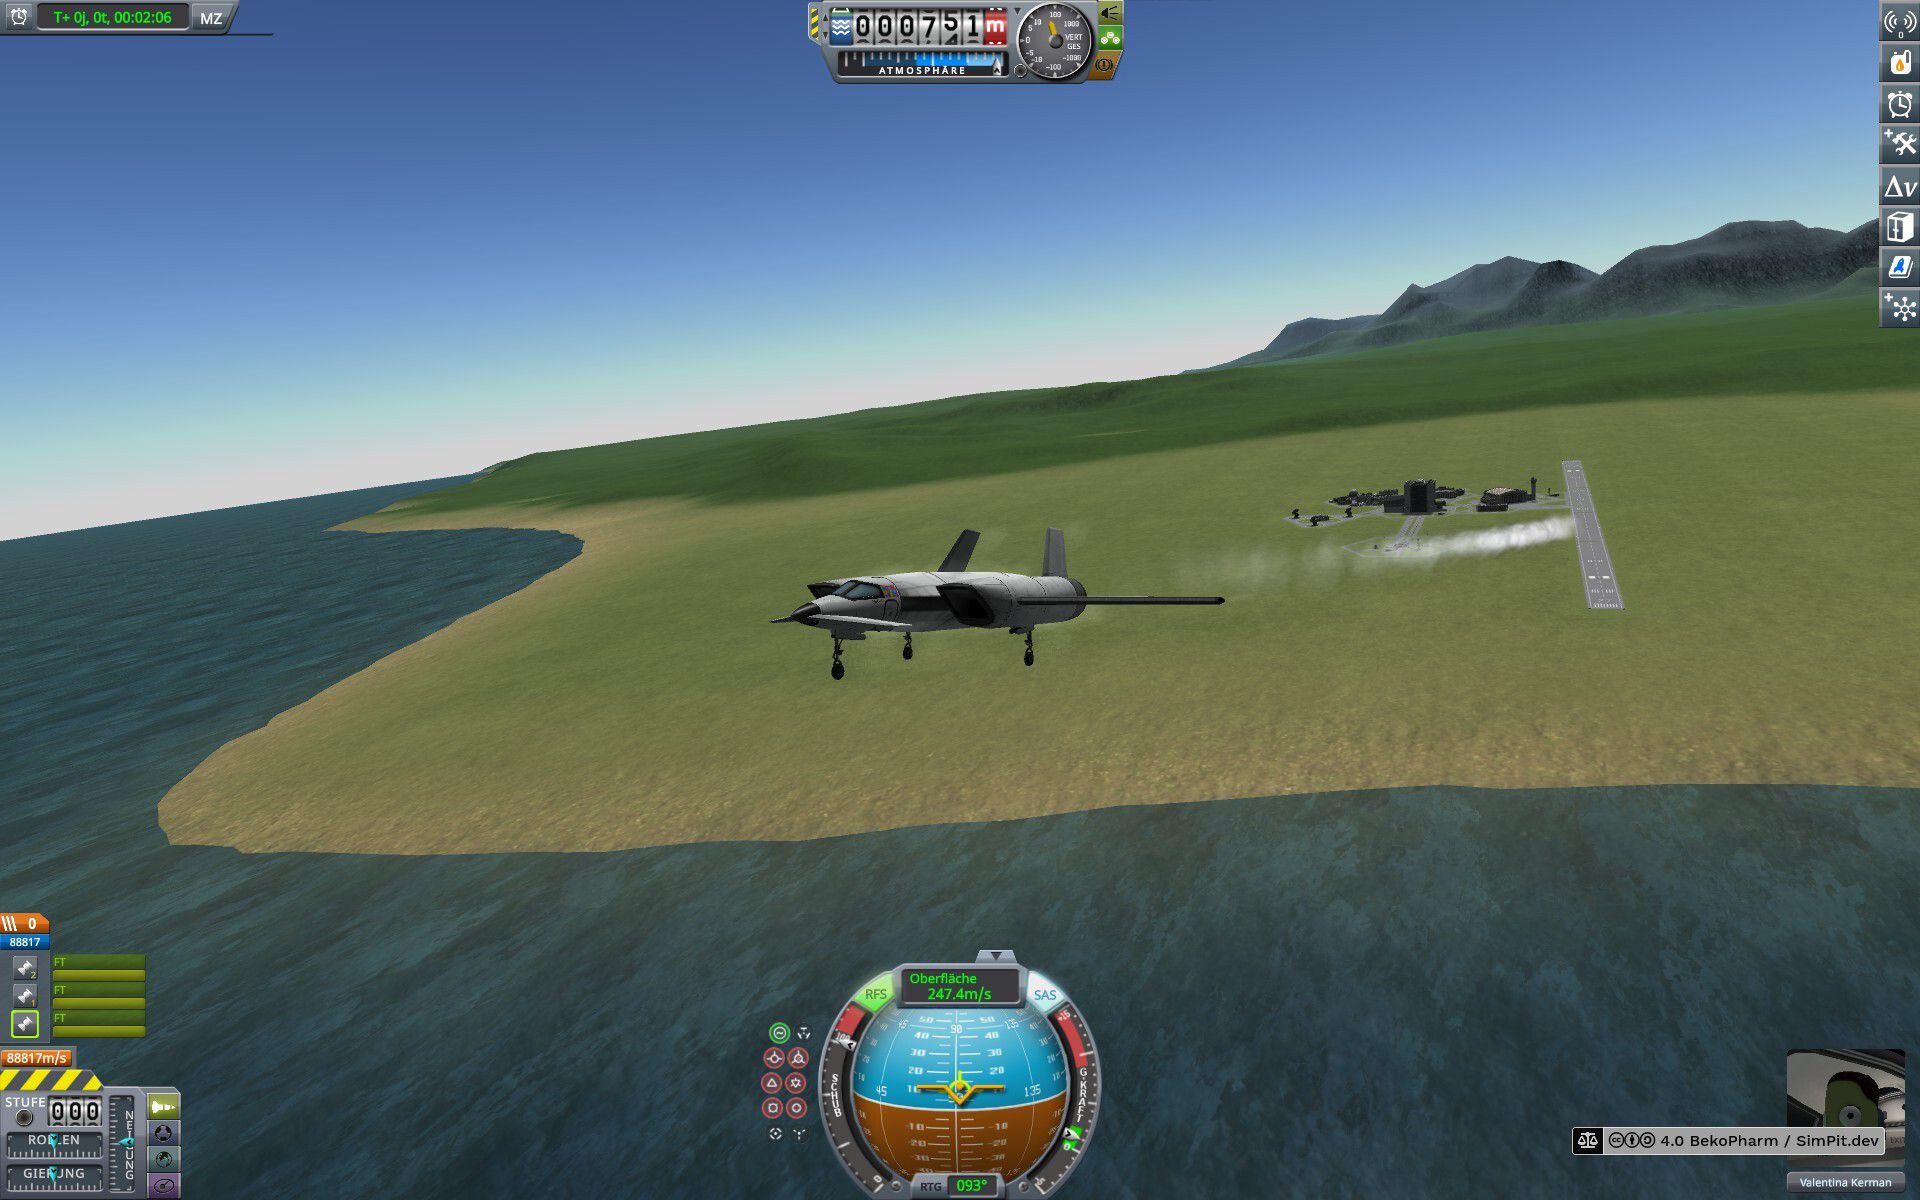
Ah yes, Kerbal Space Program do we, me and the kids, only play for the explosions. While the game does feature head tracking and stuff via plugins I did never bother to set it up. It is a Linux native though so very painless to start.
Launch parameters
-monitor 1
Yeah, that’s all. Just pointing it to a specific display because it would always use the primary display otherwise.
I don’t know of any API for Rebel Galaxy Outlaw but it’s a fun game with great sound tracks that I sometimes play with the children. Don’t think it even has head tracking support too.
And there will never be more because some entitled little brats mobbed the creators out of the whole god damn industry for taking an exclusive deal 🖕
Launch parameters
Like most games does this one also not detect a screen layout but only the primary display on a Linux PC so it won’t offer the maximum resolution possible e.g. with a triple head setup 🖥️🖥️🖥️. This can be worked around in multiple ways, e.g. with configuring a virtual desktop in the WINEPREFIX, by adding a virtual monitor to the system or simply by making use of gamescope, the SteamOS session compositing window manager.
Here is an example how games may be started from Steam by adding the following commands to the start parameters (That’s basically the same for e.g. Lutris btw).
In the beginning I did remap my X52 joystick to several virtual gamepads using MoltenGamepadbefore I noticed that tiny little dropdown in it’s launcher where it is possible to switch from gamepad to joystick. Boy did I feel stupid but frankly that is the first game I know of that does distinct between those two input methods. A rather weird design choice IMHO.
This image is from a test placement to see how the Primary Buffer Panel would look and feel before everything was wired up again.
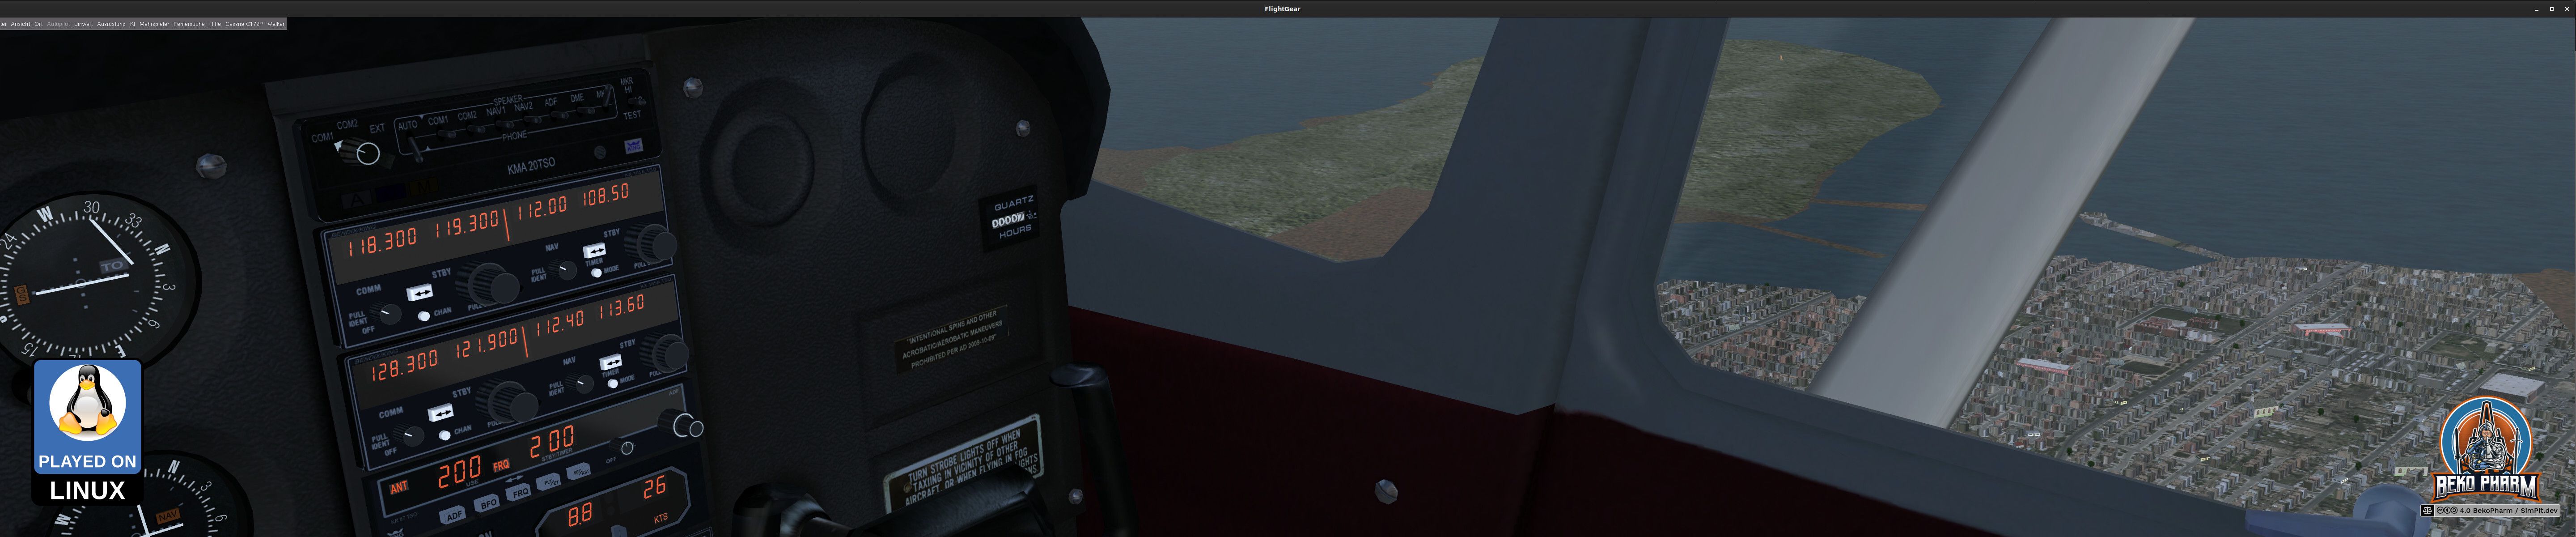
I’m pretty sure that I can connect my plumbing pipeline to FlightGear as well but I never bothered so far. It is after all open source software and many plugins exist already. It’s on my bucket list 👌
Launch parameters
--addon=full-path-to-the-headtracker-folder and --generic=socket,in,60,localhost,5542,udp,opentrack for the head tracking. Both can be configured in the FlightGear though.
Diaspora: Shattered Armistice is a freeware space sim based on the Battlestar Galactica show - and as old BSG fan I just have to play this from time to time. A native Linux version exists but it’s so old that I run into several walls compiling it and simply went with the last pre-build Windows release in the end launching it via Lutris.
Sadly it does only support one joystick so my Primary Buffer Panel has to act as a keyoard. There is also the issue that the GUI gets stretched weirdly with a ultra wide resolution but it does start and play alright. I’m hoping to come back to this one day and find out how to connect my blinken lights at least.
Launch parameters
Like most games does this one also not detect a screen layout but only the primary display on a Linux PC so it won’t offer the maximum resolution possible e.g. with a triple head setup 🖥️🖥️🖥️. This can be worked around in multiple ways, e.g. with configuring a virtual desktop in the WINEPREFIX, by adding a virtual monitor to the system or simply by making use of gamescope, the SteamOS session compositing window manager.
Here is an example how games may be started from Steam by adding the following commands to the start parameters (That’s basically the same for e.g. Lutris btw).
Ah yes, No Man's Sky really changed a lot over the years. What it still doesn’t do is supporting joysticks. Or head tracking. We’re very used to this by now though and manage.
Launch parameters
Like most games does this one also not detect a screen layout but only the primary display on a Linux PC so it won’t offer the maximum resolution possible e.g. with a triple head setup 🖥️🖥️🖥️. This can be worked around in multiple ways, e.g. with configuring a virtual desktop in the WINEPREFIX, by adding a virtual monitor to the system or simply by making use of gamescope, the SteamOS session compositing window manager.
Here is an example how games may be started from Steam by adding the following commands to the start parameters (That’s basically the same for e.g. Lutris btw).
NMS does support a gamepad but it also reads/maps all gamepads to a single device. It makes no difference between multiple gamepads!
This leaves me with a very limited amount of possible buttons on the HOTAS after mapping that to one virtual gamepad using MoltenGamepad (I usually split that one up into multiple gamepads for braindead games).
So for additional buttons I used AntiMicroX to map the rest as keyboard presses.
Doing so I noticed that NMS does “look-around” on the right stick and this is where Opentrack comes into the play. It offers a joystick output (using evdev) and that is also just… a gamepad! Needs some remapping though to get pitch and jaw to the proper axis for NMS. This is done via SDL env (basically what Steam does under the hood but boy their GUI for that sucks):
PS: I’m aware that the recording quality sucks. This was very spontaneous with a webcam sitting on my chair. I basically just finished my happy dance that this started working properly and decided to smash that recording button. PC was not even in gamemode.
What’s not to like about Fly Dangerous. It’s a FOSS 6dof racing game with a Newtonian flight model similar to Elite Dangerous, does HOTAS, Opentrack and a lot of other stuff, like VR. It even offers a UDP port to retrieve ship telemetry. A perfect candidate for a simulated cockpit and I’m with it for quite some time. Integrating it into my plumbing pipeline was a breeze.
There are a bunch of videos showcasing Fly Dangerous with my Primary Buffer Panel on my YouTube and PeerTube accounts.
Launch parameters
I usually play Fly Dangerous on Linux PC. The Linux version 5 defaulted to OpenGL and this resulted in like 25 FPS for me and the input of my X52 Pro (mapped as virtual gamepad) was so laggy that I could sip coffee during each course correction. This was when I remembered the magic parameter -force-vulkan from other Unity games and from here it was smooth sailing. Eventually I ended up with the game start options obs-gamecapture for recording, mangohud for some FPS info and -force-vulkan for… well, FPS.
obs-gamecapture mangohud %command% -force-vulkan
I switched to Proton because I was eager to see some upcoming changes, like head tracker support, on the public_beta branch. And while this works I was once more flabbergasted how complicated it is to set my desired display resolution of 5760x1200. I’m using a multihead setup with several displays and as usual the game engine would not let me simply set that. Even in windowed mode (I mean I get that this won’t work with fullscreen).
Like most games does this one also not detect a screen layout but only the primary display on a Linux PC so it won’t offer the maximum resolution possible e.g. with a triple head setup 🖥️🖥️🖥️. This can be worked around in multiple ways, e.g. with configuring a virtual desktop in the WINEPREFIX, by adding a virtual monitor to the system or simply by making use of gamescope, the SteamOS session compositing window manager.
Here is an example how games may be started from Steam by adding the following commands to the start parameters (That’s basically the same for e.g. Lutris btw).
This is not needed if only one monitor is used for gaming.
There are several ways to work around this, especially with Proton, but I was looking for the prefs file I know from Linux. I found it in the end in the file compatdata/1781750/pfx/user.reg (that’s like the Windows registry but as plain file read by Wine) where the values are stored as dword under [Software\\StarGoat\\FlyDangerous]. In hex!
This game does not yet support ultra wide and has no API or head tracker support that I know of. The HOTAS support is wonky at best. It’s also still in development so I may have to revise that at some point but it is a lot of fun. I’ve a gameplay video on my YouTube and PeerTube channel.
Launch parameters
Edited GameUserSettings.ini and Settings.ini in compatdata/1646850/pfx/drive_c/users/steamuser/AppData/Local/SB2/Saved/Config/WindowsNoEditor to get here:
The maximum that the game allowed me was 3840x1200. I did write protect the files in the end to make the config persistent. Most UI elements center so it’s playable.
This is basically a more distilled version of my simulated cockpit (or short SimPit) scribbles that I wrote over the last years in various places, like on my website, the Fediverse, YouTube or even Hackaday.
It started to become a pain to redirect people here and there if they were interested in this project so I realized that a project page is in order where I could add all the details in a more cohesive way.
I’m going to update this page (and of course all my other places) as I go. There is a lot yet to build or program. Also Linux Gaming is in a wild place currently with lots of major changes happening in a relatively fast pace so many articles may be in need of constant updates to keep up with the latest developments.
About the author
The nick name is Beko Pharm and I dabble in programming, administration, linux, gaming, historical european martial arts, reenactment, live action role play, e-mobility, carhacking, simpits and… parenting?
Contact
There are various ways to follow or contact me or to comment on my stuff. I like comments. I really do. Especially the praising ones 😉 I also love to talk about how to improve stuff or make it more accessible. So if you have questions do not hestitate to contact me over one of my various channels or even over Discord.
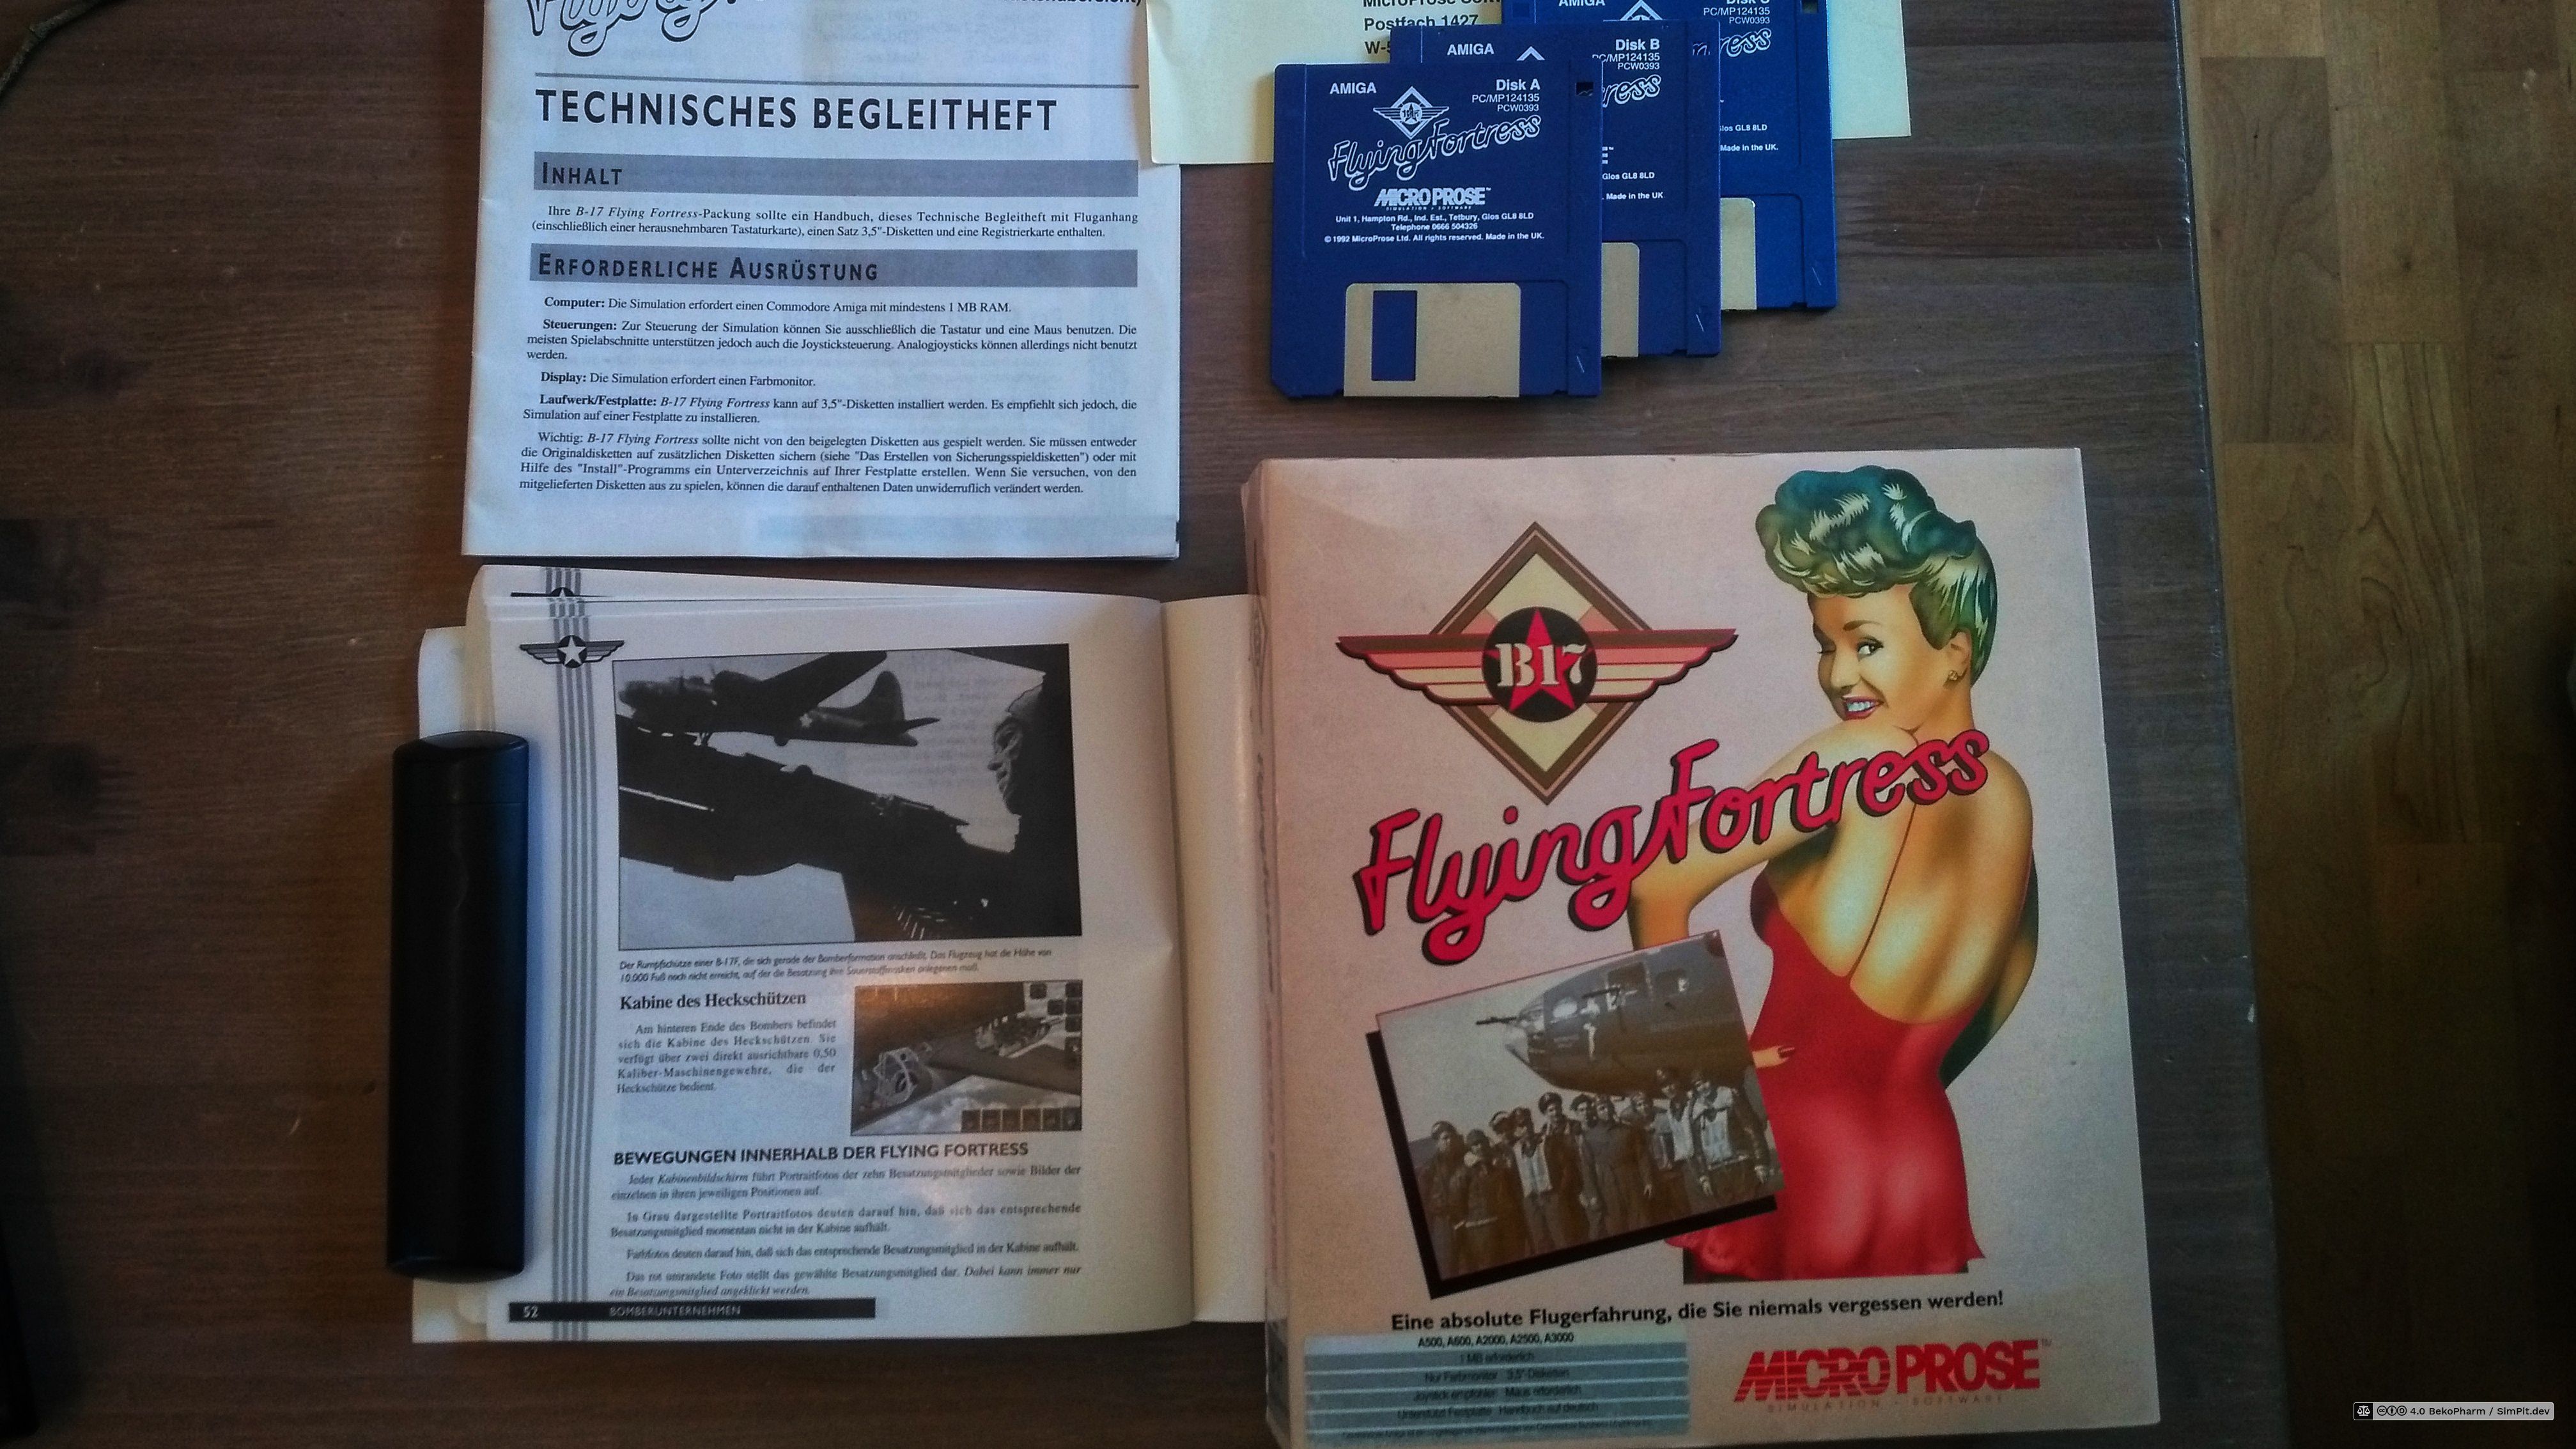
I’m not exactly new to flight sims but I didn’t play any for years and the landgamescape changed a lot since then. Just for a frame of reference: When MicroProse announced yet another B-17 game it was like the 3rd iteration for me. Yes, I did play B-17 Flying Fortress on an Amiga back in the days. Still have that box with this manual full of pictures and data. Also read 📖 A Higher Call years later.
Not a pilot
Far from it. In fact I don’t even enjoy “real” flying. Aviation does have a certain effect on me though and I’m even sometimes found at an airfield.
And while I can crash a virtual Cessna anywhere nowadays, and even got some other virtual planes in the air, I’m not qualified for any real flying.
Please keep this in mind for everything on this page especially when I describe any flight systems of mine.
There were other PC games as well. With jets, helicopters and what else. And Elite, of course, and Wing Commander and eventually X: Beyond the Frontier. Pew Pew.
And then it all stopped for many years. Until Corona happened and it was stay-at-home all of the sudden and my outdoor hobbys were set to inactive from one day to another.
Chasing Immersion
Naturally I spent a lot more time at the PC again and while reading through the patch notes of X4: Foundations I stumbled over something they called “head tracking”.
This was unknown to me and in the end I had to jump quite some hoops to get it working. The full story can be read on my blog.
So this is probably what can be called version 0 of the cockpit. I used my smartphone’s gyroscope sensor and forwarded the data to opentrack. It was clunky, messy, slow and sucked. And I wanted more. This was my start for chasing immersion.