While seeking through the available data in the Status JSON of Elite Dangerous I noticed that I don’t get any airspeed from Elite. That’s not so important in space but kinda interesting in planetary flight to satisfy the flight sim gamer in me as well. I noticed though that I do get timestamped latitude, longitude and altitude values so shouldn’t it be possible to “simply” calculate this, right? Right?
An Auto Flight System for Elite?
This was when I dived into the rabbit hole of calculating airspeed and heading on planetary objects using a spherical coordinate system and while I didn’t nail it exactly how Elite does it the result is close enough. The game provides the required data to go crazy here – most important the radius of the current object. In theory I could start writing some primitive AFS (Auto Flight System) routines now, which I’m totally going to explore at some point in the future just because 🤓
Checking my maths – yes, altitude is added to the mix so airspeed is mostly correct as long as no rapid course changes are made.
Conclusion
After spending way too much time with this and the Pythagorean theorem (Yes mum, a game made me do maths. MATHS! 🤯) I settled with some calculations and data for my current ship to the right and targeted ship data on the left. This is sort of tricky because many game events update different parts of the data so timestamps have to be kept in mind and a game specific parsing strategy is required. See the last part of the demonstration video here to get an idea how this looks.
The Primary Flight DisplayPFD is loosely based on a modern aircraft instrument and is added to the MDF automatically near planetary surfaces e.g. when descending on a planet in Elite Dangerous or when hooning around in Fly Dangerous.
Not a pilot
Far from it. In fact I don’t even enjoy “real” flying. Aviation does have a certain effect on me though and I’m even sometimes found at an airfield.
And while I can crash a virtual Cessna anywhere nowadays, and even got some other virtual planes in the air, I’m not qualified for any real flying.
Please keep this in mind for everything on this page especially when I describe any flight systems of mine.
This reduces the screen space for other system messages somewhat but is totally worth it. It comes also with the proper visuals for selected airspeed, heading and altitude. The vertical speed is still missing but on my list. I went totally overboard with showing a Mach indication over 0.5 Mach as well 🤓 (Yes, yes you Mr. Smartguy over there. I know this is not 100% correct, doesn’t work for other planets and we don’t even have pressure values from a Pitot Tube. Go get yourself a juicebox. This is for a game!)
The following video is from the development of the PFD and is fed with random mock data.
On precision
Flight instruments usually display data in realtime. This is not possible with some games like Elite Dangerous that drop data only after a certain threshold was reached. Other games, like Fly Dangerous have a real hose of a data stream going and allow thus for way more precise data. In the end it’s just a game though so who cares how exact this gimmick is when we race around with speed that would leave us splattered all over the next bulkhead in reality.
I’m still tweaking this while gaining more experience. It works pretty decent already though, which can be observed in this demo playing Fly Dangerous.
There is also an unlisted demo video in 4K available on YouTube. It’s from an earlier development phase though and a lot more clunky so keep that in mind: https://www.youtube.com/watch?v=MC-XpirO920
I’ve yet to record a better demonstration of this.
This is one of the oldest parts of my SimPit. This DIY head tracker is made of cardboard and in use for over two years now. It may be ugly but it gets the job done.
I wrote a detailled blog post on it’s construction and also made a video of the making process.
I get asked often how this is configured and while there is no one-size-fits-all setting I do have some pointers on this. The most important part is setting up the camera correctly. For this I use v4l2ucp which allows me to tune various parameters. We want as manyFPS (frames per second) as possible. For this I dial the Exposure way down and disable any automatic gain and focus. Cameras tend to maximize this when they only get darkness and this kills the FPS on most webcams. Some other parameters like Contrast or Gamma may be tweaked as well to make the detection for Opentrack easier.
More settings are available in Opentrack. The part that gets often overlocked are the Mapping properties where a Max input and curves can be configured for each axis. Make use of this! Especially for Pitch where only small movements are usually desired to have a greater effect while Yaw wants total opposite settings of this with a triple head setup 🖥️🖥️🖥️.
This works on Linux???
Hell yes. I jumped many hoops for various games to this day and have a pretty good track record by now. I demo a lot of that on my YouTube channel and on the blog. I’m also going to add some game specific chapters here and add head tracking notes whenever needed.
On Linux PC I did usually compile Opentrack with the Wine Glue, patch in my custom appdata folder for Proton and hope that it’s still ABI compliant to Just work™. Alas recent Proton is sandboxed within pressure vessel and the usual approach of memory mapping is simply no longer working, if I got the gist of this right.
So my current strategy is to download and drop the Windows build of Opentrack into the game folder and chain-load the EXE with the game where the OpentrackEXE would listen on UDP while my native OpentrackBIN would send via UDP. A task not made easy with Proton but it is possible. The following snippet may give you some pointers. You will have to adjust it for your needs:
#!/bin/bash
# 359320 is a Steam game app ID, in this case 359320 = Elite Dangerousexport STEAM_APP_ID="359320"export STEAM_COMPAT_DATA_PATH=/games/steam/steamapps/compatdata/$STEAM_APP_ID
export STEAM_COMPAT_CLIENT_INSTALL_PATH="$HOME/.steam/steam"cd "/games/steam/steamapps/common/Elite Dangerous/opentrack2/install"python3 /games/steam/steamapps/common/Proton\ -\ Experimental/proton run opentrack.exe
Why running Opentrack twice? The native build performs a lot better with my webcam and every frame really counts here. Reading data via UDP is not much of a burden for Proton. This also saves me the trouble of fiddling with Wine Glue, a painful compile process nobody should endure involving installation of many many additional 32-bit libraries. Hilarious but it works.
Compiling with Wine Glue
You have been warned but this is how it basically works once all required developer packages are installed, that includes the wine-devel packages for i686 (and libevdev if you want virtual joystick support). On Fedora Linux you’d for example also need cmake git qt5-qttools-devel qt5-qtbase-private-devel and procps-ng-devel opencv-devel libevdev-devel. Adapt to your own needs.
git clone https://github.com/opentrack/opentrack
cd opentrack
mkdir build
cd build
ccmake ../
make -j4
make install
./install/bin/opentrack
The important part is to tick the SDK_WINE option or we don’t get the precious Wine Glue. Here, have a video:
How Opentrack works
Please do keep in mind that I never touched any head tracking before so I had to grasp the theory behind all this first.
Funny enough a Kerbal Space Program extension on GitHub provided me with the idea how TrackIR is supposed to function: https://github.com/pizzaoverhead/KerbTrack/blob/master/KerbTrack/TrackIRClient.cs#L45 so let’s clear that one up: The code looks for the registry entry Software\\NaturalPoint\\NATURALPOINT\\NPClient Location that points to the NPClient.dll (or NPClient64.dll) which in turn in loaded by the executable if found and accessed.
So what Opentrack does is once it’s started and configured to use Wine - Windows layer for Unix as Output: It “injects” the key [Software\NaturalPoint\NATURALPOINT\NPClient Location] to the user.reg of the configured Wine/Proton prefix on start. The also started opentrack-wrapper-wine.exe.so is used for the shared memory mapping – means from my understanding from the Opentrack binary to some Wine process. TrackIR.exe is just a dummy that may also be run with Wine but does nothing. It’s apparently for games that check for a process with that name before they initialize head tracking features. Neat, huh?
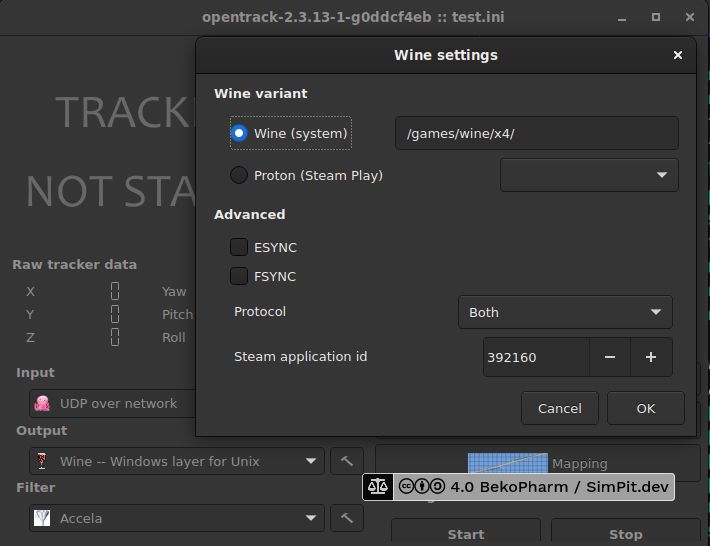
For this to work you have to click on the little hammer symbol next to Output so make sure that your Wine Prefix is properly configured or Opentrack may insert the registry key to the wrong Wine prefix.
MoltenGamepad is a flexible input device remapper, geared towards gamepads. The development of this slowed down but it is perfectly functional. I use it mostly to slice my X52 Pro into several virtual gamepads for games that do not support joysticks (or fail to detect mine).
What I didn’t scratch yet is it’s command support via FIFO or socket for controlling a running instance via scripting but that is totally on my bucket list.
This software has to be compiled from source which is usually just invoking make after installing required dependencies. There is a helper script in installation/check_installation.sh that sets up required udev rules and allows running this software as user.
Launch parameters
Example to start with two virtual gamepads:
./moltengamepad –num-gamepads 2 –mimic-xpad
Once started press first a mapped button for the first gamepad to assign it. After that press a mapped button for second gamepad to assign it:
No moltengamepad.cfg found.
driver: wiimote driver initialized.
driver: x52_pro_controller driver initialized.
plug: x52_1 added
plug: x52_2 added
stdin: ready to read commands from standard input. Try "help" for more info.
slot: x52_1 assigned to slot virtpad1
slot: x52_2 assigned to slot virtpad2
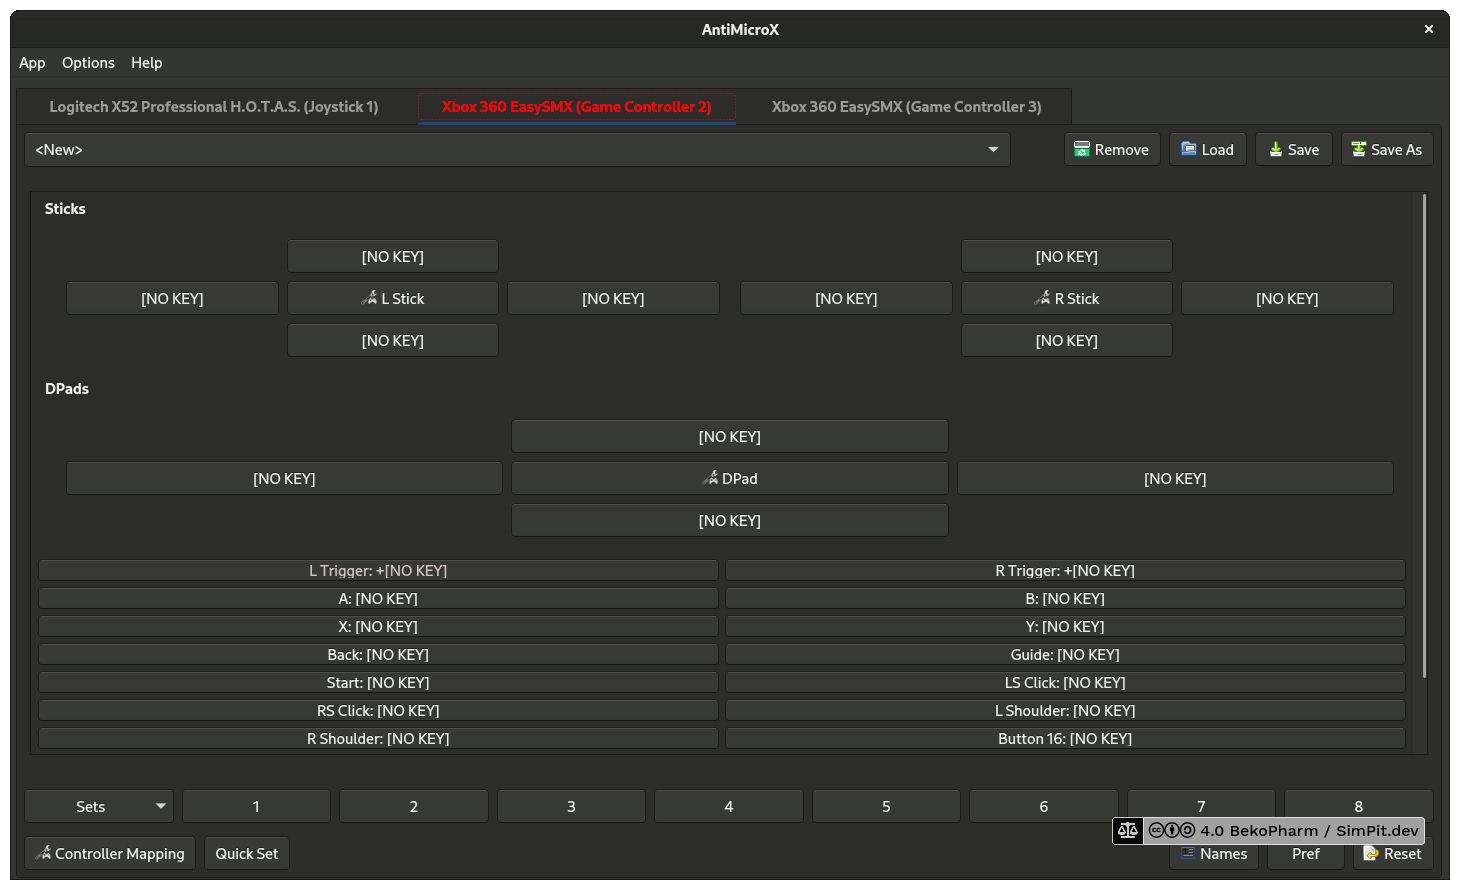
And this is how it looks e.g. in AntiMicroX:
Configuration
The configuration is dropped in ~/.config/moltengamepad/gendevices/x52-pro.cfg. I do this automatically via a script depending on the game I’m starting. I know this is not how this is supposed to be done but wrapping my head around a configuration for MoltenGamepad was a pain in the neck to begin with because not many examples exist.
[events="superset" vendor="06a3" product="0762" driver="hid-generic"]

# 06a3:0762
# Options file is license as WTFPL http://www.wtfpl.net/
# Slices most of an X52 Pro into 2 virtual gamepads

name = "x52_pro_controller"
devname = "x52_"
exclusive = "false"
change_permissions = "false"
flatten = "false"
rumble = "false"
split=2
1.device_type = "gamepad"
2.device_type = "gamepad"

# btn_east = "cross", "The cross (X) button"

# Event mappings

# 1.key(288) = "cross", "Primary fire button"
1.btn_trigger = "left_trigger", "Gun Button Step 1"
# 1.key(302) = "right_trigger", "Gun Button Step 2"
1.btn_trigger_happy15 = "bbb", "Gun Button Step 2"

1.btn_thumb2 = "a", "A button"
1.btn_top = "b", "B button"
1.btn_top2 = "x", "C button"
1.btn_thumb = "y", "Safety fire button (Fire 2)"
1.btn_pinkie = "guide"
1.btn_base2 = "button_16"

1.abs_x = "left_x", "Left stick X axis"
1.abs_y = "left_y", "Left stick Y axis"
1.abs_rz = "right_x", "Right stick X axis (Z axis)"
1.abs_z = "right_y", "Right stick Y axis (Throttle axis)"
1.abs_hat0x = "leftright", "HAT POV up"
1.abs_hat0y = "updown", "HAT POV right"
1.btn_trigger_happy4 = "right_thumb", "POV2 up"
1.btn_trigger_happy5 = "right_shoulder", "POV2 right"
1.btn_trigger_happy6 = "left_thumb", "POV2 down"
1.btn_trigger_happy7 = "left_shoulder", "POV2 left"

2.btn_trigger_happy3 = "left_trigger", "Scrollwheel click"
2.btn_dead = "right_trigger", "Mouse button (click)"
# 2.btn_trigger_happy15 = "x", "I button"

2.btn_base = "a", "D button"
# 2.btn_base2 = "b", "E button"

2.key(719) = "left_shoulder", "Function button"
2.key(722) = "left_thumb", "Function page up"
2.key(723) = "left_thumb", "Function page down"
2.key(726) = "right_shoulder", "MFD select button"
2.key(724) = "right_thumb", "MFD select button up"
2.key(725) = "right_thumb", "MFD select button down"

2.abs(004) = "left_x", "Left stick X axis"
2.abs(003) = "left_y", "Left stick Y axis"
2.abs(040) = "right_x", "Mouse X"
2.abs(041) = "right_y", "Mouse Y"
2.btn_trigger_happy8 = "up", "Throttle POV up"
2.btn_trigger_happy9 = "right", "Throttle POV right"
2.btn_trigger_happy10 = "down", "Throttle POV down"
2.btn_trigger_happy11 = "left", "Throttle POV left"
2.btn_trigger_happy17 = "start_stop", "Start/Stop"
2.btn_trigger_happy18 = "back", "Reset"

# Aliases

# 1.btn_trigger = "primary"
alias primary a
alias secondary b
alias third x
alias fourth y

alias start start_stop
alias select back
alias mode guide

alias thumbl left_thumb
alias thumbr right_thumb

# right shoulder
alias tr right_shoulder
# right trigger
alias tr2 right_trigger
# left shoulder
alias tl left_shoulder
# left trigger
alias tl2 left_trigger
[events="superset" vendor="06a3" product="0762" driver="hid-generic"]

# 06a3:0762
# Options file is license as WTFPL http://www.wtfpl.net/
# Maps _some_ buttons of an X52 Pro to a virtual gamepad for No Man's Sky

name = "x52_pro_controller"
devname = "x52_"
exclusive = "false"
change_permissions = "true"
flatten = "false"
rumble = "false"
device_type = "gamepad"

# Event mappings

btn_trigger = "a", "A button (Fire Weapons)"
btn_thumb2 = "a", "A button (Fire Weapons)"
btn_top = "b", "B button (Boost)"
btn_top2 = "x", "C button (Langing/Exit Ship)"
btn_thumb = "y", "Safety fire button (Fire 2)"
btn_pinkie = "guide"

abs_x = "left_x", "Left stick X axis"
abs_y = "left_y", "Left stick Y axis"
abs_rz = "right_y", "Right stick Y axis (Throttle axis)"
abs_hat0x = "leftright", "HAT POV up"
abs_hat0y = "updown", "HAT POV right"
btn_trigger_happy4 = "right_thumb", "POV2 up"
btn_trigger_happy6 = "left_thumb", "POV2 down"
btn_trigger_happy5 = "right_shoulder", "POV2 right"
btn_trigger_happy7 = "left_shoulder", "POV2 left"

# hat from throttle:
btn_trigger_happy8 = "up", "Throttle POV up"
btn_trigger_happy9 = "right", "Throttle POV right"
btn_trigger_happy10 = "down", "Throttle POV down"
btn_trigger_happy11 = "left", "Throttle POV left"

btn_trigger_happy17 = "start_stop", "Start/Stop"
btn_trigger_happy18 = "back", "Reset"

# thumb button
btn_trigger_happy15 = "b", "B button (Boost)"

alias primary a
alias secondary b
alias third x
alias fourth y

alias start start_stop
alias select back
alias mode guide

alias thumbl left_thumb
alias thumbr right_thumb

# right shoulder
alias tr right_shoulder
# right trigger
alias tr2 right_trigger
# left shoulder
alias tl left_shoulder
# left trigger
alias tl2 left_trigger